blankblank blank


Archive for the 'KML' Category Page 3 of 16


Plot KML And KMZ Points And Paths In A Stand-Alone Google Maps Viewer

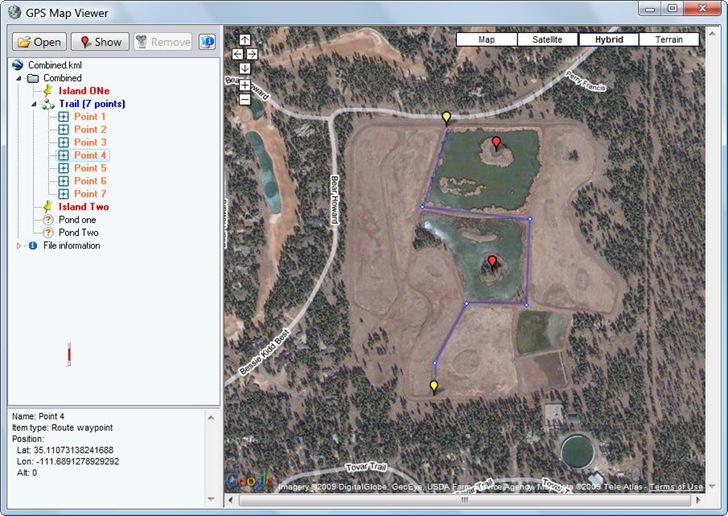
The stand-alone GPS Map Viewer plots points and paths from a KML or KMZ file in a Google Maps view. While you can do this with any number of online apps, including the My Maps feature in Google Maps itself, the GPS Map Viewer offers a couple extra functions not available in some of those.

gpsmapview

  • Get a list of all the individual points in a KML path in the info pane at left. Clicking on any of them, or on a individual waypoint, will bring up their position info in the bottom left pane, where you can copy and paste it somewhere else.
  • Move the cursor over any point plotted at right, and its name will show as a pop-up
  • Double-click on any path point to highlight it in red, and re-center the map on it; same effect by dragging and dropping a point from the list onto the map.
  • Clicking on the small vertical red line brings up a toolbar

gpsmapviewtoolbar

Functions from left to right are to save the view as a JPG, Print Setup, Print Preview, and print the map view with plotted data directly. You can drag and drop this toolbar anywhere it’s convenient.

Here’s a YouTube video demonstrating the program:


Convert From AutoCad Format To KML And Vice Versa With KML Tools Pro

I don’t have AutoCad, so I can’t try this out, but KML Tools Pro has AutoCad DVB macros that let you select features in AutoCad and convert them to Google Earth’s KML format; similarly, another macro will let you import a KML file into AutoCAD. From the website:

From AutoCad to Google Earth:

  • select objects and create .kml file
  • export points, lines, text, polygons (beta)
  • apply the icon of your choice
  • select zoom level that objects are visible
  • output automatically layer colors
  • adjust weight and transparency of objects

From Google Earth to AutoCad:

  • digitize points, lines, polygons in GEarth
  • save “.kml”
  • import in AutoCad using wanted projection

Supported projections:

  • NAD-83′ State Plane (*Alaska Zone 1 not supported)
  • UTM zones
  • HATT
  • Greek Grid (EGSA 87)

The current download site is in Greek, but the link to the downloadable file is obvious at the bottom. An older version of the page used to be available at this link, but isn’t currently working; you might try the cached version of the page from Google.

For converting KML files to DXF format, you can also try this online converter.


Disaster Response Map Symbols

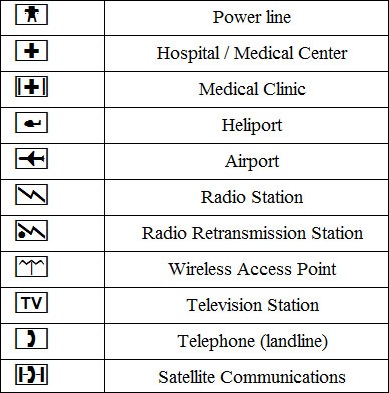
The Portuguese chapter of the Association Of Volunteer Emergency Response Teams, in collaboration with Peter Guth and Donald Springer, is working to create a general-purpose set of symbols useful in mapping the position and condition of infrastructure, resources and incidents during emergency situations. You can download these Disaster Response Map Symbols as a True Type font from the DRMS website, along with a PDF file that documents the symbols There are 253 symbols depicting infrastructure, resources and incidents (graphic from the help file for MicroDEM, Peter Guth’s freeware GIS):
drms table

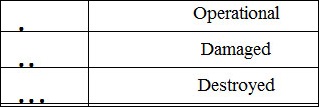
And additional dot symbols that represent the status of the higher-level symbol:
drmsstatus

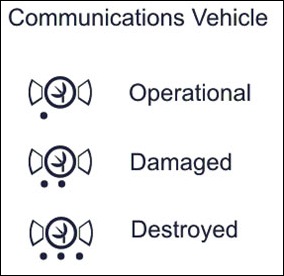
These status symbols would be plotted directly below the higher-level symbol, to indicates its condition/status:
commstatus

Any GIS software that can use True Type fonts for symbols or labeling can use the DRMS symbol set directly. But MicroDEM has some special capabilities built in for working with this symbology. Make sure you’ve used the most recent program install, which includes the DRMS True-Type font; also, download the latest executable and copy it into the program directory.

From MicroDEM’s File => Tools menu, selecting Military icon generator brings up the icon composer window; make sure the DRMS tab is selected:
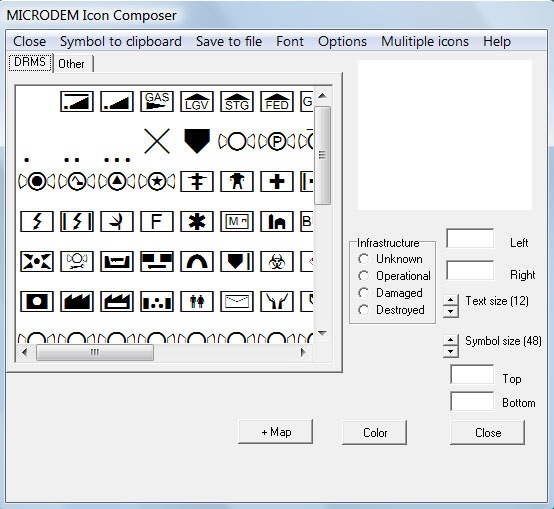
iconcomposer1

Double-click on an icon to select it, and then modify it as you like:

  • Use the color button to modify the color
  • Use Left/Right/Top/Bottom to add text around the symbol.
  • Select the Infrastructure status to plot dots depicting the status of the feature underneath the symbol
  • Modify the test and symbol size using the arrow keys
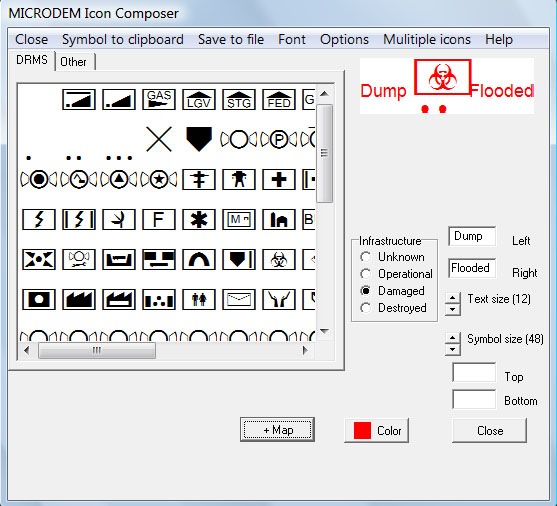
iconcomposer2

Once the symbol design is complete, you can save the symbol to the clipboard to paste into a graphics program, or choose “Save to file” to save it as a PNG, GIF, JPG, BMP or Targa format graphic file for those GIS programs that let you select graphic images to represent points.

You can also plot these symbols directly on a map in MicroDEM. Open up a georeferenced raster image in MicroDEM:
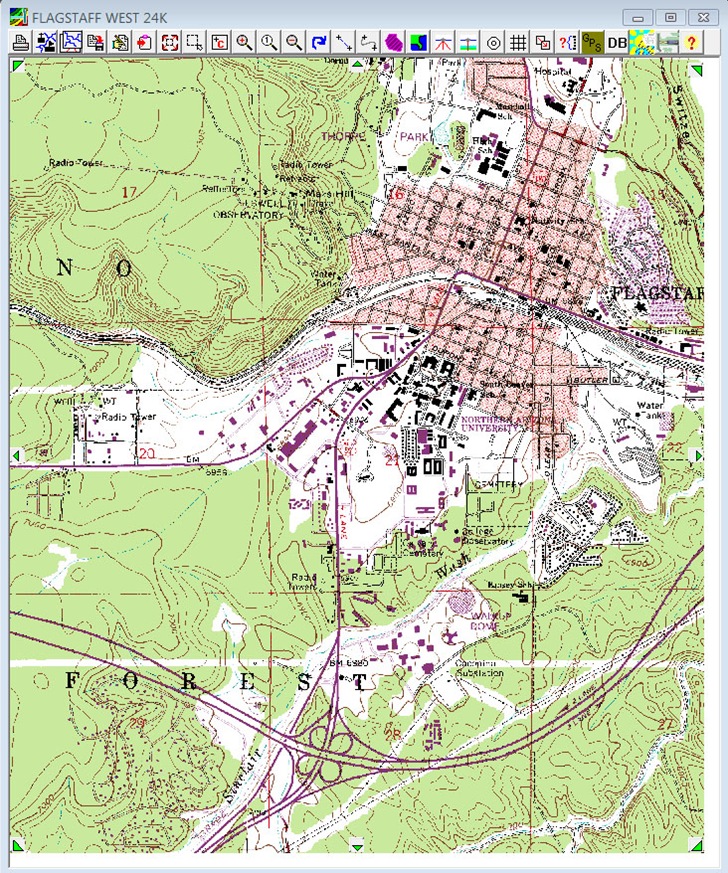
raster

Clicking on the Map Annotation button on the toolbar (second from the left), choose Military icons from the drop-down, and then enter a filename to save the locations for the icons you want to place. You’ll then use the same Icon Composer interface as above to design your DRMS icons. The Left text is used as a feature ID in the DBF file, and also in the KML file you have the option of creating later on. Once you’ve designed your icon, you can double-click on the raster map to place the icon on that map:
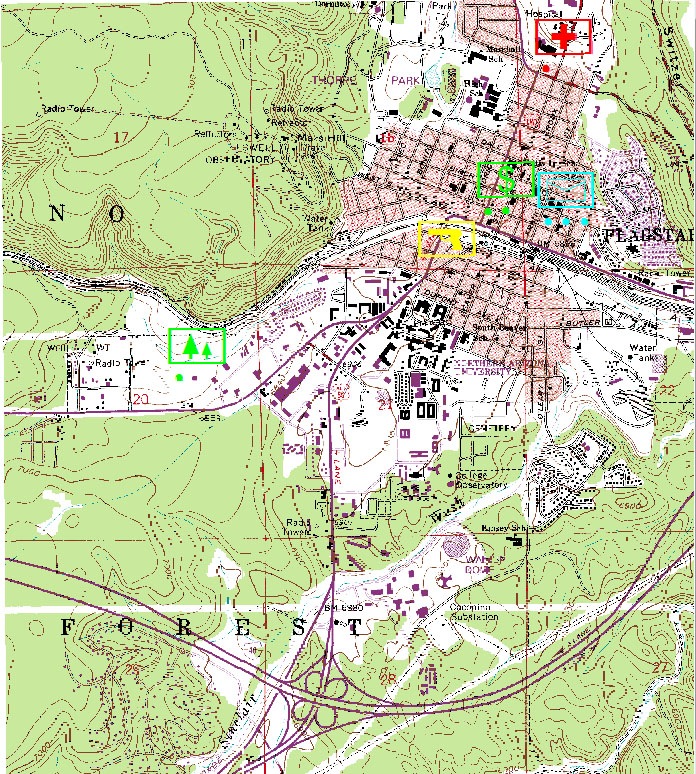
mapwithicons

Click on the “Close” button in the Icon Composer when you’re done. You can now export this map image directly to a generic image file or GeoTiff using the appropriate File => Save … option. But by right-clicking on the map, choosing Load => Google Earth overlay, you can export both the raster image and vector points to Google Earth. Here’s the raster overlay in Google Earth (vector overlay is turned off):
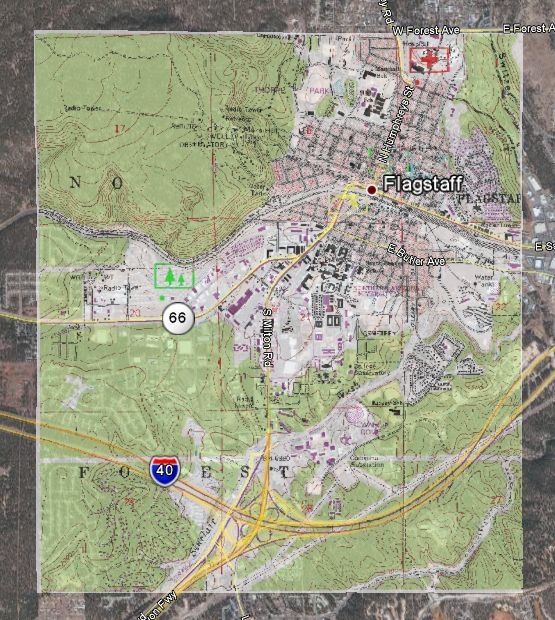
drmsraster

And here are the vector points, with the selected icons, for the same area (raster overlay turned off):
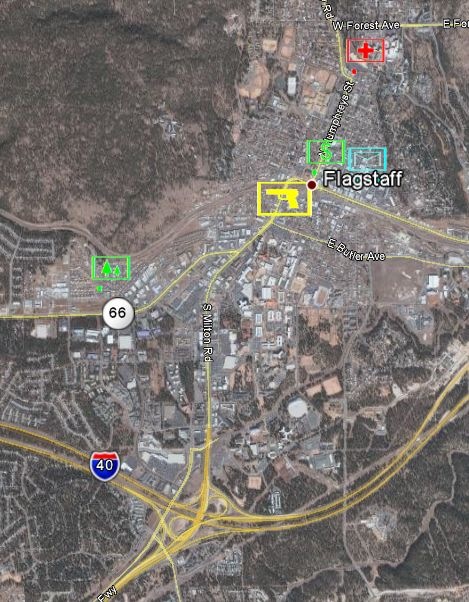
drmsvector

These data files are loaded into Google Earth automatically, but they’re not saved; to keep them for future use, right-click on the dataset listed in the Google Earth Places pane, choose “Save Place As”, then save it as a KMZ file.

Closing the Icon Composer will also open up a DBF  table window with the locations of the points you’ve just created; you can convert that to a point shapefile by clicking on the Report button, then selecting point shapefile. There’s also an option with this Report to create a KML file, but make sure you save this KML file in an empty folder. As I found out by testing it, this option creates a KMZ file, copies every single file in that folder into the KMZ file, then deletes the original file from the folder. If this happens to you, rename the KMZ extension to ZIP, then use your favorite unzipping program to extract out the original files. Also, the KMZ file contains only the KML text data, which  references the graphic icon files in a local directory on your computer for display in Google Earth. If you want to save this file for future use on your computer or another computer, and keep the graphics, you will need to open the file immediately in Google Earth, then save it as a KMZ file (right-click, choose “Save Place As”,etc.).


LandSerf – Google Earth And GPS Functions

In previous posts, I reviewed LandSerf’s raster terrain analysis functions and vector functions. Today I’ll wrap up with a short review of LandSerf’s Google Earth and GPS functions.

Google Earth: The most notable Google Earth functionality is the ability to export vector data, either imported or generated by the program, into KML vector files. So I can open a DEM, like the sample one of Mt. Rainier included with the program:

lsdem

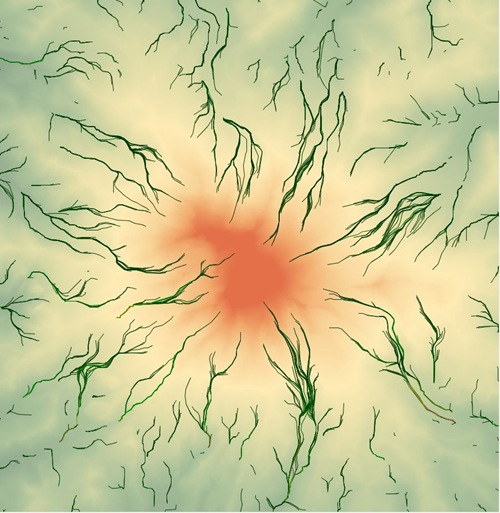
Generate a set of flow vectors for the DEM:

flowvectors

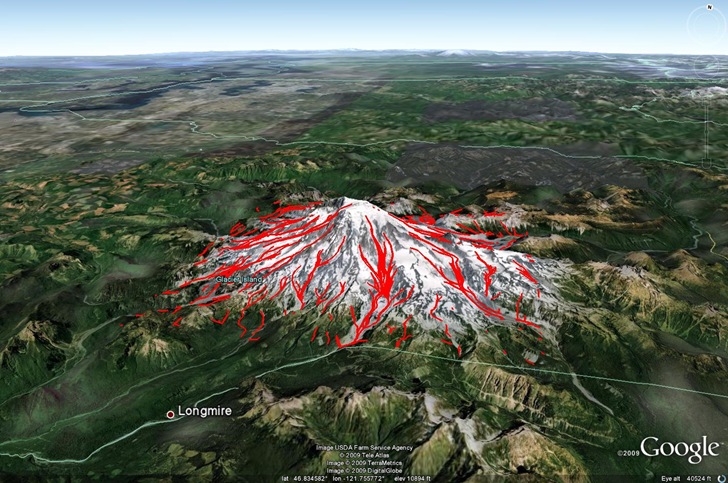
And then export the vector data as a KML file:

rainier

You could do something similar with a shapefile opened in LandSerf, but just be sure the shapefile is in NAD83 or WGS84. As I mention in the post on LandSerf vector functions, LandSerf has problems re-projecting from one datum to a significantly different second datum, and Google Earth data needs to be in WGS84 (NAD83 is almost the same). A search for “KML shapefile” on this blog will bring up a number of other programs that do a better job of converting shapefiles to KML, including preserving attribute data, which LandSerf doesn’t. But all of those are Windows-based; LandSerf runs on Macintosh and Linux, so it might be a useful option for those OSes.

Note: You should save vector data as a KML file; the KMZ file format is supposedly reserved for saving raster data as Google Earth image overlays, but I’ve been unsuccessful in getting that to work.

GPS: The list of useful GPS functions in LandSerf is a bit longer:

  • Convert loaded shapefiles or other vector data to GPX format (data must be in WGS84/NAD83 datum)
  • Load a GPX file as vector data, then save it in any of the vector formats LandSerf supports
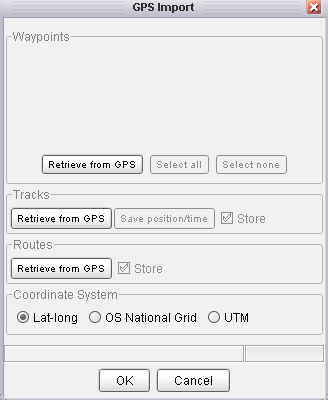
  • Interface directly with a GPS. You’ll need to have the GPS connected to your computer and turned on before starting up LandSerf. To establish a connection to the GPS, use Configure=>GPS and scan for a connected unit. Once you do this, you can import waypoint data using the File=>Import from GPS function. While the dialog box gives you the option to import waypoints, tracks and routes:

gpsimport

I’ve had difficulty getting tracks to import successfully – the program just shuts down on me. This may just be an issue with my model GPS (Garmin 60Cx); f you have better luck, let me know. You can import the data in the default lat/long coordinate system. or re-project it on import to OSNG or UTM. Once there, you can export it in GPX, shapefile or other vector format.

  • You can also export point data (no lines or polygons) directly from LandSerf to a connected GPS as waypoints.

If you can get track data to import successfully from your GPS to LandSerf, which I couldn’t, there are several other functions that might prove useful:

  • On importing the data, you have the option of saving all the track data in spreadsheet format with position, elevation and time
  • As with other vector data, if you have a digital elevation model loaded in the program, you can get a elevation profile plot; see this previous LandSerf post for more info
  • If you have a GPS track that is broken into .segments because you lost the GPS signal, LandSerf has the ability to join all of the line segments into a single line, which you can then save as a GPX track file, using the Edit => Join vector lines function. AFAIK, it’s the only free program that can do this.

As with the Google Earth functions, there are other programs that can do most of this in Windows, but far fewer free options in Macintosh and Linux.


Online Google Earth Path Length Measurement

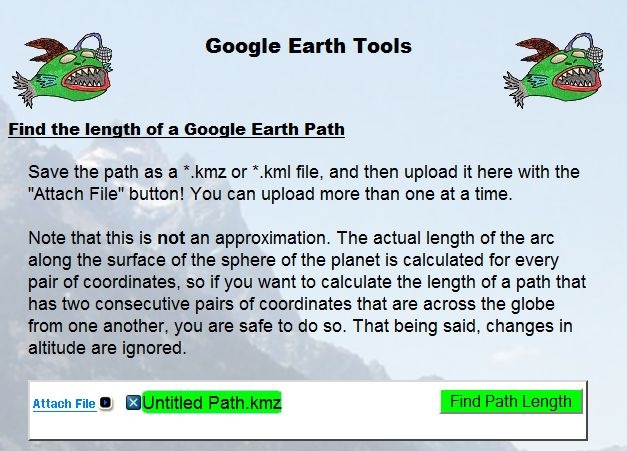
One oddity of Google Earth is that while you can measure distances, and also draw paths, there’s no direct way to determine the length of a path you’ve drawn. I’ve previously covered several applications that will take a KML path file and determine its total length; all of the require that the path file be a KML, not KMZ file. Via the comments in that post, Nicholas Hoza announces that he has a new online application that will also compute Google Eath path lengths, and do it for either KML or KMZ files.  Click the “Attach file” link to select the file on your computer:

craterfish

Then click “Find Path Length” to, ummm, you know:

path

And you’ll also get back the input screen so that you can select another file. As a bonus, the website cycles through scenic backgrounds, and you have the lovely angler fish logos to look at; you can even order a T-shirt with the logo.


Convert TIGER Census Shapefiles (And General Shapefiles As Well) Into Thematic Google Earth KML Files

Bruce Ralston of the University of Tennessee has previously released several US Census TIGER data tools that I’ve posted about in the past. TGR2SHP converts TIGER files into shapefile format, while TGR2KML converts TIGER polygon files (like legislative districts and county subdivisions) into basic KML files for viewing in Google Earth. Both of these tools only work with the older pre-2007 TIGER format, which is no longer in use; the Census Bureau now issues all this TIGER data in standard shapefile format. But Bruce Ralston has just released a new tool called AFF Mapper that goes a step beyond his previous ones: it can convert TIGER shapefile data into KML format, link it to tabular American Fact Finder data (AFF) from the US Census, and plot this census data thematically. But unlike the previous TIGER tools, this one is a general-purpose one; it can convert any shapefile – point, line or polygon – into a thematic or unique value KML file, with the option of using thematic data from a linked external table. The only limitation is that the shapefile must be in geographic coordinates (lat/long), WGS84 datum, Google Earth’s native coordinate system.

I won’t go through the process with Census data; there’s an excellent PDF manual that describes the process of creating maps like this one (from the manual):

Continue reading ‘Convert TIGER Census Shapefiles (And General Shapefiles As Well) Into Thematic Google Earth KML Files’


Easy Google Maps Route Creation With NetKvik

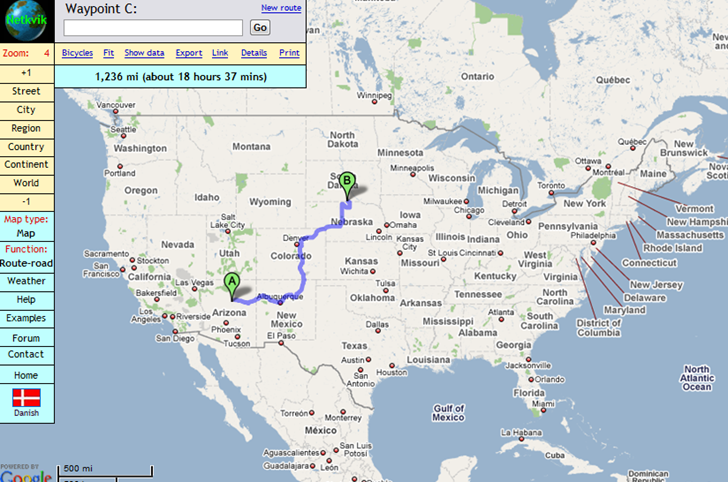
NetKvik offer an alternate interface to Google Maps for creating routes from one location to another, with easier access to some of Google Maps’ standard options, plus a few added features.

netkvik

Probably the most confusing feature of NetKvik is the zoom function, or the apparent lack of one at first inspection; there’s no standard Google Maps zoom slider. But you can use the +1 and –1 buttons at upper left to zoom in and out, and use the level buttons to jump to gross zoom levels like city, region, or continent; the mouse wheel also  zooms the map in and out. Once you get past that quirk, NetKvik offers a lot.

Like Google Maps, you can drag and drop the destinations and track to modify the route; you also have the option to bypass highways (using the Function menu to select that option. You can also create a link to the map with the route drawn. But unlike Google Maps:

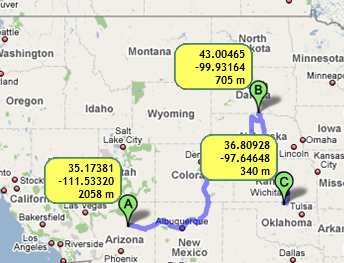
– You can add successive destinations not only by entering the location in a search box, but also by clicking on the map

– Click on Show Data to get coordinates and elevations for your destinations:

nkdetails

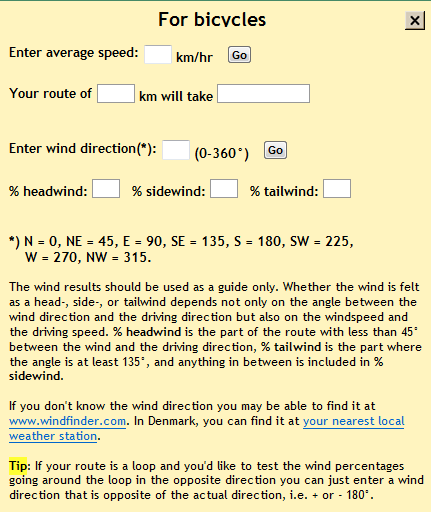
– Click on Bicycles to enter details like travel speed and wind direction to get travel time and headwind/tailwind details for a bike trip:

nkbicycle

– Use Details to toggle on/off driving directions; total travel distance is always shown. Print prints out driving directions.

– Option for Point to point routes (great circle routes plotted between destinations)

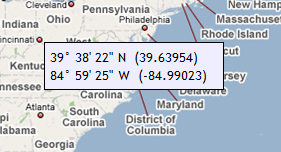
– A coordinate function option displays latitude/longitude next to the cursor:

5-10-2009-9.40.21 PM

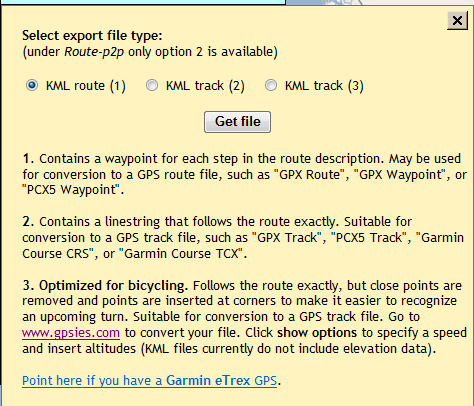
– Export a KML file for your trip in one of three formats:

nkexport

– Weather brings up a weather map from Weather Underground for the location you’re viewing.

– Moving the mouse over every button/feature pops up a concise but useful help screen; when those pop-ups get to be too annoying, you can turn them off.

HT to Carl DK.


USGS Topographic Map Overlays For Google Earth

Over at the Google Earth Library site, Matt has started a project to convert USGS topographic maps (1:250K, 1:100K and 1:24K scales) into Google Earth overlays.. These are “super” overlays, where views from higher elevations are at lower resolutions, while closer views load in high-resolution imagery; this speeds up display times significantly. Arizona and Nevada are available now, with Colorado and California coming soon.

The network link to access the overlays online is at the bottom of the web page; click on the “G-Earth” graphic. Once loaded in Google Earth, activate it, then expand it to select the state and map type you want, 1:24K maps for Arizona here:

Continue reading ‘USGS Topographic Map Overlays For Google Earth’