blankblank blank


Archive for the 'Garmin' Category Page 4 of 13


Free Tools For Custom Garmin Vector Maps V: Other Format Converters

A few utilities that convert from raster formats into Garmin vector formats, plus several reverse format converters.

dem2topo: Covered in an earlier post. Takes digital elevation raster files (DEMs) in GeoTiff and a few other formats, and converts them to vector contour lines in shapefile, DXF, and the Garmin Polish Map format (.mp); the latter includes type assignments to the contour lines (major, intermediate, minor). You can choose units and contour line spacings. Great program; I’ve used it a few times.

XYZ2PMF: Command-line program that converts simple ASCII XYZ height files to contour lines. Pretty much requires that you have the expensive (but excellent) GlobalMapper data viewer/converter program. Might have some special feature that fits your needs, but dem2topo is much easier to use.

BMap2MP: Comprehensively covered in an earlier post. Vectorizes a raster image, and converts it to the Garmin Polish Map format (.mp) along with custom data to assign colors to vectorized areas. Works surprisingly well, but not necessarily easy to use; command line only with lots of options. Be sure to read the associated text files for info on how to use it. My Moagu program has a front-end to BMap2MP that makes it somewhat easier to use.

Now, converters that go in the opposite direction:

mp2kml: The oddball program; converts a Garmin Polish Map (.mp) file into the Google Earth KML format. This could be useful for double-checking the accuracy of the .mp file. Perl script, so you’ll need to have Perl installed on your system (ActivePerl is free). Not a Perl user, haven’t tried it. Not updated since 2006, so probably not under active development any more.

ptxt2shp: Converts a Polish Map file into shapefiles, split up by point, line and polygon.

MP2GPXTracks, MP2GPXWaypoints – Java programs that extract tracks and waypoints from an .mp file and convert them to GPX format. The Free GPS utilities website also has a bunch of handy drag-and-drop icon interfaces for GPSBabel, for batch conversion of various GPS  waypoint/track/route formats. HT to Martin.


Free Tools For Custom Garmin Vector Maps IV: Vector Data Format Converters

Some links to programs that convert vector data in other formats to the Garmin Polish Map (.mp) format; the data can then be imported into map editors like GPSMapEdit and MapMan for use either by themselves, or as part of more complex maps.

ezimg: Supposedly converts GPX and KML files to .mp format, and comes with an older version of the cgpsmapper compiler to directly generate .img binary Garmin map files. I say supposedly because I get an error message on my system, and no valid .mp or .img file is created. Others seem to have gotten it to work; may be a Windows 7 issue.

ocad2mp / ocad2img: Posted about this already, briefly. OCAD is a vector map drawing program, popular in Europe. ocad2mp converts an ocad file to Garmin .mp format, along with special formatting data to duplicate the exact look of the map on a Garmin GPS. ocad2img is a Perl front-end to ocad2mp that also sends the .mp file directly to the cgpsmapper compiler to create a binary .img map file. See this website for a comprehensive step-by-step description of the process.

OZItrk2MP: Converts an OziExplorer .PLT file to a .mp file. Available in the “Files” section of the Yahoo Map Authors group (registration required for access).

Perl scripts: Along with a bunch of other GPS and Garmin info at this site, there are a couple of Perl scripts that will convert GPX waypoint files and GPX track files into transparent .mp/.img files. Haven’t tried ‘em, don’t have any experience with Perl, and don’t really have any inclination to learn it, but be my guest. Requires that cgpsmapper be installed on your system.


Free Tools For Custom Garmin Vector Maps III – Other .mp And General Vector Map Editors

GPSMapEdit and its clone GPSMapEdit++ are the most fully-featured free Garmin map editors currently available, but there are a few other options available as well.

MapMan (aka Map Manipulator) – A decent feature set, and a good number of input formats:

  • Shapefile
  • GPX
  • MP and img
  • JPEG images; the program lets you calibrate these with a large number of acceptable datums and coordinate systems, and use them as a background for tracing vector features:

Continue reading ‘Free Tools For Custom Garmin Vector Maps III – Other .mp And General Vector Map Editors’


Free Tools For Custom Garmin Vector Maps II – GPSMapEdit And GPSMapEdit++

Second in the series.

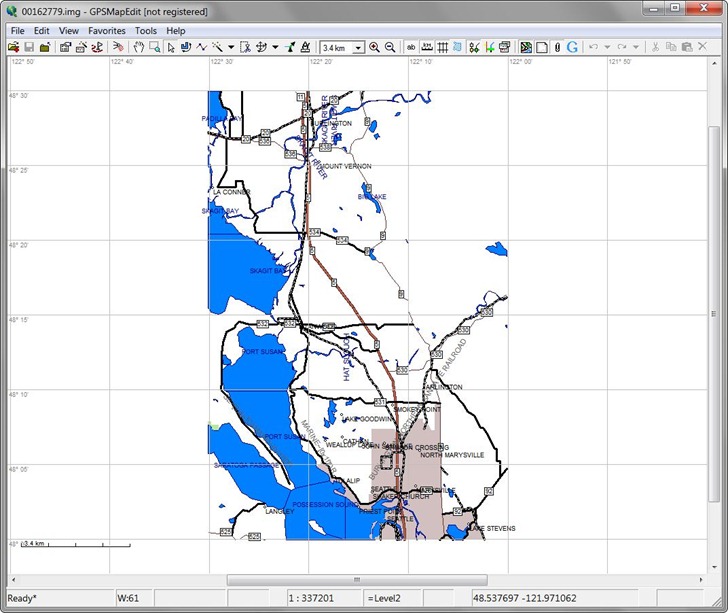
GPSMapEdit – This program is the most commonly referenced and recommended editor for creating mp map files that can be compiled into Garmin-ready .img files. And with good reason – it’s easily the most comprehensive and full-featured Garmin map editor around, even in the limited-feature evaluation version. You can load or import vector data in a wide variety of common vector formats like:

  • GPs eXchange (.gpx)
  • Shapefile (.shp)
  • Garmin MapSource formats (.mps, .gdb)
  • Magellan MapSend files (.trk, .wpt)
  • Polish map files (.mp)
  • Garmin .img map files (program can also export these to .mp format)
  • OziExplorer vector formats (also can load .map image files for use as a drawing background)
  • PCX5 (.rte, .trk, .wpt)

… Plus a whole bunch of other oddball formats (Holux, Navitel, Alan). Map display in approximately the same view you get in either Garmin’s MapSource or BaseCamp application:

gspmapedit

All the standard editing features you’d expect in a vector-based map editor:

  • Create/delete points, lines and polygons
  • Set map object types
  • Snapping, splitting, rotating, measuring, slicing, merging, rotating, removing duplicates
  • … and so on

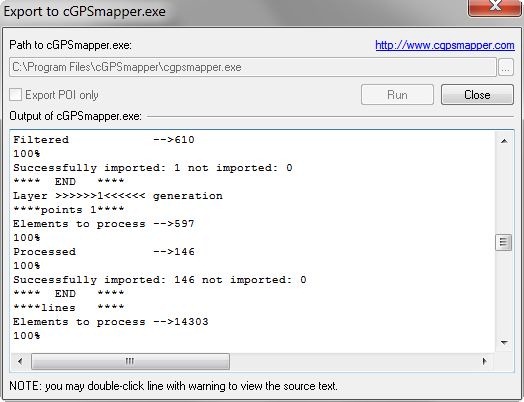
GPSMapEdit also allows full setting of all parameters required by the cgpsmapper compiler, and interfaces directly with the compiler, so you don’t have to mess with any command line commands or controls. Just create the map, save it in .mp format, then export it in .img format; GPSMapEdit does the rest, including displaying processing status, and error message feedback if something goes wrong:

cgpsexport

However, one of the biggest drawbacks to GPSMapEdit is the lack of a manual or proper help file. The website offers a list of links to various websites that describe how use the program; in particular, I highly commend both the MalsingWiki mapping reference and the cgpsmapper manual.  Even with all these help resources, though, be prepared to struggle and experiment in order to figure out how to do everything you want to do.

Registration of the program adds the following features:

  • Visualization of satellite images from Google Maps.
  • Semi-automatic vectorizer tool.
  • Find by address (the menu item ‘Tools | Find by Address…’).
  • Loading of huge raster maps (format OziExplorer MAP) – over 20-30 megapixels.
  • Loading ECW and JPEG 2000 raster maps.
  • Import from MapInfo MIF/MID.
  • Export to MapInfo MIF/MID.
  • Import POI from external table file with address data, the formats are: CSV, MS Excel XLS, MS Access MDB, dBase DBF, Paradox DB, Visual FoxPro.
  • Splitting map to smaller files (the menu item ‘Tools | Split Map to Files…’).
  • Saving to CRD format (ALAN Map 500 and Holux).

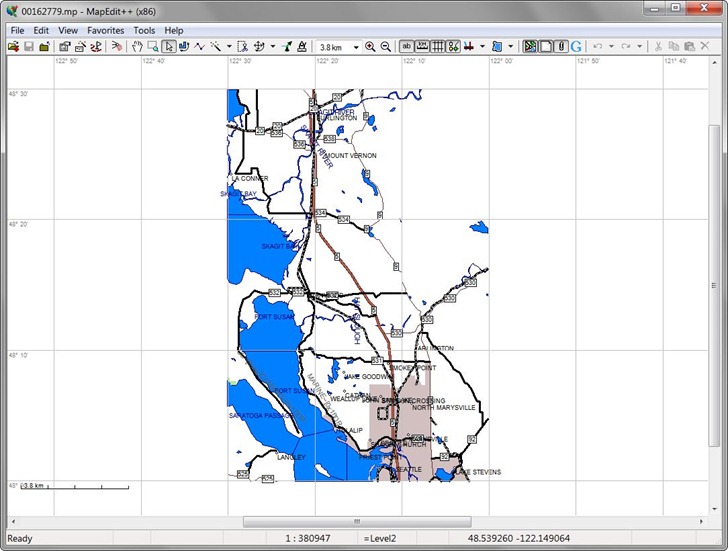
GPSMapEdit++ – GPSMapEdit was originally freeware, but went to shareware as of version 1.0. If you look hard enough, you can probably find a copy of the last freeware version out there somewhere on the Internet. But GPSMapEdit++ is a free, open-source extension of the GPSMapEdit source code, and is probably a better choice than the much older GPSMapEdit freeware release. The feature set of GPSMapEdit++ is bit more limited than the GPSMapEdit evaluation version, much less the full registered version, but you really have to hunt to spot the differences. Most of the functionality that you would want to create and edit a map is in place in both versions. And the interface of GPSMapEdit++ is essentially identical to that of GPSMapEdit, allowing you to use any of the help references. Below is a screenshot of GPSMapEdit++ with the same data as loaded above in GPSMapEdit; you’ll be hard-pressed to spot any differences:

gpsmapeditpp


Free Tools For Custom Garmin Vector Maps I – cgpsmapper

First in a series on tools for creating your own vector maps for Garmin GPS units.

cgpsmapper – cgpsmapper is a compiler that converts geographic features in the textual mp (Mapa Polska) format into the .img format required for Garmin GPS units. cgpsmapper was one of the first tools for making your own Garmin maps, if not the first. Since some other free tools require it for full functionality, it’s pretty much a must-have program for Garmin map creators.

The free version, available at the download page, supports compiling basic maps and many Garmin-compatible features, but other advanced features like POI indexing, routing and and addressing aren’t supported. Oher limitations of the free version include:

Continue reading ‘Free Tools For Custom Garmin Vector Maps I – cgpsmapper’


Free Tools For Creating Custom Garmin Vector Maps – Intro

So I was rummaging through my folders of programs for creating and managing custom vector maps for Garmin GPS units, to find out what was there and what needed to be updated. Turns out I’ve got a lot more stuff than I thought. Rather than writing up individual posts on all of them, which would take a while, I’ve decided to put out a shorter series of posts listing as many of these programs as I can, with brief descriptions of what’s available. These will cover only those tools related to vector map creation; I’ll have a post later on some free tools for creating raster maps for the most recent Garmin GPS units, those in the Colorado/Oregon/Dakota series.

But for those who aren’t familiar with the topic, some background. The first Garmin GPS units to have the ability to display actual maps, instead of just coordinate positions and waypoint lists, came out about a dozen years ago. I can still remember buying my first map-ready unit, a Garmin eMap, and thinking how cool it was to have topo maps displayed on an affordable GPS unit. Since then, Garmin has released dozens of vector-map-compatible units, and most of their current handheld models can display these maps.

Continue reading ‘Free Tools For Creating Custom Garmin Vector Maps – Intro’


A Review Of The Garmin Oregon 450t GPS For Field Work: Part II – The Touch Screen Interface

See this post for Part I of this review.

Starting with their Colorado GPS unit, which had a click-wheel-like “Rock N Roller” controller, and moving on to their Oregon and Dakota units, which rely exclusively on a touch screen interface, Garmin has moved away from having multiple physical buttons on their units to access functions and different screens. There’s nothing inherently wrong with that; replacing physical buttons with a touch screen lets you make a smaller unit, with less parts that can break. And it can give you greater flexibility in designing an optimal user interface.  But separate buttons also allow you immediate access to unit functions regardless of what’s currently being displayed on the screen; you have to be careful and clever in designing a touch screen interface that works in a similar manner. Unfortunately, the touch interface for Garmin’s Oregon GPS units (and the Dakota series as well) fails in that respect; operations that were simple and easy on older units are now a chore on the newer ones.

Let’s take one of the basic procedures you’re likely to do on a regular basis with your GPS: record your current position as a waypoint. I’ve been using handheld GPS units for 17 years now, starting with the Motorola Traxar, the first “consumer-grade” GPS unit. With every one of those units up until the Oregon, if I wanted to bring up a screen to record and edit all of the parameters of my current position, regardless of where I was in the menu/interface, I could push a single button and bring up the waypoint recording screen. Fast, simple, easy.

Not so on the Oregon/Dakota. If you’re in the map display, which is where you’re likely to be most of the time, you’ll see something like this:

map

There’s no single button to push to record your position (the “x” in the lower left takes you back to the main menu screen); instead, you have to:

1. Exit from the map screen.

2. On the menu screen, press the “Mark Waypoint” button.

3. Choose either the “Save” option (to save it with the default name and icon), or press the “Save and Edit” button to bring up another screen to let me modify various parameters.

4. If I choose to edit, I have to scroll down a screen of various parameter buttons (Name, Photo, Symbol, Comment, Depth, Elevation, etc.), press a button to change that single parameter, exit that screen, press another parameter to change that one, and so on.

You have more parameters to choose from, I suppose, and the touch screen makes entering data a bit easier. But why isn’t there a simple way to reach a single screen that lets you see and modify all the parameters at once, instead of this “one-at-a-time” piecemeal approach? What should be the simplest operation you do on a regular basis becomes a chore. Why isn’t there the option for one or two user-selectable buttons that can access common functions with a single press from any screen? Or, for that matter, a few more physical buttons on the outside of the unit that the user can assign functions to?

The more time I spent with the Oregon, the more frustrated I became with the interface choices Garmin made; everything seems to be organized to take far more time than necessary. Take, for example, the main menu where you access functions. There are about 20-odd functions that can be included in this main menu, but Garmin made the function buttons so large that only six can appear on the screen at one time, two columns by three rows:

menu

To access additional functions, you have to use the scroll buttons at the bottom; if you leave all the function buttons enabled, that’s four screens to scroll back and forth across. Shrink the buttons just a bit, and they could fit 3 x 4 = 12 buttons on a single screen, and all the buttons on two screens.

A few more annoyances:

– Garmin is in love with scrolling/expanding/shrinking display changes, when a function screen appears or disappears. It’s clever the first few times, but rapidly becomes a pain, especially as you have to dive through five or six of these screen changes to reach a desired function. It wastes time, and processor power; just let the screen pop up instantly, OK?

– With the old GPSMap and eTrex interface, track management and control was consolidated in a single screen. I could turn tracking on, record a track, turn the tracking off, and then save the track under its own name with minimal effort. Not any more. While there is a Track Manager function, you can only turn tracking on here. If you want to turn it off, you have to exit the Track Manager, go to the Setup Screen, choose Tracks, go to the Track Log button, and turn off track recording. Same thing for changing the track recording method and intervals. Why is all this functionality not available from a single screen, as it used to be?

– On older units, if you were looking at the map display and wanted to change the map data you were looking at, or map parameters, those screens were a few quick button pushes away. Not any more; once again, you have to exit the Map Screen, go to Setup, go to Select Map, scroll (slowly) through the list of available maps, click the button for the map you want to display, then press the Enable button. The ability to change the map data being displayed is one of the most commonly-used functions on such a GPS unit; why is there no option to make this accessible via a single button push?

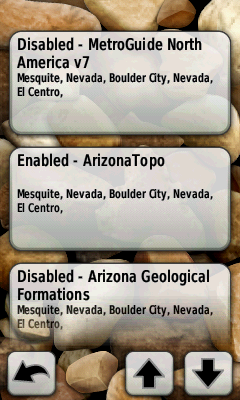
– While I’m on the topic of maps; take a look at the list of available maps that I loaded on my review unit:

maplist

It’s bad enough that the buttons are huge, requiring you to often scroll down through even a small number of maps to reach the mapset you want. But you see that button at the bottom for the Arizona Geological Formations mapset? You’d think I’d be able to tap that to select it, but noooooo – it’s not completely on the screen. So I have to scroll down again until the button is completely on the screen before I can select it.

– There are occasions when you need to scroll through a long list. If you’re at the top of the list, you’d think it would make sense that if you hit the scroll button to go up, it would wrap around and show the bottom of the list right away; same thing if you’re at the bottom and want to jump to the top. Nope; have to scroll all the way through the list to reach top or bottom, regardless of where you are.

– The position indicator (the blue triangle on the map image above) is far larger than it has to be; it’s about 3-4 times larger than the comparable indicator on the 60Cx. Not a big deal with vector maps, but now that you can put raster imagery on an Oregon, it can block out too much of the image, especially if you have an aerial/satellite photo displayed.

… and I could go on and on. Organization of basic functions is scattered all over the place; accessing them takes way too much time and effort; the interface is poorly designed and laid out; more thought seems to have been given to making the interface look “cool” than actually making it functional and easy to use. I’ve been a huge Garmin fanboy for about a dozen years, starting with the 12XL, then the eMap, and then finally my most recent Garmin, the GPSMap 60Cx. The Oregon 450t isn’t a bad GPS unit, and I’ll be a bit sorry to send it back, but it’s a huge disappointment. Without a serious re-working of the whole interface, I’d have a tough time recommending the Oregon/Dakota series to anyone. Given the choice between the 2010-vintage 450t model and the 4-year-old 60Cx model, there is no choice – the 60Cx, for all its limitations, is a better GPS unit for field work.


A Review Of The Garmin Oregon 450t GPS For Field Work: Part I

A few weeks ago, I did a post called “In Search Of The Perfect Fieldwork GPS”, a list of the features I’d like to see in a handheld GPS unit designed for serious fieldwork and mapping. The Magellan Triton 2000 GPS unit, which I reviewed last year, had some but not all of these features, and while it’s a decent GPS it’s just not good enough for fieldwork. Recently, Garmin was nice enough to send me one of the latest models in their Oregon line of GPS units, the Oregon 450t, for review:

This post will look at the basic hardware and GPS performance of this unit, comparing it with the Magellan Triton 2000 and my old-school Garmin 60Cx. Tomorrow’s post will be a review (rant?) of the Oregon’s touchscreen interface.

The Oregon 450 series, another touchscreen model, is a follow-on to the Oregon 550 models introduced in mid-2009, and the successor to the Oregon 400 series. The biggest difference between the 400 and 450 series is the tri-axial compass on the 450, which works at any angle; the compass on the 400 requires you to hold the unit horizontally. Comparing the 450 to the higher-end 550 units, the 450 models don’t have the built-in 3 MP digital camera found in the 550s. I think a camera is a useful add-on for a fieldwork GPS; while the 3 megapixel sensor is a bit small, I’ve heard that you can focus from two inches to infinity with this camera, making it useful for both closeup and distance shots. A “t” at the end of a model number indicates that it has a 1:100K-equivalent US topographic map dataset pre-loaded into the unit; non-“t” models have a simple basemap installed, plus an elevation database that lets them display shaded terrain relief and 3-D views.

At 2.25” x 4.25”, the Oregon is substantially smaller than either the Triton or 60Cx, and fits comfortably in my hand. I think I would have liked to have seen a bit more texturing on the outer surface to help with the grip, since the unit only has the power button to break the surface continuity. Still, the “rubbery” edge of the unit shouldn’t make hanging on to it too difficult, even in wet conditions. There’s a lanyard hole at the bottom of the unit, but no lanyard is included; instead, a carabineer clip can be slid onto the back, letting you clip it onto your belt or pack. I’d personally prefer a lanyard, and buy a separate belt case/clip. While the unit is small, it weighs just slightly less than the Triton or 60Cx, so it actually feels heavier than those units even though it’s not (weight vs. density).

Documentation: Only a quick-start guide was included in the package. You can download a PDF user manual from the Garmin website, but even it is seriously lacking in basic information about the unit. I can’t recommend the Garmin Oregon GPS Wiki enough as a far more complete documentation source for the Oregon line than anything Garmin puts out.

Software: None included.  Unlike the 60Cx model, the Oregon does not come with Garmin’s MapSource program, which allows you to manage and upload vector mapsets to your Garmin unit; you have to either pay for a Garmin mapset that includes this program, or beg/borrow/steal a copy from someone else. A recent update to Garmin’s Basecamp software added the ability to upload mapset data, but I find this program far inferior to MapSource for this purpose. This is nickel-and-dime stuff; for the price you’re paying for this unit, a copy of MapSource should be included.

Computer interface: Mini USB plug, and thank God it’s USB 2.0; older Garmins had USB 1.0, which made large map transfers painfully slow. One annoying feature is that the only way to use USB for power only is to have the USB interface set to Garmin Spanner; in other interface modes, the GPS unit display is turned off automatically. On the flip side, you have the option of an NMEA serial interface through the USB connection, which is useful for those programs that only work with NMEA connections.

Battery life: I got a respectable 15-20 hours out in the field from the recommended NiMH rechargeable batteries, far better than the Triton, slightly worse than the 60Cx.

Display: The 3” diagonal, 65K-color 240 x 400 display is gorgeous when viewed under the right lighting conditions and angle. When the first Oregon units were released, many people complained about display visibility, especially in sunlight conditions. I don’t have an older model for comparison, but I can say that this Oregon’s display is very usable in sunlight conditions, far better than the Triton. Outdoors under reduced light (cloud or shade), the display is less than ideal unless you turn the backlight on at full intensity; even then, it’s not great. Terrain shading on maps looks great in screenshots, but in the field, you’ll get better results by turning it off. Oddly enough, the Triton display is better under those conditions when the backlight is turned on. The Garmin 60Cx is far better than either of those in all lighting conditions, at the cost of reduced color depth and resolution; still, a low-color display you can see is better than a high-color one you can’t.

One final problem with the display: since it’s a touchscreen, it’s going to get covered with fingerprints pretty quickly, and these can degrade screen visibility, especially in sunlit conditions.

GPS Satellite Reception: The Oregon units have small ceramic path antennas, which require you to hold the unit horizontally for optimal reception. I wish Garmin had stuck with the larger, omni-directional quad helix stub antennas found on their 60Cx and Colorado units; while they might break up the “clean” look of the unit, you’d get better reception at all angles. And there’s no connector on the Oregon for an external GPS antenna that might improve reception. I consistently acquired more GPS satellites on my old Garmin 60Cx than on the newer Oregon model. Still, outdoor reception with the Oregon for the regular GPS constellation is acceptable under most usage conditions, even holding the unit at an angle, and is superior to the Magellan Triton. I also liked the unit’s ability to store GPS satellite data to increase acquisition speed the next time you turned it on. WAAS reception was very problematical; even under wide open skies, with no terrain blockage and two WAAS satellites high in the sky, picking up a WAAS signal could take as long as half an hour, and the WAAS signal frequently dropped out. Even when a WAAS signal was received, not every GPS satellite signal had the “D” indicator showing that the GPS position was being properly corrected. Not a huge problem now while the sun is currently in a quiet phase, but that will change as the sun moves towards a more active phase over the next few years; Garmin needs to fix this issue ASAP. Neither the Garmin 60Cx or Magellan Triton had similar WAAS signal problems.

Positional accuracy: For a quick qualitative analysis of positional accuracy, I loaded high-resolution calibrated aerial imagery onto both the Garmin Oregon and Magellan Triton, and tested them under fully open skies (no terrain or tree blockage). Both were equally excellent in positional accuracy; while the displayed error estimates were on the order of 5 meters for both units, the actual error based on the aerial imagery was on the order of 1-2 meters.

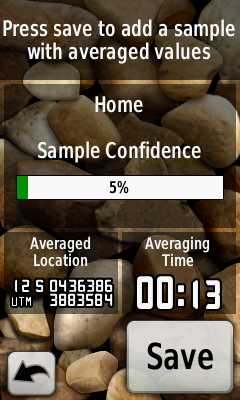
One thing the Oregon has that is sorely lacking on the Triton is waypoint averaging; for good waypoint accuracy for serious field work, this is essential. Garmin suggests returning to a specific point several times to do waypoint averaging that takes into account errors due to satellite geometry; I’d suggest to Garmin that they include Dilution of Precision (DOP) in the display, letting people know how good the current satellite geometry is.
average

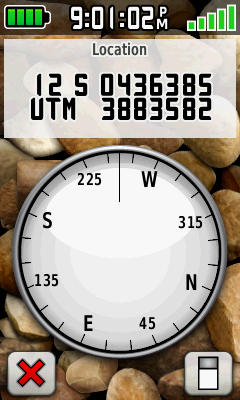
Compass: I’ve used GPS units with built-in compasses before, and always wound up turning them off. Accuracy was always questionable; direction readings tended to be “jerky”, jumping around continuously; the need to hold the unit horizontally limited the utility. The compass on the Oregon 450t has none of these problems; it’s the best GPS compass I’ve ever used, by far. Accuracy is outstanding when you follow the simple calibration procedure; readings are smooth and solid; the “tri-axis” functionality lets you hold the unit at any angle and get an accurate reading. It’s not a complete substitute for a good handheld compass, but it’s not that far off, either. A+ for Garmin on this one. If they could only add a feature that would let you measure the angle from level at which you hold your unit, it would be fantastic for combined angle/direction measurements like slope and dip/strike.

Compass screen:
compass

Maps: Every standard vector map I tried on the Oregon unit worked perfectly, including custom maps with standard feature types. I tested some custom maps with custom feature types, and they worked as well, but there’s no guarantee with those that all of them will work. As I mentioned above, terrain shading looks great with some of these maps when you do screenshots, but doesn’t work that well in real-life, and I turned it off right away. In terms of map variety and availability, Garmin blows Magellan away completely; in addition to Garmin’s own proprietary maps, a search on this website and others like GPSTracklog will bring up many sources of free Garmin maps (e.g. the GPSFileDepot).

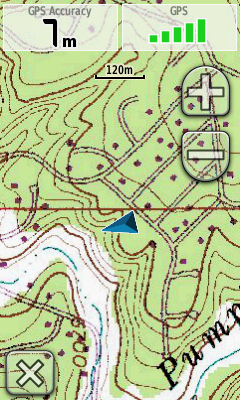
Last year, Garmin added the capability to display raster maps on the Colorado/Oregon/Dakota series, and included the capability for you to create your own maps for free. I give Garmin major props for that, as no other GPS maker has done that. deLorme requires you to pay $200 for a copy of xMap in order to put your own raster data on their GPS units. Magellan has never released any official way to put your own raster maps on their Triton units, limiting your official choices to maps sold by them (though there are now free unofficial options for generating Magellan Triton raster maps, like TritonRMP Maker, RMP Creator and Mobile Atlas Creator).

Having said that, though, there are currently too many limitations on raster map functionality on the Oregon for it to be fully useful right now. No map segment can be larger than one megapixel in size (1024 x 1024 pixels square), requiring either downscaling or tiling of larger raster images. Garmin hasn’t issued any tools for creating, managing or uploading such raster maps; you have to use either Google Earth or one of the many 3rd-party tools that have popped up to aid in creating raster imagery (like G-Raster or Mobile Atlas Creator). You’re limited to 100 active map segments in total on your unit; since you can’t turn raster image files on and off, that means a total of 100 map segments is all you can have. And you can’t have different types of raster imagery, say aerial photos and topo maps, for the same area; since you can’t turn one type off while leaving another on, only one type can be displayed. The Magellan Triton is far superior in this respect; raster images can be up to 18000 x 18000 pixels in size, you can put as many into your unit as you have memory for, and you can turn raster image mapsets on and off at will. In order for this capability to be fully functional, Garmin needs to:

– Increase the total number of map segments that can be active

– Give you the ability to turn raster mapsets on and off.

Sample raster map (USGS topo in this case):
raster

Memory: The 450t comes with 1 GB of built-in memory, and the ability to add 4 GB of additional memory with a microSD card that fits into a slot behind the batteries. With the current limitations on raster maps, 5 GB is more than enough space; if Garmin fixes those issues, then I can see where this might not be enough storage space. However, memory cards are cheap and easy to swap out, so that’s not a big problem.

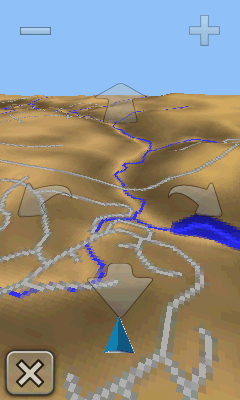
3D View: With a built-in elevation basemap for the US, the Oregon 450t can give you a 3D view of the terrain; with the built-in compass, it changes the view to match the direction you’re facing in. Initially a very cool feature, but IMO it has limitations that limit its usefulness:

– While it will overlay vector map features on top of the terrain view, they’re not labeled. So, for example, if there’s a hill/mountain in the 3D view, its name won’t be displayed.

– Waypoints and tracks are not displayed in 3D view; without that, 3D View’s utility in navigation is limited (although it will display a navigation track).

– Raster maps are not overlaid
3dview

Waypoints: Maximum of 1000 waypoints, the same as older units. But I think you’d have to work hard to come up with a scenario that requires that many waypoints; you can always download and archive waypoints on your computer for future uploads. The touchscreen interface makes entering the waypoint name a lot faster than with rocker switches.

I was going to complain about the lack of custom waypoint symbols, but Garmin recently added that as a beta feature; now they only need to add support for that in their MapSource and Basecamp software.

Tracks: Far better support for track data than earlier Garmin units. Up to 200 tracks can be saved on a unit, and tracks you save now include time data, useful for geotagging photos. Up to 10,000 points in a track, and if you run over that limit on your current track, the Oregon automatically saves the first part of the track in GPX format, and then truncates the current track to free up room for subsquent track points. See the Oregon Wiki track section for full details.

Custom POIs: I’ve posted about these before; they’re a useful way to store points and related data on your unit without having to use up waypoint space. The Oregon units support these, though they annoyingly hide them in the Where To => Extras folder; what’s up with that name, Garmin? Older Garmin units limited POI names to 40 characters, and associated data to 80 characters; Oregon units increase those to 1023 characters, and add some extra data fields (Oregon Wiki has full details). Using the techniques in this post, and taking advantage of the extra data space, you could associate several hundred words of data with each POI; this could be very handy for field work.

There are a host of other features that I’ll skip, like geocaching support, calendar, stopwatch, alarm, etc., since these aren’t really relevant to what I’d want to use this unit for: navigation and data collection. Except for the WAAS issues, which I really hope they fix soon, I found a lot to like in the feature set and basic functions of the Garmin Oregon 450t unit. What I didn’t like, in fact actively dislike, is much of the touchscreen interface; I’ll deal with that in Part II of this review.