3/6/2010: The newer Colorado/Oregon/Dakota GPS units can store and display more data; see this Oregon Wiki page for more information. So you can now incorporate far more shapefile attribute data into the POI information section than with earlier GPS models.
Garmin POIs (Points of Interest) datafiles can contain up to two lines of text data for the name, and up to four lines of data for the description, far more than the more limited space for the same data in a GPS waypoint. This gives you enough room to include at least some of a point shapefile’s tabular attribute data for a location, and take it into the field with you for reference. And while there’s typically a limit of 500 to 1000 waypoints on many Garmin GPS units, you can put tens of thousands of locations into a POI file, along with that associated data. Here’s one way to create Garmin POI files from a point shapefile, though you could use comparable tabular data as well.
For this example, I’ll use a point shapefile that has the locations of mines in Arizona, along with associated data.
1. Get your shapefile
2. If it’s not in the WGS84 latitude/longitude coordinate system that GPS units require, convert it (MapWindow has a built-in shapefile re-projection function)
3. If you want, subset the shapefile by a specific attribute. For example, I could select all the mine locations where uranium was one of the principal products, and export that into a separate shapefile. Many GIS programs, like MapWindow, have the ability to select points in a shapefile by attribute value, and then export them to a new shapefile.
4. Convert the shapefile into a spreadsheet-compatible format, with each point’s longitude and latitude and the attributes you’d like to include in the POI file. There’s a free program that will let you do that called Shape2Text that I’ve posted about previously. For this example, I’ll export a limited subset of the attributes:
- Name
- Type
- Status
- USGS 250K Quadrangle Map Name
- USGS 24K Topo Map Name
- Township
- Range
- Section
- Subdivision
- County
Here’s the first four lines of data from the CSV file:
-114.0174781434,36.9388650680,DREAMER,PROSPECT,EXP PROSPECT,LAS VEGAS,MESQUITE,041 N,016 W,21,C,Mohave
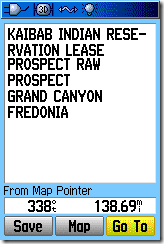
-112.6527074209,36.9472053250,KAIBAB INDIAN RESERVATION LEASE,PROSPECT,RAW PROSPECT,GRAND CANYON,FREDONIA,041 N,003 W,6,,Mohave
-112.9043764406,36.8560952115,RADON 6 AND 7,UNKNOWN,UNKNOWN,GRAND CANYON,COLO CITY,040 N,006 W,23,E2,Mohave
-113.8974797878,36.7096959269,COTTONWOOD WASH,UNKNOWN,UNKNOWN,GRAND CANYON,CANE SPRINGS,038 N,015 W,10,N2C,Mohave
Longitude and latitude are the first two pieces of data in each line, with the selected attributes following. I probably won’t be able to fit all of this shapefile attribute data into the POI file, but I’ll try to see how much I can get to fit.
Tip: If you think any of your data values might contain commas, don’t export it as a CSV (comma-separated value) file, since this will scramble up your data when you read it into a spreadsheet program in the next steps. Instead, export it in tab-delimited format. Also, if you have all of your data already in spreadsheet-compatible format like DBF or XLS (including the coordinates), you can also follow the following procedure to create a POI file.
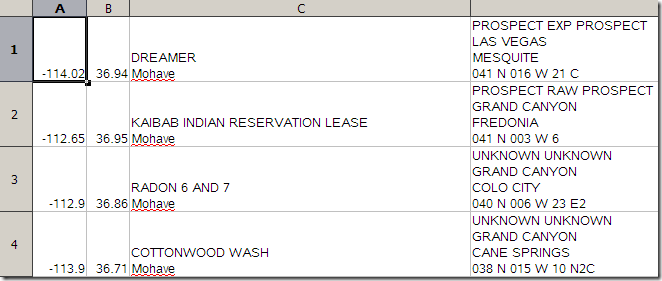
5. Open the CSV file in a spreadsheet program; I’ll be using OpenOffice‘s Calc spreadsheet:

The first two columns of data are the coordinate position, which is incorporated automatically into the POI data, and doesn’t need to be included in the data. If you need the coordinate data for a point while in the field, you can select a POI, and choose the “Save” function to create a waypoint at the POI location that will have the coordinate data in the display. So, the data I’d like to have in the POI’s data screen is everything else.
If you’ve worked with Garmin POIs before, or read my earlier post on the topic, you’ll know that each POI can have two sets of information in the data screen:
I’ll combine the data in the D column (the mine name) and L column (county) into a single text string in the C column, using a “$” character as a separator, where D is the “Name” column and M is the “County” column after I’ve inserted the new C column. I could have used spaces instead of “$” as a separator, but the reason for using this unique character as a separator will become clear in a bit. Copying and pasting that formula into the other cells in the C column, I’ll get:

Similarly, I can take the rest of the data in the other columns, and combine all of it into a single text string with separators as well. If I insert a new column before the D column, and use the same process as above with the formula:
=CONCATENATE(F1;” “;G1;”$”;H1;”$”;I1;”$”;J1;” “;K1;” “;L1;” “;M1)
To combine the remaining attributes into a single line of text data:

I can now save this data file as a CSV file, then use Garmin’s POILoader to upload it to a compatible Garmin GPS unit. If I select one of the POI data points on the GPS, and look at its data screen:
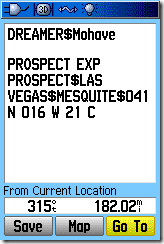
All of the data from the C and D columns in the CSV data file has been uploaded to the GPS. If any of the text strings is too long to fit into the designated space, it will be truncated, as in this case where the county name is cut short:
Only the first four columns of data in the CSV file (Longitude, Latitude, Name and Description) are used by the POILoader; the rest are ignored.
Note: If instead of the data you uploaded, you see indications of “Proximity alerts” and “Speed alerts”, the POILoader has seen special characters in your file that designate those alerts, and set them automatically. To get around this problem, upload in “Manual” mode instead of “Express” mode, and uncheck the box marked “This file contains proximity alert points”.
The above data screens are a good start, but the data runs together in the single string, and would even if I used spaces to break it up. It would be great if you could put specific sets of data on separate lines, and you can. The trick is to insert CR/LF characters into the name and description data columns of the CSV file. I haven’t found a way to do this directly in Calc, unlike Excel where Alt-Enter lets you do that. But I’ve found a way around that using another OpenOffice application, and I suspect there are ways to do it in MS Office as well.
7. After saving the CSV file in Calc, with double-quotes (“) as the text delimiter, open the file in OpenOffice’s Writer program (a word processor); if you have trouble getting Writer to open the CSV file, change the file extension to “.txt”, then change it back to “.csv” when you’re done. With Edit=>Find & Replace, click on the “More Options” button, then check the box next to “Regular expressions”. Put the separator character (“$”) in the Find box, and “\n” into the replace box; “\n” is the regular expression for CR/LF in OpenOffice. The Find & Replace window should look like this:
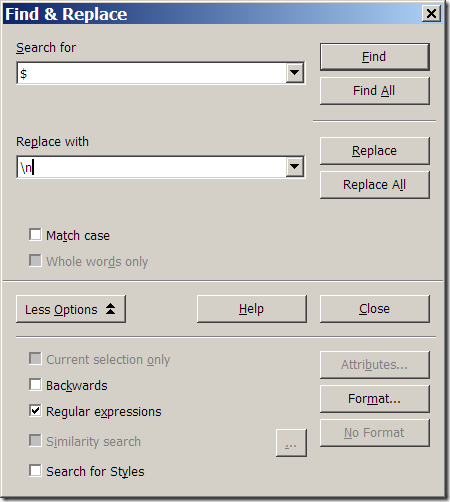
Click “Replace All”, and all of the separator characters should be replaced by CR/LF. I say “should be” because with some characters, it doesn’t work, and the “$” character is one of those. But you can get around that problem by first doing a Find and Replace on the “$” character, replacing it with something unique like “©”, and then replacing the “©” with CR/LF. Better yet, when selecting a separator character in Calc, pick a better one than the one I did.
Save this modified file as a CSV file, and if you open it in Calc again:
There are now line breaks where the separator character “$” used to be. Upload this CSV file using the POILoader, and the data page now looks like this:

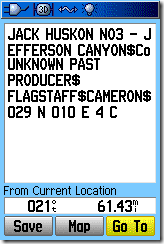
Each set of data is now on separate lines. But, there’s a line of data missing; the Township-Range-Section-Subsection data isn’t there. That’s because the first set of data in the description section, the Type and Status, doesn’t fit on the first line in the description section, and wraps over to the next line. When it does that, it bumps the other data down a line; the T-S-R-Sub data then can’t be displayed because there’s a maximum of 4 lines of text in the description area. The same thing happens in the name section if the name text is too long to fit on one line; the name wraps over to the next line, and bumps out the county text data, since there are a maximum of two text lines in the name section:
There’s not much I can do about the name spanning two lines, since you have to have the name of the mine in this data. But if I re-shuffle the data around in the original CSV file so that the Type And Status are the last set of data in the description area, instead of the first, using the formula:
=CONCATENATE(H1;”$”;I1;”$”;J1;” “;K1;” “;L1;” “;M1;”$”;F1;” “;G1)
Creating this data text for the description:
LAS VEGAS$MESQUITE$041 N 016 W 21 C$PROSPECT EXP PROSPECT
And then going through the process of inserting CR/LF to replace the separator, and uploading the CSV POI file, I’d get a new data screen for the “DREAMER” mine:
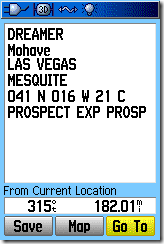
Compare this screen to the original above, and you’ll see that the Type and Status data is now truncated, because it’s on the fourth line and can’t wrap over. But there’s enough info on that line to get the gist of it, and it’s not bumping the Township-Range-Section-Subsection data off the end as it did before. So, by managing the position of the data intelligently, you can maximize the number of data attributes you can include on the POI screen, and minimize the chances you’ll truncate critical data.
So I’ve put 10 shapefile attributes into the data screen for a single POI. But there’s actually a way you can add even more data attributes for a single point without excessively cluttering up your Garmin’s display screen or complicating your POI data management too much. That will be the topic of the last post in this interminable series.

Great article! I’ve gotten everything done, but haven’t been able to get the CR/LF characters inserted. When I do the find and replace in OOWriter, ‘\n’ causes a paragraph break to be inserted, which bumps everything to the next field in Calc. Any thoughts?
My first suggestion would be to make sure that when you create the CSV file, make sure that you us double-quotes (“) as the text delimiter; if you don’t, you’ll get exactly the result you’re describing. If that’s not it, send me a copy of the original CSV file (before substitution), and I’ll take a look at it.
That was the problem! Thanks for your help, and thanks for all the hours hunched over the keyboard to figure out the whole procedure. Priceless!
I have a shapefile that is projected on the NAD 1983 coordinate system. I used MapWindow as you described and selected WGS 1984 17S which should be my coordinate system. I went through the steps and then used Shape2Text and selected .csv file. When I open it in Excel my XCoo and YCoo are 6 digit numbers. Isn’t that supposed to come out in a three digit and two digit format? Where could I have gone wrong? Example my XCoo after the re-projection and shape2text conversion is 682479.25
It’s not clear from your comment what coordinate system your original shapefile is in. NAD83 is not a coordinate system, projected or unprojected; it’s a datum, a description of the earth’s surface that coordinates are projected onto. You need to find out what the exact coordinate system and datum of your shapefile is, specify that as the input coordinate system in MapWindow, then specify geographic coordinates (latitude/longitude), WGS84 as the output coordinates. It sounds as though you specified UTM as the output format in MapWindow, and the results you got are exactly what you’d expect from that.
I’m assuming that by “three digit and two digit format”, you’re looking for output in degrees and minutes. All output from a geographic coordinates shapefile from Shape2Text will be in decimal degrees.