blankblank blank


Archive for the 'Google Earth' Category Page 6 of 25


Google Earth Caching Programs III – Google Earth Voyager

Note: you should read this post first for general info about how to use automated Google Earth caching programs.

The final Google Earth cache automation program I’ll cover, and the only one that still seems to be under active development, is Google Earth Voyager. The original download link at GeoCities disappeared when GeoCities shut down; for now, you can download it from the CNet page; here’s another download site. The program zip file also contains a good user guide in PDF format; unzip all the files into the folder of your choice, and run the program:
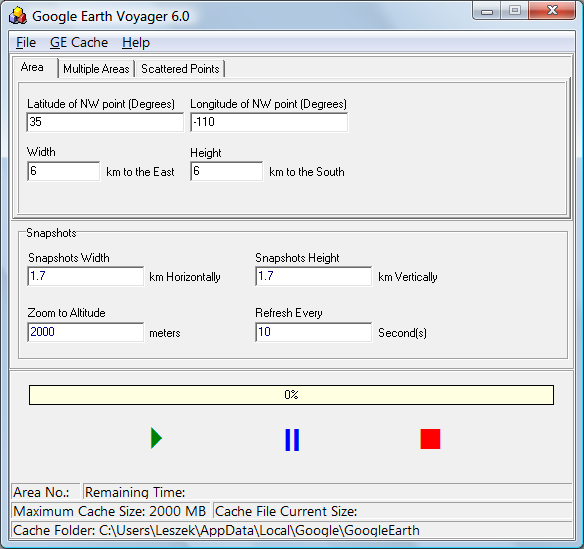
Google Earth Voyager cache creation program

As with GECacheBldr, you enter the NW coordinates of the area you’re interested in, and then the distance east and south of that point you want to create a cache for; I wish you could specify the bounds instead. Then set the width and height of the area covered by the Google Earth view, along with the altitude; note that the width/height is in kilometers, while altitude is in meters. GE Voyager lets you set the update time interval as well, which is useful. Once you’re done, you can open Google Earth and create a network link to the GEVData.kml file located in the same directory as the executable. This KML file comes in the zip file, so unlike the previous two caching programs, you don’t have to start/stop the program to generate the file. Once the network link is ready, clear the current cache if desired, click the green play button, and the caching process will start; you can pause or stop the process at any time. Indicators with the current cache size and time remaining are a nice touch.

Unlike the previous two programs, you can specify multiple areas to be cached at the same time:
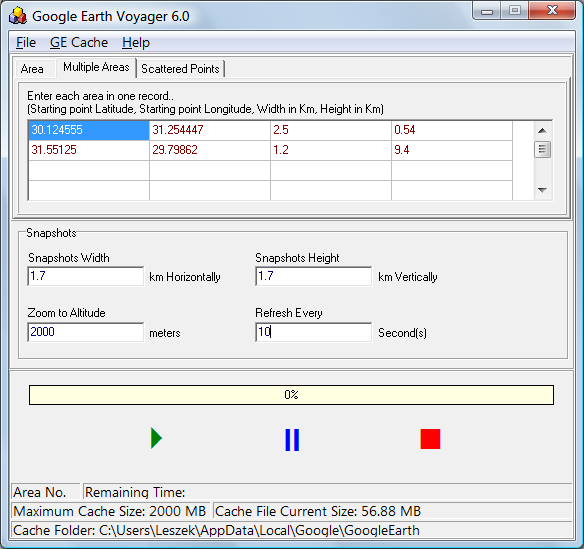
1-11-2009-2.00.40 PM

You can also entered scattered points, and have a single area around those points be cached; this, I think, is less useful than the multiple areas:
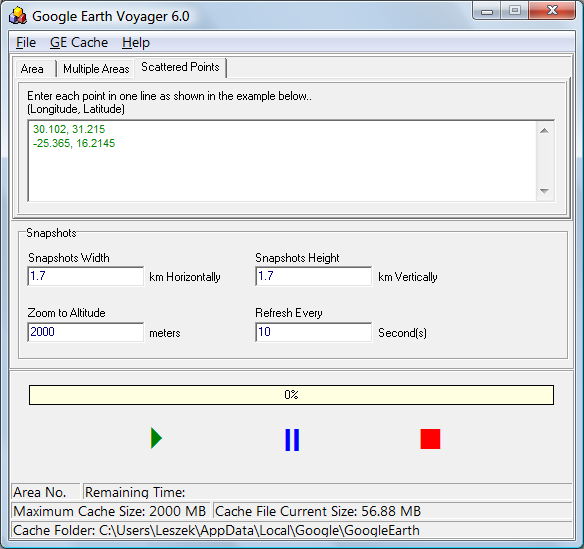
1-11-2009-2.00.58 PM

Under the GE Cache menu, you can open the folder containing the cache, which is convenient for making a copy of those files to store away in a different folder, or move to another computer. It also lets you change the cache folder, which I wouldn’t recommend unless you have a really good reason; it requires modifying the registry, and also might have other side effects as well.

GE Voyager is probably the best choice for general use in automatically creating a Google Earth cache for an area. If you could set the absolute area bounds, instead of the NW corner and distances, it would be almost perfect (if you need that capability, GE Cacher is the only choice, but its feature set is inferior to GE Voyager). The ability to do multiple coverages of a single area with different altitudes/resolutions would also be a useful addition.
Google Earth Caching Programs II – GE Cacher

Note: you should read this post first for general info about how to use automated Google Earth caching programs.

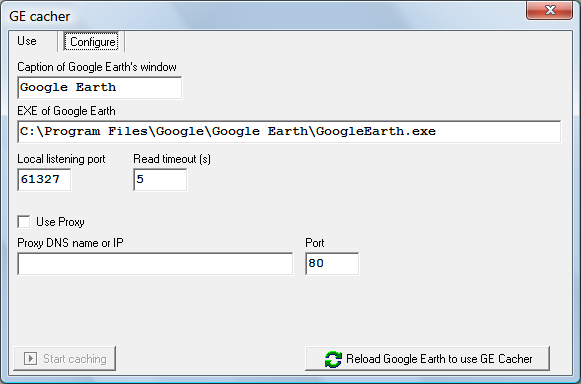
Next Google Earth caching program up for review is GE Cacher.  No install program, just download and unzip the executable into a folder, then run it from there; it will always run on top of other windows. You’re likely to get a security warning from Windows asking if you want to unblock network access for the program. The program has two tabs; first, for configuration:

GE Cacher configuration

Proxy data is read from the registry, and entered if needed (though it usually isn’t needed for most systems). If you’ve installed Google Earth somewhere other than the default directory, you’ll need to enter its location in the appropriate box.

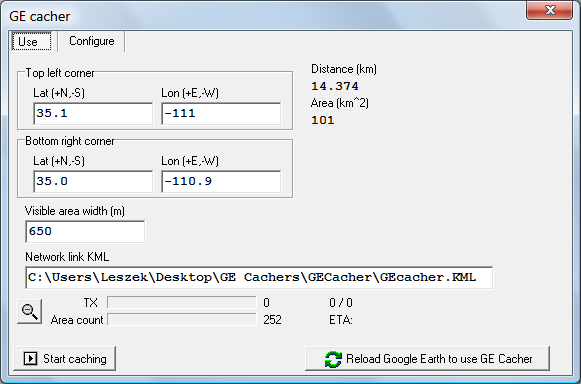
In the “Use” tab:

Ge Cacher use tab

Unlike the two other caching programs I’m reviewing, GE Cacher lets you set the latitude/longitude bounds, which is more convenient, and calculates the area covered. It also saves the entered data in a config file, so it shows up again if you re-start the program. On the downside, though, the time update interval is fixed, and you also have to set the altitude manually in Google Earth. Use this altitude to set the imagery resolution, and also to set the position spacing interval (here called the visible area width). On my system, the “Reload Google Earth to use GE Cacher” button either has no effect, or gives an error message.

You can also specify the location of the KML file to be used as the network link, unlike the other two which have a fixed KML file name and location. You’ll still need to click “Start caching”, then “Stop caching”, to create the KML file, then make a Network Link to it in Google Earth. Once you’re ready, with Google Earth running and the network link created, click on “Start caching” to begin the process. The program will show a bar graph indicator of progress next to “Area count”, and also an approximate estimated time remaining (“ETA”). The program is sometimes cranky in Windows Vista about exiting, which may require bringing up the Windows Task Manager “(Ctrl-Alt-Esc) to shut it down.

I found that the best results were obtained by setting the “Visible area width” lower than you think you’ll need, and also adjusting the Fly-To speed in Google Earth to the fastest setting. The update interval isn’t adjustable, and IMO the program’s fixed update interval is too short to ensure that all the data for an area is downloaded before moving to the next area. But apart from that, the program does do the job, and the ability to set the absolute bounds for the area is a big plus; there’s also decent documentation on the web page. The program doesn’t seem to be in active development any longer; a link is provided to the partial source code in Delphi, but only for educational purposes.


Google Earth Caching Programs I – GECacheBldr

Note: you should read this post first for general info about how to use automated Google Earth caching programs.

First up is the oldest Google Earth caching program I could find, GECacheBldr; download it from any of the program links in this message board thread. No install program, but by copying it into its own directory, you’ll be able to more easily find the KML file it generates during operation, called “Cashbild,kml”.

Running the program brings up a simple screen:

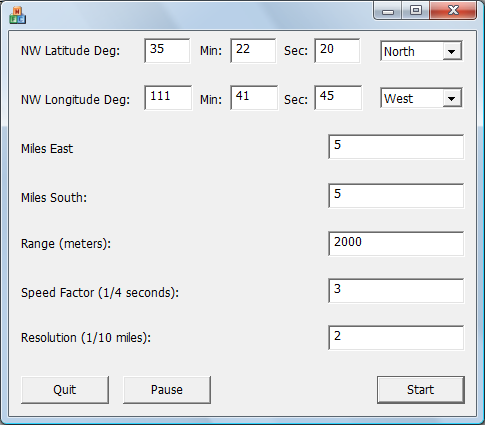
Google Earth cache program GECacheBldr

You start by entering the latitude/longitude coordinates of the NW corner of the area you’re interested in, in degrees-minutes-seconds, also setting North/South and East/West for latitude and longitude. You can set Google Earth to display in these units using the Tools => Options menu item, 3D View tab.  Then set the distance east and south of this corner location you want to cache the data for in miles. Range (in meters) sets the altitude above the ground, which in turn determines the resolution of the cached imagery – a lower altitude means higher resolution imagery (and a larger cache file).

Speed factor refers to the time between successive KML file position updates, with higher numbers meaning slower updates; the author recommends 3 to start with, but I would start with 40 (a 10 second update time), and then adjust that up or down as needed. Resolution sets the spacing between successive Google Earth views, when the caching takes place. Follow the guidelines in this post for setting the resolution based on either the Range or your Google Earth view. Once you’ve set the parameters for a caching run, you can’t change them without quitting and starting all over again.

The first time you run the program, click the Start button, then immediately click the Pause button. This generates a file called “CashBild.kml” in the same directory as the executable; this is the KML file that the program regularly updates with new positions. You’ll need to create a Network Link to this file (see this post for details). Once this “CashBild.kml” file is created, you won’t have to do Start/Pause again; just make sure the Network Link to the file is created and active in Google Earth.

When the Google Earth Network link is ready, click on the Start button again in GECacheBldr, and watch Google Earth for a brief time. You’ll see Google Earth move automatically from one to view to another. If the parameters are set correctly, then the imagery will have time to download completely, and will look sharp; if not, it will stay blurry, and you’ll need to try again with a different set of parameters. It may take a few trials, but eventually you should come up with a set of parameters for a particular altitude that gives good results. When the view stops changing in Google Earth, the caching is complete, and you can now use the disk cache data directly, or copy it to another directory for use at another time as described in this post. Don’t forget to delete or de-activate that network link to “Cashbild.kml”, or every time you open Google Earth afterwards it will fly to that last location and view.

The program does the job, and has a nice, simple stripped-down interface. I’d prefer it if you could set the actual latitude/longitude bounds instead of the NW corner and then the distances; the mix of units (DMS for coordinates, miles for distance, meters for range, 1/4 seconds for update speed, and 1/10 mile for position spacing) is a bit confusing as well. The program is no longer being updated, and the author will provide the source code upon request.


Automating The Google Earth Caching Process

In a previous post, I described how to manually create a Google Earth disk cache file for an area. For small areas, this is probably the fastest approach, but for larger areas, doing it manually can get tedious. I’ve found three programs that can automate this process, but before reviewing them, it might be useful to go through common factors for all of them.

All three programs work by creating a KML file for a particular location, and then updating that file on user-specified schedule, typically every 5-10 seconds, with a new location. You need to create a Network Link in Google Earth to this KML file that updates on a regular basis as well; as the KML file is updated on a regular basis, the Network Link picks this up, and moves the Google Earth view to the new location, where imagery is downloaded and added to the cache.

To create a Network Link in Google Earth:

1. Open up Google Earth, and from the Add menu choose Network Link.

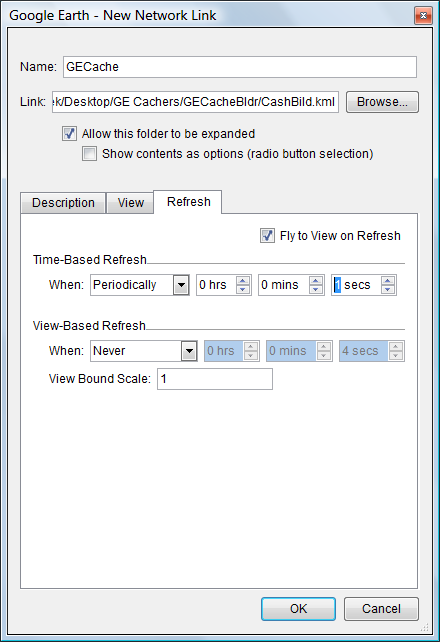
2. Click the Browse button, and select the KML file used by the cache automation programs (CashBild.kml in the example below):

Network link Google Earth

3. Select the “Periodically” option for the Time-Based Refresh, and then set the refresh time to 5-10 seconds (more on this shortly).

4. Check the “Fly to View on Refresh” box; this tells Google Earth to move to the updated location in the Network link file.

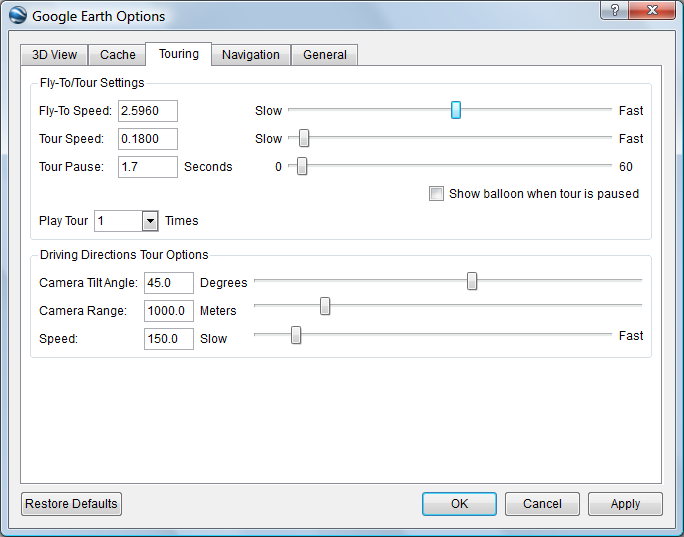
When the location is updated in the network link, Google Earth will fly to that location, download the imagery and display it. But if the speed with which it flies to the location is too slow, then the location may shift to a new one before all the data is downloaded. To make sure this doesn’t happen, go to Tools => Options, Touring tab, and set the “Fly-To Speed” to a higher value than the default of 0.180:

Google Earth fly to speed

Here I’ve set it midway, which should be fast enough for caching, but not too fast for regular fly-to operations. You can experiment with this setting to find the one that works best for you.

The caching programs I’ll be reviewing have the following options:

  • Set the bounds of the area you want to cache. Two of them require you to specify the NW corner of the area in latitude/longitude, and the east and south bounds of the area from that point in distance (meters or kilometers); the third requires the E/W longitude and N/S latitude bounds. Because of how they work, they don’t function directly over the poles, or across the 180W/180E longitude transition (essentially the International Date Line)
  • Set the spacing for successive points. This sets the distance that the view moves between one point and another. It would be convenient if the programs calculated the correct value for you, so that every bit of imagery in your designated area was covered, but they don’t. You have to set this manually, and the correct value will depend on the altitude the views are downloaded at (i.e. the image resolution).  Set it too small, and you won’t miss any imagery, but it will take longer; set it too large, and you might miss some areas. I’ve found that a reasonable rule-of-thumb is to set the spacing about 10-15% smaller than the altitude you set (see the next item), and then watch the first few Google Earth views to see if you’re getting enough overlap between successive views. If you’re getting too much overlap, increase the spacing; no overlap, decrease the spacing. You can also set the eye altitude you plan to use manually in Google Earth, and then use the Ruler tool to manually measure the field of view in both E/W and N/S. Take the smaller of the two values, decrease it by about 10-15%, and that should be a satisfactory spacing
  • Set the altitude. Two of the programs let you set the altitude/elevation over terrain (Eye alt – elev in Google Earth), while the third requires you to set that manually. The lower the altitude, the higher the resolution of the imagery downloaded to the cache, but the more time it will take and the larger the final cache size. For some areas with very high resolution imagery, the eye altitude will need to be no more than a few hundred meters to capture the highest resolution imagery. For other areas where only Landsat imagery is available, this could easily be set to a kilometer or two. If you want the cache to contain the imagery appropriate for varying heights, you’ll have to run these programs with different eye altitudes for the same area. For GE Cacher, you’ll need to
  • Set the update time.Two of the programs update the KML file with a user-defined time interval. The longer the time interval, the longer it will take, but too short an interval may not give Google Earth enough time to download all the data. The appropriate interval will depend on your Internet connection speed, and how fast the Google Earth servers can provide the data. Start with about 10 seconds, and then adjust it up or down based on whether all the data for a view is downloaded before it moves to a new view. Important: You should set the Network Link Time-Based Refresh interval to be no longer than the update time, otherwise you might miss some of the position updates. You might even try the shortest refresh interval available, one second, and see if that works for you; too often shouldn’t cause a problem, too seldom will. For the third program with a fixed update interval, GE Cacher, you should definitely set the Refresh to one second.

Once everything is set up, all the programs will have the option to start the caching, and manually pause or stop it before it’s completed if you want. As with the manual caching process, you might want to empty the current disk cache before starting, and set the memory cache as small as possible. When you’re done with a caching session, you should either uncheck or delete the Network Link to the KML file; otherwise, next time you run Google Earth, it will go to that file’s location/view and keep returning there regardless of where you want to see. If you want to save the cache data, copy the files from their location to another one for safekeeping.

Next up: reviews of the Google Earth cache automation programs.


Manually Caching Google Earth Data

The last post covered the basics of the Google Earth disk cache, and how it lets you use Google Earth even when you don’t have an Internet connection. Today I’ll talk about the simplest method to create a Google Earth disk cache file for an area – doing it manually

To create a localized Google Earth cache file manually:

1. Start up Google Earth while connected to the Internet

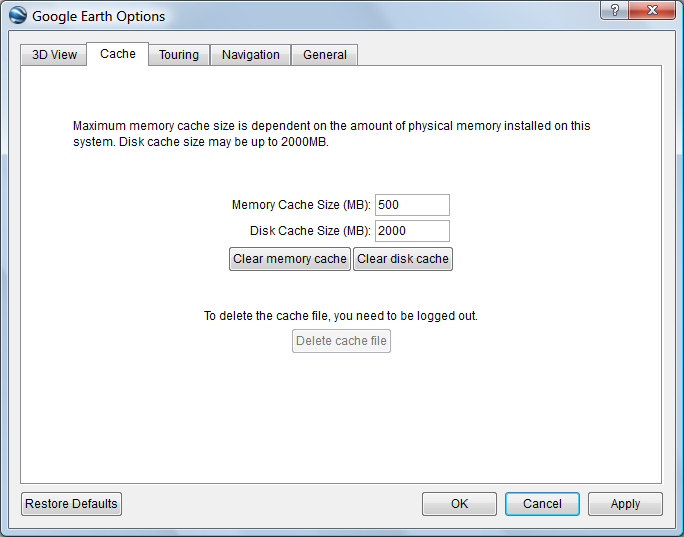
2. Go to Tools => Options, and select the Cache tab:

1-10-2009-1.09.26 PM

3. Click the “Clear disk cache” button to remove all data from the cache and cache index files. This maximizes the available amount of space for your cached data, so that you can cover more area with the cached data.

4. Set the Memory Cache Size to the minimum allowable value of 16MB; this will force Google Earth to put data in the disk cache more quickly. Click the “Clear memory cache” button, then exit the Options screen

5. In Google Earth, navigate to your area of interest.

6. Set your viewing altitude (the “Eye alt”) for the desired imagery resolution. Higher altitudes mean lower resolution, but the data will take up less space. Lower altitudes give you higher image resolution, but at the cost of more disk space. If there are major changes in elevation over the area, you may have to change your altitude to match them to keep your relative height; if the terrain elevation drops, but your “eye alt” stays the same, the image resolution will decrease because you are further away from the surface.

7. Wait for the “data loading” indicator at lower right to show that all the data for that area and resolution has been downloaded; it will display as a solid light-blue circle when downloading is complete for that area. You’ll also see the imagery change from blurry to sharp.

8. With the mouse or cursor keys, move the view to an adjacent area that overlaps the first area at least partially, and wait for the “data loading” indicator to show once again that all the data has been downloaded.

9. Repeat this process until you’ve covered your entire area of interest.

10. If want data at several different resolution levels, you could repeat steps 5-9, but at different viewing altitudes.

11. When you’re finished with steps 5-10, you might consider zooming all the way in to the closest level at one point, then all the way out to the planetary view level. It seems to me that this prompts Google Earth to write all of its data cached in RAM to the disk cache, but I could be wrong about this. It also seems as though there can be a time delay between viewing a location, and when it’s cached to disk, so waiting 10 minutes after you’ve finished covering the area of interest might be a good idea.

You now have a set of Google Earth data for that area saved in the disk cache. If you take your computer offline and start up Google Earth, it will tell you that it can’t log on to the server and download data, but it can still read in whatever data it has in the cache. You can copy this cached data (see this previous post for where to find it) into a different directory, and then copy it back into the cache directory when you need it, or even copy it to a different computer.

For small areas, manual caching of data won’t take too long, but for larger areas, manually scrolling to an area, waiting for the data to download, then scrolling to another area gets old very quickly. Fortunately, there are several free applications that can partially automate the process, and I’ll cover some of those in the next few posts.


Using The Google Earth Cache – Basics

When you view a location in Google Earth, it caches the imagery data (but not the elevation data), storing it locally so that as you scroll back and forth across different areas, it doesn’t have to download the same imagery over and over again from the server on the Internet. There are actually two sets of locally cached data:

Memory Cache: Data stored in system RAM. This information can be retrieved very quickly, but vanishes when you exit the application.

Disk Cache: Data stored on the hard drive, and which persists after program exit. So if you have data cached for a particular area in Google Earth, exit the program, and then return to the same area the next time you use Google Earth, GE will load the imagery information directly from the hard drive cache – a lot faster than having to download it again over the Internet.

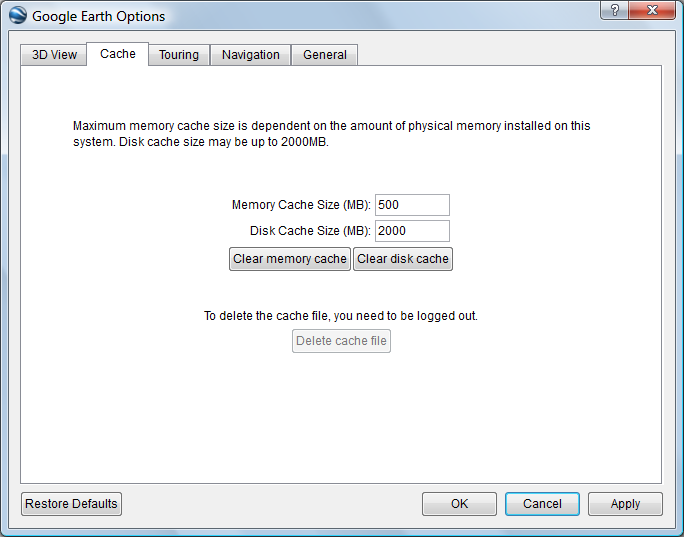
The size of these caches can be set in the Tools => Options section, under the Cache tab:

Google Earth cache options

The maximum values are the ones above, 500MB for memory cache, and 2GB (2000MB) for disk cache; apparently, Google doesn’t want people to download the entire imagery dataset for the whole planet to their systems :). If you’ve got the disk space, and most modern systems do, you should definitely set the disk cache size at this maximum value. Optimum value for the memory cache will depend on how much RAM you have installed on your system, and how much your OS uses. If you have a system with a relatively small amount of RAM (512 MB to 1 GB), making this memory cache too large might impede performance. On most modern systems, with 2GB or more of RAM, the maximum memory cache size of 500MB shouldn’t cause any problems.

Disk cache data is stored by default in the C:\Users\your_user_name\AppData\Local\Google\GoogleEarth directory in Windows Vista.If you can’t find it there, you can determine the actual location using the registry entry HKEY-CURRENT-User/Software/Google /Google Earth Plus, under the CachePath entry. There are two files: dbCache.dat which contains the actual data, and dbCache.dat.index, which presumably is the index file for the data. You can clear out all the disk cache data using the “Clear disk cache” button, which removes all the data but keeps the files there. To delete the files completely, you need to either log out of the server (File => Server Log Out) and then click the “Delete cache file” button you see above, or exit Google Earth and delete those two files directly from the cache directory. You can also copy them to another directory to hang on to them.

Why would you want to delete or copy these files? Two reasons:

1. If you’re having crashing or graphics issues with Google Earth, Google recommends deleting the disk cache files as one possible fix.

2. You can “pre-cache” a set of data for a particular area of interest, then copy them to a different directory on your hard drive. Then, when you want to look at this area in detail in Google Earth, you can copy these files back to the original directory, and Google Earth will access this data from the hard drive, a lot faster than downloading it again from the Google Earth server. If you have a decent Internet connection all the time, this is likely to be more trouble than it’s worth. But if you have a slow connection, this can speed things up enormously. And if you’d like to use Google Earth on your laptop, in a location that has no Internet connection, using cached data is your only option; Google Earth can access and use cached data when no Internet connection is present or available. You can copy this cache data from one computer to another as well.

Note: This only caches image  terrain data from Google Earth, not data from KML/KMZ files. If the KML/KMZ files are self-contained, you can load them into Google Earth and view the data, but if they’re network links, and you’re not connected to the network, the data in the links won’t show up.

Coming up next: how to cache Google Earth data manually.


Using Apple And Online Tools With Google Earth

I haven’t posted much about Apple-related geography tools on this blog, for two very good reasons:

1. I don’t own any Apple hardware (Mac, iPhone or iTouch)

2. There’s a lot less geographically-oriented software available for the Mac than there is for Windows, or even Linux

But Stefan Geens, who runs the Ogle Earth blog, does have a Mac and and iPhone, and posts regularly on geographic applications for those platforms, usually Google Earth related. And he’s just put up several posts (one, two, three) on how he used these tools along with Google Earth to document a trip in Egypt to visit a number of archaeological sites. The series is very much worth a look, even if you don’t use Apple products:

– The trip itself, and the locations documented, are incredibly interesting, especially if you’re into Egyptian archaeology. In particular, the cubic panoramas embedded in the file, using 360cities.net, are jaw-droppingly spectacular. Stefan documents his panorama-creation process here.

– A number of the tools used are online-based, so they’re not tied to Apple platforms and can be used by anyone

– Valery Hronusov posted a few days ago on his blog about using the DropBox service (free for up to 2 GB of data) to sync a KMZ file on your desktop to your DropBox account, and then create a publicly-accessible URL link to this file that anyone can access. Stefan created such a link to his Egyptian travelogue, demonstrating how you can now have an Internet-accessible KMZ link that updates automatically whenever you change the matching file on your desktop; no FTP or other file upload process required. KMZ is a better choice than KML for most cases, since it compresses the file and also incorporates all of the supporting materials (like photographs).

– Stefan also uses the caching capability of Google Earth on the iPhone, storing GE data for the locations he was going to visit using a WiFi link for use when he couldn’t get a good connection, or when it would have been expensive to do so. This is a good technique to use with Windows laptops as well, if you’d like to use Google Earth in a location where an Internet connection is either unavailable or expensive. I’ve been meaning to do short series on this for a while, and this is as good a prompt as any, so the rest of this week’s posts will be on using Google Earth’s caching capability on a Windows system.


Battle KML Time Animations For Google Earth

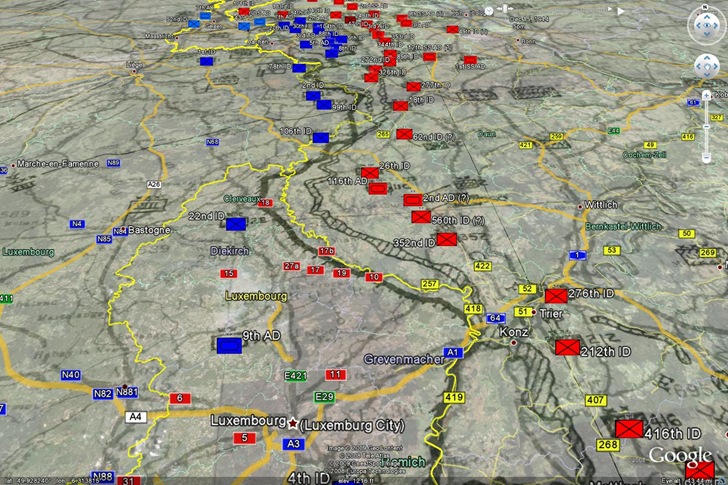
Professor Peter Guth of the US Naval Academy, author of the first-rate terrain analysis and GIS program MicroDEM, writes to let me know that the final projects of one of his classes are available online. Among the projects are KML files for a number of historic battles, including time animations for Antietam, the Battle Of The Bulge, and Dien Bien Phu. These combine both actual historical situation maps as image overlays, and placemarks for unit positions:

Battle Of The Bulge in Google Earth

While you can click the “Play” button on the time animation control, I find it easier to follow the animation by manually moving the time slider over from left to right to follow the progress of the battle.