When you view a location in Google Earth, it caches the imagery data (but not the elevation data), storing it locally so that as you scroll back and forth across different areas, it doesn’t have to download the same imagery over and over again from the server on the Internet. There are actually two sets of locally cached data:
Memory Cache: Data stored in system RAM. This information can be retrieved very quickly, but vanishes when you exit the application.
Disk Cache: Data stored on the hard drive, and which persists after program exit. So if you have data cached for a particular area in Google Earth, exit the program, and then return to the same area the next time you use Google Earth, GE will load the imagery information directly from the hard drive cache – a lot faster than having to download it again over the Internet.
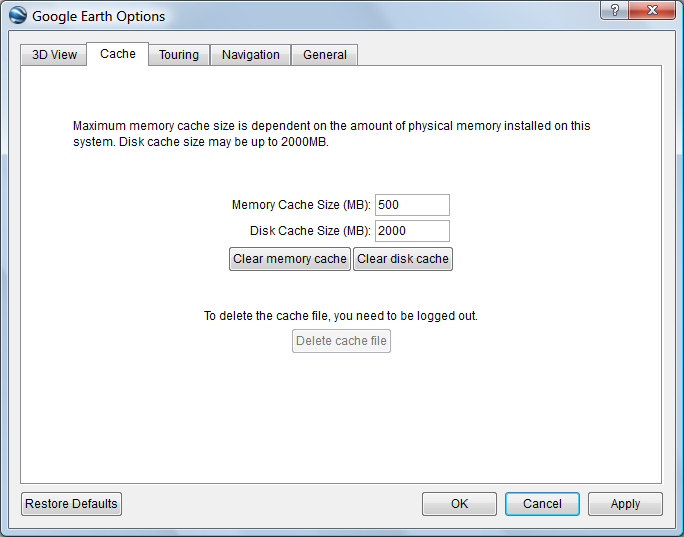
The size of these caches can be set in the Tools => Options section, under the Cache tab:

The maximum values are the ones above, 500MB for memory cache, and 2GB (2000MB) for disk cache; apparently, Google doesn’t want people to download the entire imagery dataset for the whole planet to their systems :). If you’ve got the disk space, and most modern systems do, you should definitely set the disk cache size at this maximum value. Optimum value for the memory cache will depend on how much RAM you have installed on your system, and how much your OS uses. If you have a system with a relatively small amount of RAM (512 MB to 1 GB), making this memory cache too large might impede performance. On most modern systems, with 2GB or more of RAM, the maximum memory cache size of 500MB shouldn’t cause any problems.
Disk cache data is stored by default in the C:\Users\your_user_name\AppData\Local\Google\GoogleEarth directory in Windows Vista.If you can’t find it there, you can determine the actual location using the registry entry HKEY-CURRENT-User/Software/Google /Google Earth Plus, under the CachePath entry. There are two files: dbCache.dat which contains the actual data, and dbCache.dat.index, which presumably is the index file for the data. You can clear out all the disk cache data using the “Clear disk cache” button, which removes all the data but keeps the files there. To delete the files completely, you need to either log out of the server (File => Server Log Out) and then click the “Delete cache file” button you see above, or exit Google Earth and delete those two files directly from the cache directory. You can also copy them to another directory to hang on to them.
Why would you want to delete or copy these files? Two reasons:
1. If you’re having crashing or graphics issues with Google Earth, Google recommends deleting the disk cache files as one possible fix.
2. You can “pre-cache” a set of data for a particular area of interest, then copy them to a different directory on your hard drive. Then, when you want to look at this area in detail in Google Earth, you can copy these files back to the original directory, and Google Earth will access this data from the hard drive, a lot faster than downloading it again from the Google Earth server. If you have a decent Internet connection all the time, this is likely to be more trouble than it’s worth. But if you have a slow connection, this can speed things up enormously. And if you’d like to use Google Earth on your laptop, in a location that has no Internet connection, using cached data is your only option; Google Earth can access and use cached data when no Internet connection is present or available. You can copy this cache data from one computer to another as well.
Note: This only caches image terrain data from Google Earth, not data from KML/KMZ files. If the KML/KMZ files are self-contained, you can load them into Google Earth and view the data, but if they’re network links, and you’re not connected to the network, the data in the links won’t show up.
Coming up next: how to cache Google Earth data manually.
Good One!! Thank you!!
great article and thank you for this
ah yes i love this site thank you again ga
bye
is it possible to increase Disk Cache size?
This, and the guides on using the auto caching software have been absolutely invaluable to me in the last couple of weeks.
Thanks heaps for a brilliant guide.