USAPhotoMaps has built-in GPS interface capabilities for Garmin GPS units; it also supports the general NMEA GPS interface for other units. While there are a lot of GPS functions, they’re a mixed bag. Waypoint creation, export, and import on the fly are pretty easy (with some minor quirks), and USAPhotoMaps is my program of choice for quickly creating waypoints on a topo map or aerial imagery and then exporting them to my GPS unit. Saving and manipulating waypoint data is more problematical, and dealing with routes and tracks is a major headache. It seems as though some of these features were bolted on rather than integrated with the main program in a logical fashion. My experiences were with a Garmin GPS (60Cx); YMMV.
Archive for the 'GPX' Category Page 4 of 5
The last photo geotagging application I’ll cover for now is GPicSync, freeware from Francois Schnell. This application doesn’t have as fancy an interface as PhotoMapper, locr or Location Stamper, but it has some useful, and unique, features:
- It just works, cleanly and neatly. Set the locations for picture folder and the GPS file (GPX or NMEA), set the correct time offset between local time and UTC (aka GMT), and click the Synchronize button to geotag the photos.
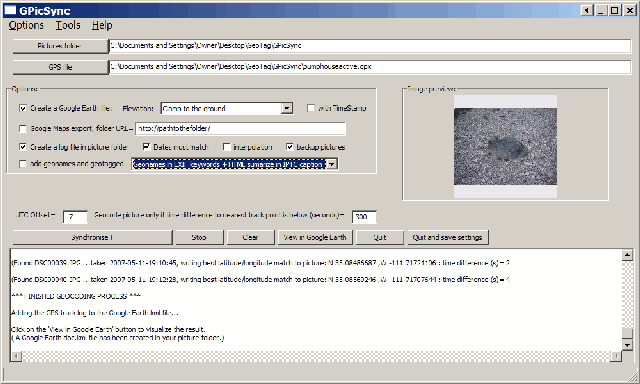
- Pictures geotagged by GPicSync are recognized by Picasa right away; no need to re-process them with EXIFTool.
- You can create a Google Earth/Google Maps KML thumbnails file at the same time you’re geotagging the photos. You can also associate audio and video files with the pictures, so that GPicSync will create links in the Google Earth / Google Maps files that link to the audio/video.
- Handy tools include an EXIF reader, a utility that lets you manually embed geographic location into the EXIF header, a GPX file reader, and KMZ file generator to create a Google Earth file with the photo thumbnails embedded in it (unlike the KML file).
- And there’s a newsgroup where you can interact directly with the program author, report bugs, and suggest new features.
Thanks, Francois!
5/2/2009: Apparently no longer available. Check out Microsoft’s new geotagging program, or the geotagging category at right for more option
A few years ago, Microsoft was promoting something called the World Wide Media Exchange, WMMX for short, a centralized index of photos tagged by geographic location – sort of a proto-Flickr. It got a bit of press, but seems to have faded into obscurity. But it’s left behind a few useful utilities, including a nice, simple photo geotagging utility called Location Stamper.
You can download WMMX Location Stamper from this link. Note that while you need to have Microsoft .NET 1.1 or higher installed, you probably already have that on our system. You don’t need the WMMX Client Application at all unless you want it – it’s the program that lets you upload and browse photos in the WMMX index, and create photo slideshows, but isn’t required for the Location Stamper or any of the other utilities on this page. Install Location Stamper, then run it.
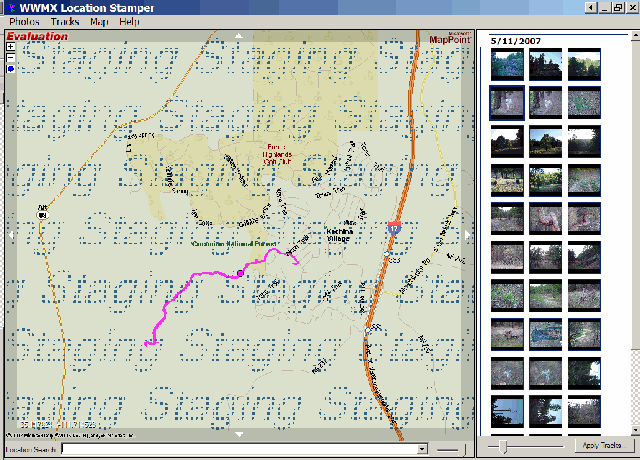
Not a lot of options, but it doesn’t need many. Add photos to be geotagged using the Photos => Add Photos menu, and they’ll show up as thumbnails on the right. Add your GPX track with the Tracks => Add Tracks menu, and the track will be loaded into the map window at left, along with an antique Microsoft MapPoint map for the area (it would be nice if they would update this with Virtual Earth, but I wouldn’t hold my breath). Click on the “Apply Tracks” button in the lower right, and the location/time data from the GPX track will be matched with the timestamp on the photo to geotag it. Select a photo that’s been geotagged, and a circle will appear on the track in the map window to show its location.
You can also geotag photos by zooming in to a location in the map window (click on the blue globe in the upper left to bring up a map if nothing is showing, or enter a location in the search box at the bottom), and then dragging a photo to a location on the map. But the map quality is so poor, it isn’t all that useful an option here – you’d be better off using Picasa with Google Earth for this kind of tagging.
Photos geotagged by Location Stamper appear to have fully-legitimate EXIF geographic tags, but as with locr, Picasa doesn’t seem to be able to recognize those tags. But EXIFTool, along with my utility, can modify the header so that Picasa does recognize the geotags.
As long as you’re checking out WMMX Location Stamper, you might take a look at some of the other utilities you can download from the WMMX page. The WMMX Travelogue Authoring Tool lets you create a geographic web page with your geotagged photos, maps, text and GPX tracks. If you download and install the full WMMX Client, you can create photo slideshows with maps and pop-ups that can be converted into files for viewing with the stand-alone WMMX Story Viewer.
AnyGeo and OgleEarth both post today on TakItWithMe, a new free web service that lets you upload Google Maps MyMaps KML data directly from your browser to a GPS unit. It’s limited now to Garmin units, since it relies on the Garmin Communicator plugin. And while the device support page indicates that some serial interface GPS receivers will work, Garmin says that it works best with USB devices, and doesn’t promise good serial support.
For other GPS manufacturers, and for KML files created in Google Earth or by some other means on your local computer, I’ve posted before about a number of free ways to upload KML file data into a GPS unit:
Exporting Data From Google Earth To A GPS Unit
Using GPS Utility To Import/Export GPS Data To/From Google Earth
GPS Trackmaker: A Better Solution For GPS Export/Import With Google Earth
There’s another way for Garmin units, but I’m waiting until it’s out of beta to post on it ….
Addendum: Google Earth Blog points out that TakItWithMe can also convert KML files to GPX format, so that you can upload them to a non-Garmin GPS using any program that accepts GPX, like EasyGPS or GPS Trackmaker.
Locr is a web album site oriented around geographic location, where you can upload geotagged photos, share them, and have them display in an album or on a map interface. Basic accounts are free, and while I assume that premium accounts will be available for a price at some point, I can’t seem to find any mention of that on the site. Geotagging can be done with separate software called “locr GPS Photo”; the software is free, and available for download even without registering for the site. Make sure you download the PDF manual as well, as you’ll probably need it. You can either manually geotag a photo using a Google Maps interface, or use GPS data to assign geotags. Here’s the basic interface:

The software does work, but it’s not without quirks, particularly for automatic geotagging with GPS data.
1. One of the biggest pains of locr is that it doesn’t accept standard GPX files for geotagging – it requires nmea files. You can convert GPX to nmea using GPSBabel, and the following procedure from the help file:
Converting gpx file into nmea format
- Double-click the “GPSBabelGUI.exe” file to start GPSBabel.
- In the GPSBabel window select the “Format” of the input file: “GPX XML”.
- Click the “Start the file open dialog” button and select the respective folder and input file.
- As “Output Format” select “NMEA 0183 sentences”.
- Click the “Start the file save dialog” button to determine the output folder. Enter the file name. Do not forget the “.nmea” file extension!
- In the menu click “Options” and select the “Filter” command (or click the “Filter” button).
- In the “Filter” window activate the “GPS fixes” check box and select “pps” as option. Click “OK”.
- Then click the “Let´s go” button.
The gpx file will be saved in the nmea format, which then can be opened in the GPS Photo software.
Make sure you have the latest version of GPSBabel and the GPSBabelGUI. And be prepared for problems. In particular, if any of your GPX trackpoints don’t have a timestamp, GPSBabel won’t be able to create the nmea file, and will generate an error message. You’ll have to open the GPX file in a text editor, manually delete the trackpoints with no timestamp, then save the file as a new GPX file before using GPSBabel to convert it to the nmea format. Hopefully, locr will recognize the need to accept the standard GPX format in their program, and add it as an option sometime soon.
2. Sometimes, it won’t tag a photo in a series; if that happens, click on the “Clear EXIF location tags”, and that may be enough to get it to work.
3. The geographic location is written in the EXIF tag, but some programs (like Picasa) can’t read EXIF tags modified by locr. 9/3/08: I’ve heard this is no longer an issue. The problem apparently results from a problem that Picasa has reading the GPSVersionTag created by locr. There’s a fix for this: download EXIFTool, a free command-line utility for EXIF tags, re-name the executable file to exiftool.exe, copy it to the directory with the photos in it, and from the command line execute the following command:
exiftool -GPSVersionID=0.0.2.2 -overwrite_original *.jpg
This will re-write the GPSVersionID tag to one that Picasa recognizes, and Picasa will then pick up the geotagging information in those photos.
Addendum: Check this follow-up post for a GUI for EXIFTool.
On the plus side, manual photo geotagging is fairly painless – zoom in to the area in a Google Maps interface, select the photo, and click on the “Manual geotagging” button to tag it. You can also enter an address into a search box, and have that be automatically geocoded for you. You can then move the marker manually after the initial tagging to fine-tune its position. Select a group of photos that have been geotagged, and click on the “Show photos on map” button, and their positions will be indicated on the Google Map. You can also select a set of photos, and create a KML file of thumbnails for display in Google Earth with the push of a button.
If locr would accept GPX files, not have the occasional tagging glitch, and write the GPSVersionID tag properly, it would be pretty awesome. Even with those faults, though, locr is still pretty good, especially at the price.
Ogle Earth posts about ITNConv, a program that converts from one GPS format to another. It opens:
– Autoroute Express (.axe, .axg)
– Streets & Trips (.est)
– MapPoint (.ptm)
– MapSource (.gdb, .mps)
– TomTom 3, 5 & 6, Go, Rider, One (.itn, .ov2)
– Navigon MN|4, MN|5 & MN|6 (.rte)
– Destinator PN (.dat)
– Marco Polo, Falk Navigator, Motorrad Tourenplaner & OnRoute (.bcr)
– GPS eXchange (.gpx)
– GPX MapSource (.gpx)
– Garmin PCX5 (CartoExploreur) (.rte)
– Magellan SD (Meridian et eXplorist) (.rte, .upt)
– ViaMichelin (.xvm)
– IGN Rando (.rdn)
– OziExplorer (.rte)
– OziExplorer CE (.rt2)
– Google Earth (.kml)
– CSV (Longitude,Latitude,Comments)
And writes in:
– Autoroute Express (.axe) (Version 2004 and higher)
– TomTom 3, 5 & 6, Go, Rider, One (.itn)
– Navigon MN|4, MN|5 & MN|6 (.rte)
– Destinator PN (.dat)
– Marco Polo, Falk Navigator, Motorrad Tourenplaner & OnRoute (.bcr)
– GPS eXchange (.gpx)
– GPX MapSource (.gpx)
– Garmin PCX5 (CartoExploreur) (.rte)
– Magellan SD (Meridian et eXplorist) (.rte)
– ViaMichelin (.xvm)
– IGN Rando (.rdn)
– OziExplorer (.rte)
– OziExplorer CE (.rt2)
– XML Location (.loc)
– Google Earth (.kml)
– CSV (Longitude,Latitude,Comments)
Not as many as GPSBabel, but it does a few that GPSBabel doesn’t, and the interface is a bit easier to handle:

It’s very much point-oriented, though. If you convert a GPX file with several tracks into a KML file, it will connect the endpoints of successive tracks to create one single, long track. Similarly, if you convert a set of waypoints into KML, it will connect all the points sequentially into a single long track (but you can always turn the track off in Google Earth, or delete it entirely). GPSBabel handles tracks better.
One nice touch is the built-in editor that loads the points into a Google Maps interface, where you can re-label them, move them around, add or delete points, search, find get directions, etc.. You can even create a set of points, and then save them in one of the supported formats:

Note: The website is in French, but the program itself is in English. Look for the download at the left under “Telechargement”, or at the bottom labeled “Télécharger la version Windows“.
There are a fair number of programs that not only embed geographic data from a GPS file into a photo’s EXIF header, but also have a host of other features as well. While I’ll be posting about some of those shortly, I thought I’d start out with two more modest programs that don’t do much more than geotag the photos.
More after the fold …
Continue reading ‘GPS Photo GeoTagging I – Two Simple Solutions’
Using Picasa, PicasaWeb or iTag to geotag your photos through Google Earth (or Google Maps) is fine for the occasional photo, or for photos from the past where you don’t have specific location data, i.e. latitude and longitude. But if you’re going to be geotagging a lot of photos in the future, doing it manually will turn into a chore very quickly. There’s a way to simplify that task: Take location data from a GPS unit, and then embed it into your photo’s EXIF header or IPTC tags with software that automates the process. There are a lot of free and cheap programs that let you do that, and I’ll be covering many of the Windows options in upcoming posts. First, though, I want to go over some of the basics of equipment and data.
Equipment: Some day, most cameras may come with GPS capabilities built-in, so that they can automatically geotag your photos as you take them. But I’ve heard of only two cameras with built-in GPS released to date: the Navman iCN750 (discontinued), and the Ricoh Pro G3 GPS Camera, a two-year-old 3-megapixel model. So for now, the only reasonable choice is to use a handheld GPS receiver that can log your position continuously as a function of time, save that data, and then upload it to your computer (typically in GPX format).
Most handheld GPS units can do all of this, with the cheapest units running less than a hundred dollars. If you don’t need a large, handheld GPS receiver with all its features (data screen, input, maps, etc.), another option is to buy a simple GPS datalogger, like the Sony GPSCS1KA or Sony GPS-CS1 units. Both Sony units are described as being specifically designed for digital camera use, but any GPS datalogger capable of saving data in GPX format will work just as well (do a Google search for GPS data logger). You won’t save that much money buying a datalogger instead of a basic handheld GPS unit, but they are often much smaller in size and weight, and can have longer battery lives and store more data than handheld units.
Data: You need to have both position and time data stored by the GPS units in order to geotag the photos,. The position data is obviously needed for the geotagging, but the time data plays a critical part as well. The software programs that I’ll be posting about match up the time you take your photo with the location the GPS data says you were at for that time, and then embed that time-specific location data in the photographs. Dataloggers will normally save both the location and time together automatically, but handheld GPS units may require you to specify that both time and position data be recorded in a GPS tracklog. Handheld units often let you specify whether your position is recorded continuously based on distance, time, or some combination of the two.
There’s another catch: some GPS units (like my Garmin) strip out the time data if you save the track in a separate tracklog, separate from the active track. So if you save a track in these units, make sure you don’t clear out the active track as well, or else you’ll have no way to synchronize your position with the time you took a photo. Found this out rather annoyingly after having taken a whole bunch of photos, saving the track, and then discovering that all the time data was gone. The newer Garmin x-series models let you log time and position data continuously to a GPX file on their microSD memory cards, bypassing the need to manage track data completely (and letting you record literally months worth of position and time data on a single microSD card).
You should also check to make sure that your camera is set to the same time as your GPS unit; if the camera’s time is off, or in a different time zone, that can complicate the process of matching up the GPS track time with the time the photo was taken. Many programs come with the ability to adjust for such a time difference, but it will make life a lot easier if you make sure they’re in time synch right from the start. GPS track times are recorded in UTC (aka Greenwich Mean Time), and while most programs can correct for the difference, some have problems with that correction.
Uploading the data to your computer from your GPS is usually straightforward; if the software that came with your GPS can’t take track data and save it in GPX format, a free program like EasyGPS or GPS TrackMaker does a great job.
Summing up: to automate geotagging your photos with GPS, you’ll need a GPS receiver that can log both your position and time on a continuous basis, and then upload the data to your computer in GPX format, where it can be synchronized with your photos based on time.