blankblank blank


Archive for the 'GPS' Category Page 10 of 25


Viewing And Analyzing NMEA GPS Data With VisualGPS

If you own an NMEA-capable GPS receiver, there are a substantial number of programs available for free that can monitor and display NMEA data. But my current program of choice is VisualGPS, because in addition to several commonly-found functions, it has one potentially very useful function that I haven’t found in any other similar program. Note: A version of VisualGPS with similar functionality is also available for Windows CE/Mobile devices.

After you’ve installed the Visual GPS program, started it up, and configured it to connect to your NMEA COM port (perhaps the one defined by XPort, described in yesterday’s post), you’ll have access to five function panels from the toolbar:

VGToolbar

From left to right:

Continue reading ‘Viewing And Analyzing NMEA GPS Data With VisualGPS’


Splitting A Single NMEA Serial GPS Connection Into Multiple Virtual NMEA Ports

If you have a GPS connected to your computer with a serial NMEA connection, either old-school (a hardwired serial port) or new-school (a wireless Bluetooth connection), the connection to the program you’re using to monitor the data is typically made through a single serial Windows COM port. Normally, if one program is accessing the NMEA data stream through this COM port, no other program can access that port at the same time; you’ll get an error message saying something like “Unable to open port” or “ “Port is already in use”. Which is a pain if you want to run multiple applications at the same time, and have each one receive the same GPS data. You could have multiple GPS receivers, each with its own COM port, but that can get expensive.

The donationware program XPort takes the input data from a single serial COM port, the one your NMEA GPS data is coming through, and lets you split the serial data stream between up to 8 user-designated COM ports. You can then have each application access a different COM port, so that at least  8 applications can receive, store, display, analyze, etc. the NMEA GPS data stream. And as it turns out, maybe even more than eight apps …

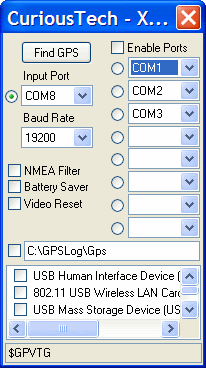
No installation required; just run the executable, and the program both puts an icon in the traybar, and opens up the program window:

XPort

Here, I’ve already configured the program to connect to my Bluetooth GPS on COM port 8, and with my auto-connect feature enabled, it started up the Bluetooth connection to the GPS receiver automatically. If you don’t have this capability, you may have to manually establish the Bluetooth link between your GPS receiver and its assigned COM port, which can be a real pain (more below). The default serial speed for NMEA is 4800 baud, but I’ve found that sometimes setting it higher (19200 in this case) can improve reliability; other times, it has to be set at 4800 or it won’t work. In this case, clicking on the “Enable Ports” button starts splitting the COM8 input between COM ports 1, 2, and 3. You can select any COM port numbers unassigned by your system from COM1 to COM255, but some applications only let you choose from a limited set of preset COM port numbers.

It’s probably safest to connect each program you have running to a separate COM port. By accident, though, I discovered that at least under some circumstances, you can have more than one program accessing a single COM port. Unlike system COM ports, XPort won’t block access to a COM port already opened by another program. For example, I’ve had as many as 5 programs accessing data through the COM2 port with no apparent problems. Not sure what the limitations are on this, and it’s probably best to have each program have its own unique COM port. But if you ever have to run more than 8 programs that require GPS data, it may be possible just by having two programs share the same COM port for data.

For the checkboxes:

  • NMEA Filter: Filters noise and unneeded data. Haven’t seen this making a difference with my receiver.
  • Battery Saver: Keeps the hardware serial port closed until you enable the virtual ports. If you have a Bluetooth GPS receiver, this may save on battery use by keeping the Bluetooth connection off until absolutely necessary.
  • Video Reset: Turns the display off and on to keep the monitor from going into blanking/power-saving mode

The tray icon also changes color depending on the status of the GPS connection:

  • Black=Not Connected
  • Cyan=Connected-No data
  • Red=Connected/No Fix
  • Yellow=2D Fix
  • Green=3D Fix

The download page has additional technical data.

If you have a Garmin GPS unit that connects to a computer only via USB, it uses a proprietary Garmin protocol that is not NMEA-compatible. For those units, you might want to consider the paid utility program GPSGate from Franson. Note: Haven’t tried it myself, but have heard from others who swear by it. For $12.95, the express version converts the USB Garmin protocol into one or two virtual NMEA ports; the more expensive standard version lets you add even more virtual ports. Other functions include a Google Earth GPS connection interface, a conversion of NMEA serial data to the Garmin proprietary serial protocol, and a direct connection function to Bluetooth GPS devices to simplify the task of establishing a link between your computer and the Bluetooth GPS receiver. In my case, I struggled unsuccessfully for a while to get the standard Windows XP Bluetooth interface to work correctly with my Bluetooth GPS receiver before giving up and using the BlueSoleil Bluetooth manager that came with my Bluetooth dongle; if you run into similar problems with your system, GPSGate might be able to help.


Curing Garmin Blue Flag Waypoint Disease

I’ve been asked this question twice already, which is good enough for me to write a post about it. If you use any of the color Garmin eTrex or GPSMap series, you’ll quickly discover that the default waypoint symbol, a blue flag, is pretty useless. It takes up a huge amount of screen space, and if you have multiple waypoints spaced closely together, it can become impossible to differentiate them. This is especially when the display is zoomed out to a lower scale:
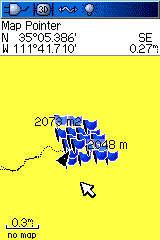
blueflagdisease

There are a number of ways to deal with this problem.

1. Set the waypoints zoom level so that they don’t appear until you’ve zoom in.

The default setting for waypoints to display is Auto, which usually means that they’ll show up at virtually every zoom level. But you can set a specific zoom level so that waypoints don’t appear until you reach that zoom. From Setup Map – Points:
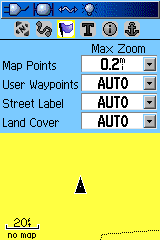
autowaypoints

Change the User Waypoints setting to the desired zoom level at which waypoints will first appear. E.g., the 800-ft. zoom:
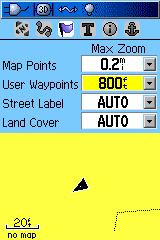
800ftzoom

Since you’re zoomed in closer to the waypoints when they show up, they’ll be spaced more widely. But if you actually want them visible when zoomed out to a lower scale, you’ll need to do something else.

2. Change the default waypoint symbol on the Garmin unit to something smaller.

When you create a new waypoint on your Garmin, the waypoint icon used is the same as the last one used. If you’ve never changed the waypoint icon, that will be a blue flag. You can change the waypoint icon in the waypoint creation screen by moving the yellow highlight box using the arrow keys:
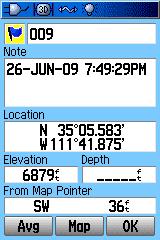
waypointhighlight

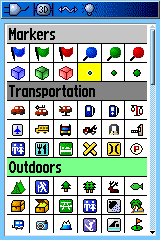
Then press Enter, and choose a smaller icon:
smallicon

I like the small green dot because it takes up far less display space than just about any other symbol. But you can choose any icon you want; or see my series on creating custom Garmin waypoint symbols if you want to design your own. Once you’ve selected a new waypoint symbol, it will be used for all subsequent waypoints you create on your Garmin.

3. Use MapSource to modify the waypoint icons.

Unfortunately, there’s no way on your Garmin GPS unit to bulk convert waypoint icon symbols created on your Garmin; you have to edit them on the unit one at a time. But if Garmin’s MapSource program (aka Trip and Waypoint Manager) came with your GPS or with a mapset you’ve purchased, you can easily do a symbol conversion, either one at a time or in bulk.

a. Use MapSource to download the waypoints from your GPS.

b. Click on the Waypoints tab to bring up a list of waypoints
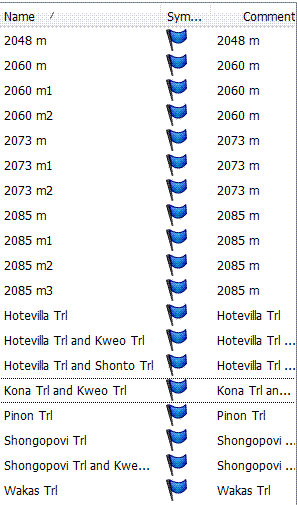
Waypoint list

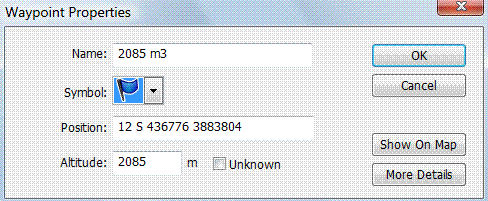
c. To change the icon for a single waypoint, right-click on the waypoint in the list and choose Waypoint properties; or, from the map, right-click on a waypoint and choose Waypoint Properties. This brings up a dialog box with a icon symbol selection drop-down:
waypointproperties

d. To change the symbol for multiple waypoints, Ctrl-click on them in the Waypoint list; to select all the waypoints, click in the Waypoint list and then press Ctrl-A. Then right-click on any selected waypoint, and choose a symbol; your choice will be applied to all the waypoints. You can then save these waypoints in a file, or export them directly back to your GPS. For the latter, you might want first to delete the old waypoints with the undesired symbol; Garmin unit give you the option in the Waypoints listing screen to delete all waypoints that share the same symbol.

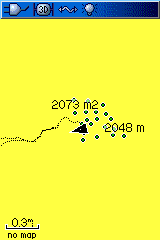
Having done this with the waypoints in the first image, converting them to green dots:
greendots

You can now differentiate different waypoints, where before they were a mass of indistinguishable blue flags.

This is also a useful technique to use when creating waypoints in a program that doesn’t support Garmin waypoint icons directly, like USAPhotoMaps; loading waypoints directly from a program like this into a Garmin GPS may result in Blue Flag Disease. Create the waypoints in this program, then save them as a GPX file and load them into MapSource. You can then use the above process to select your desired waypoint icons, and load them into the GPS.

4. Use GPS TrackMaker to modity the waypoint icons

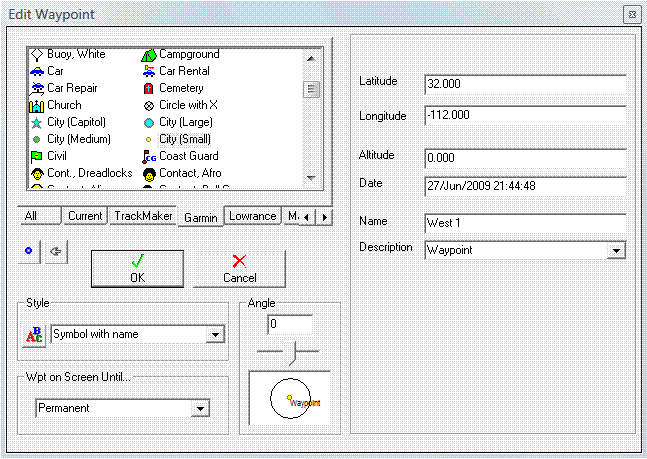
If you don’t own MapSource, you can use the free program GPS Trackmaker to import waypoints from a Garmin, or from a GPX file, and then modify they waypoint icons. One at a time is easy – with the cursor in “Select data” mode (white arrow), move the cursor to near the waypoint until a black circle appears. Right-click on that black circle to bring up the Edit Waypoint window:
gpstm edit

Click on the Garmin tab to see only Garmin-compatible symbols, then choose a new symbol from the icons visible in the window. You can then upload the icons directly to your Garmin from the GPS menu, or save them as a GPX file.

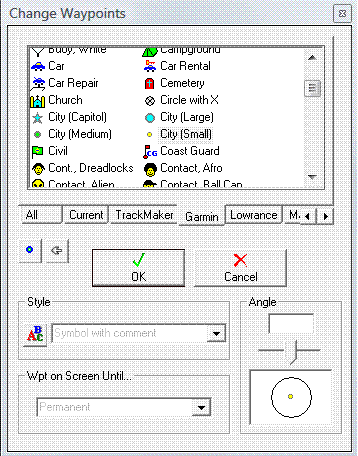
Bulk conversion is also pretty easy. Use the Select data cursor to select all of the waypoints you want to change (click-and-drag to select a rectangular box). From the menu at top, select Tools => Waypoints =>  Change Selected Wpts … . A window similar to the one above will come up:
gpstm bulk

As before, choose the Garmin tab, then select the icon you want to use. Save it as a GPX file, or upload directly to your Garmin.


Automating Your Garmin Oregon Photo Geotagging Flow Using GeoHarvest

There are a number of stand-alone Windows apps and web apps that led you geotag photos by matching the time they were taken with points on a GPS track (see the geotagging category of this blog for examples). But all of them require you to start up the program, load in the photos, load in the GPS track, and then start up the geotagging process. Flip Fahrenfort geotags a lot of his photos, and got tired of the multiple steps involved. So he wrote GeoHarvest, a program that automates the process to a large degree for owners of Oregon Garmin GPS units. When a memory card or camera is attached to your computer, it can automatically download a copy of digital photos from a memory card/camera to a folder of your choice, and keeps track of the photo filenames. When you connect a GPS, it will download track data and save it in GPX format. It then matches up the track times with the times the photos were taken, and geotags the photos with the appropriate coordinates.

The program can run continuously on your system, monitoring for all inserted memory cards or attached cameras with images to download, or GPS units with tracks to download as well. But if you want it to run this way, you’ll have to copy a shortcut to the program to your Startup folder manually, since the program doesn’t come with an install program that does that. It also can run in single-transfer mode, so that you can connect the data sources, have the photos geotagged automatically, then have the program terminate.

Unfortunately, since I don’t own a Garmin Oregon unit, I was unable to figure out how well it works with that unit. And while the program option suggest that you should be able to get the program to work with other GPS models with some manual work, I was repeatedly unsuccessful at this – GeoHarvest refused to accept GPX files generated by multiple programs. There are online help pages on program configuration and usage; if you can get it to work with your non-Oregon GPS, please leave a comment below.


LandSerf – Google Earth And GPS Functions

In previous posts, I reviewed LandSerf’s raster terrain analysis functions and vector functions. Today I’ll wrap up with a short review of LandSerf’s Google Earth and GPS functions.

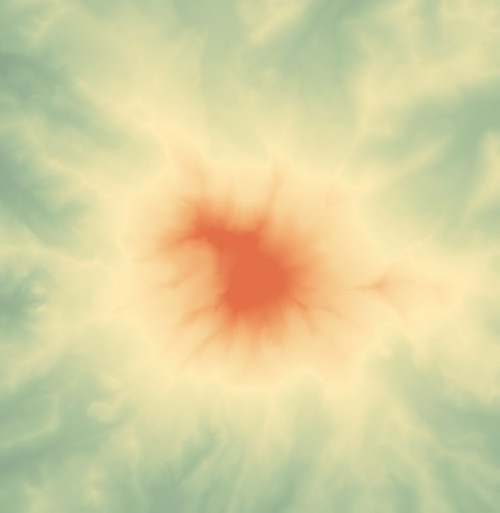
Google Earth: The most notable Google Earth functionality is the ability to export vector data, either imported or generated by the program, into KML vector files. So I can open a DEM, like the sample one of Mt. Rainier included with the program:

lsdem

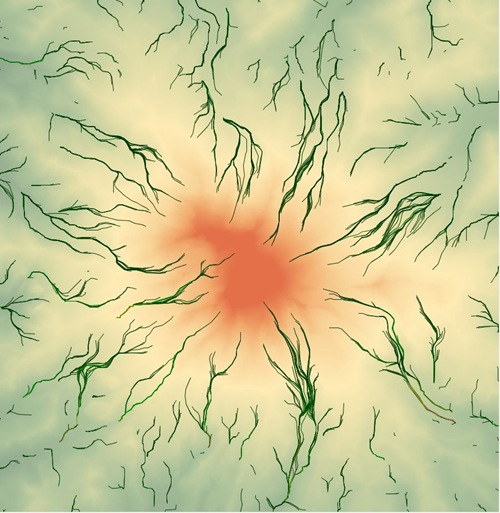
Generate a set of flow vectors for the DEM:

flowvectors

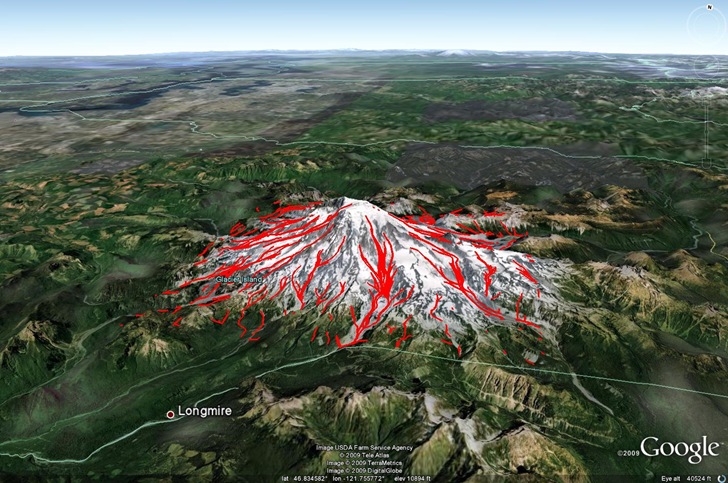
And then export the vector data as a KML file:

rainier

You could do something similar with a shapefile opened in LandSerf, but just be sure the shapefile is in NAD83 or WGS84. As I mention in the post on LandSerf vector functions, LandSerf has problems re-projecting from one datum to a significantly different second datum, and Google Earth data needs to be in WGS84 (NAD83 is almost the same). A search for “KML shapefile” on this blog will bring up a number of other programs that do a better job of converting shapefiles to KML, including preserving attribute data, which LandSerf doesn’t. But all of those are Windows-based; LandSerf runs on Macintosh and Linux, so it might be a useful option for those OSes.

Note: You should save vector data as a KML file; the KMZ file format is supposedly reserved for saving raster data as Google Earth image overlays, but I’ve been unsuccessful in getting that to work.

GPS: The list of useful GPS functions in LandSerf is a bit longer:

  • Convert loaded shapefiles or other vector data to GPX format (data must be in WGS84/NAD83 datum)
  • Load a GPX file as vector data, then save it in any of the vector formats LandSerf supports
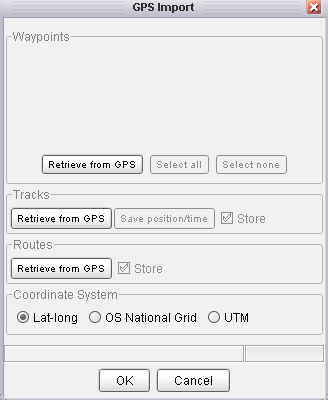
  • Interface directly with a GPS. You’ll need to have the GPS connected to your computer and turned on before starting up LandSerf. To establish a connection to the GPS, use Configure=>GPS and scan for a connected unit. Once you do this, you can import waypoint data using the File=>Import from GPS function. While the dialog box gives you the option to import waypoints, tracks and routes:

gpsimport

I’ve had difficulty getting tracks to import successfully – the program just shuts down on me. This may just be an issue with my model GPS (Garmin 60Cx); f you have better luck, let me know. You can import the data in the default lat/long coordinate system. or re-project it on import to OSNG or UTM. Once there, you can export it in GPX, shapefile or other vector format.

  • You can also export point data (no lines or polygons) directly from LandSerf to a connected GPS as waypoints.

If you can get track data to import successfully from your GPS to LandSerf, which I couldn’t, there are several other functions that might prove useful:

  • On importing the data, you have the option of saving all the track data in spreadsheet format with position, elevation and time
  • As with other vector data, if you have a digital elevation model loaded in the program, you can get a elevation profile plot; see this previous LandSerf post for more info
  • If you have a GPS track that is broken into .segments because you lost the GPS signal, LandSerf has the ability to join all of the line segments into a single line, which you can then save as a GPX track file, using the Edit => Join vector lines function. AFAIK, it’s the only free program that can do this.

As with the Google Earth functions, there are other programs that can do most of this in Windows, but far fewer free options in Macintosh and Linux.


Online GPS Format Conversion And Track Creation With GPSies

GPSies is a site whose primary function seems to be as a social site where you can upload tracks of your travels, and have them posted on a map to keep track of them or share them with others. Tracks can be uploaded from standard formats like GPX or KML, directly from Garmin GPS using the Garmin Communicator plugin, or from the iPhone using their free app. This social aspect isn’t something I’m all that interested in doing, so those features are wasted on me. But the site has two tools that GPS users will find useful:

Continue reading ‘Online GPS Format Conversion And Track Creation With GPSies’


Garmin BaseCamp Released

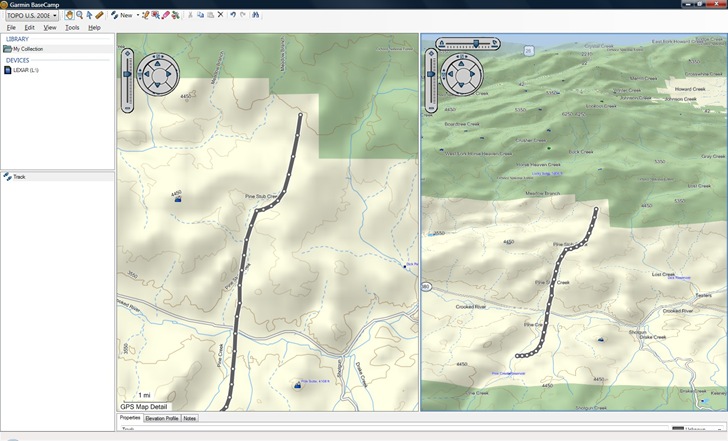
If you own a Garmin mapset that includes DEM data, like their 1:24K topographic mapsets or Topo US 2008, you might want to download and take a look at Garmin’s new free 3D map viewer and GPS data editor, BaseCamp. Here’s a screenshot using Topo US 2008 data:

3-30-2009-11.10.29 PM

On the plus side:

  • 2D/3D/Overview map views
  • Elevation profiles along a track
  • Photo geotagging using a GPS track
  • Some advanced editing features, like a track split function and eraser

On the down side:

  • Program is slooooow, even on my fairly recent quad-core system
  • Default 3D view is too subtle, even with decent topography; go to the options section and change the elevation exaggeration to something more useable, like 200%.

It’s probably worth downloading if you have a compatible mapset, but I don’t find the new features compelling enough to make me switch over from Garmin’s older Mapsource program to BaseCamp, especially given how sluggish the latter is. Hopefully future versions will be snappier, and add more features.


Free Introductory Guide To GIS And GPS

MapAction is a non-profit volunteer organization that provides GIS and mapping services to disaster areas. They’ve just published a free 118-page Field Guide To Humanitarian Mapping that’s a terrific introduction to both data acquisition using a GPS, and how to use Google Earth and the free open-source Windows GIS program MapWindow for mapping. I’d even say that it’s a far better choice for beginners than the recently-published GIS For Dummies (more on that soon, when I get the review of that volume done).

Via GIS @ Vassar.