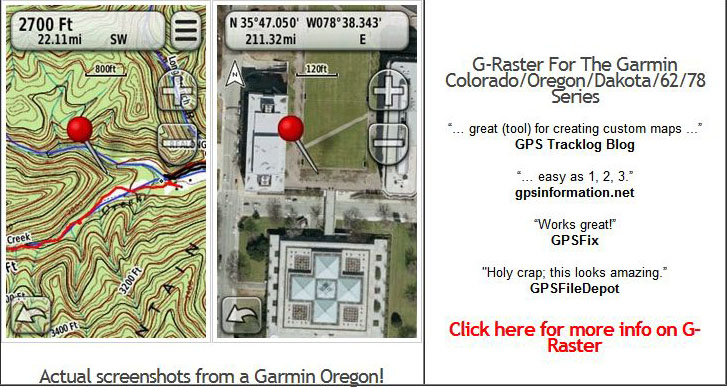
Garmin recently announced support for raster imagery like aerial photos and topo maps for some of their handheld GPS units, specifically their newer product lines: the Colorado, Oregon, and Dakota series. See recent posts at GPS Tracklog and GPS Fix for more information on this new feature. It requires download and installation of beta firmware on your Garmin GPS unit, and conversion of the raster images to a compatible format. Fortunately, the compatible format is the open format KMZ image overlay, which can be created in Google Earth:
- Zoom to the desired location in Google Earth
- Load the map or aerial image as an Image Overlay
- Calibrate the image by manually positioning, rotating and resizing it until it corresponds to the underlying Google Earth imagery.
- Save it as a KMZ file.
- Copy it to the \Garmin\Custom Maps folder on your Garmin GPS unit.
A fairly straightforward process, but there are some drawbacks:
- The image must be no larger than one megapixel in size (1024 x 1024; 2048 x 512; etc.)
- You can chop an image into subsections/tiles and combine them into a single overlay file, but this requires individually calibrating each tile
- You can have no more than 100 such tiles loaded onto your GPS unit
- If you have an image that’s georeferenced with either embedded geodata (like a GeoTiff, ERDAS Imagine, MRSID or BSB file), or a worldfile, there’s no way to use that georeferencing data, and you have to manually convert the file to JPG format
I’ve just finished version 1.0 of G-Raster, a utility that helps solve some of these problems:
- Loads map/aerial imagery files with embedded geodata or worldfiles
- Automatically extracts the geographic data, and optimally reprojects the image
- Chops images larger than 1 megapixel into smaller subtiles, and calibrates all of them
- Converts the image into JPG format
- Creates a KMZ file that can be copied over to your Garmin unit
You can find the link to the latest version of the program installer here (look for the G-Raster download link, then the link that says “Click here to start download”). Once installed, run the program, and it will walk you through the process step by step.

Step 1: Loading The Data
G-Raster accepts four basic types of georeferenced raster imagery:
Type 1: Files with the geographic data embedded in the graphic file itself. These include:
- GeoTiffs: TIFF images with embedded geodata
- MRSID imagery (file extension .sid or .mrsid)
- NOAA BSB imagery (file extension .kap)
- ERDAS Imagine format (file extension .img
Note: These must include all geographic data, including the type of coordinate system used. A great source for free USGS topo maps and aerial imagery is the USGS Seamless Server, which offers this data in the compatible GeoTiff format. Links to that site and other useful sources of data are available from the program menu.
Type 2: JPG imagery (“Big JPEG”) generated by the free program USAPhotoMaps. You will need to specify the UTM zone for the map you want to use.
Type 3: General graphic files with geodata in worldfile format for the UTM coordinate system (e.g. JPG with .jgw, BMP with .bpw, GIF with .gfw, TIF with .tfw). You will need to specify the UTM zone for the map, and also the datum and hemisphere if appropriate (default is northern hemisphere, WGS84 datum)
Type 4: General graphic files with geodata in worldfile format in any coordinate system. But you will have to: a) Know what that coordinate system is; b) Look up its EPSG code; c) Enter the code in the specified box
The process is easiest for Type 1 files; click the “Load …” button, and choose the file you want to create a KMZ overlay for. The program will automatically process the file, and take you directly to Step 3.
For Type 2 files, you will need to select the JPG file created by USAPhotomaps, normally placed into that program’s main directory. You will also need to specify the UTM zone for that map; you can get this information from USAPhotoMaps directly by choosing View => LatLon => UTM from the menu when viewing the maps you want to use; the UTM zone will be listed at the top. Alternatively, try one of the links under the UTM/EPSG Info menu. G-Raster will highlight the input section in red to remind you that it needs that data:

The process is similar for Type 3 files, except that you’ll have more choices for types of graphics (JPG, TIFF, BMG, GIF), and in addition to the UTM zone you’ll need to make sure the correct datum and hemisphere is chosen.
The process for Type 4 files is like that for Type 3 files, except that you will need to enter the EPSG code for the data in question.
Step 2: Process the raster graphic
After you enter the required data for files of Type 2-4, the button marked “Process Raster Graphic” will be enabled. Click on this button to start the process of converting the map graphic into the correct format. When it’s complete, a message will show up in green directly below this step, and the “Create KMZ File” button will be enabled. You can now go to Step 3
Possible problems:
– If the file is larger than 100 million pixels, it will be impossible for the program to process it as is; you’ll have the option of cropping the outer edges of the picture to bring it down to an acceptable size, but this will eliminate the map image data at the edges.
– In rare cases, an image close to but just below the maximum pixel count may not be able to be chopped up into 100 tiles or less. Future versions of the program will offer you the chance to resize the image slightly to fix this problem, but for now, you’ll have to crop or resize the image yourself.
Step 3: Set Parameters For KMZ Files
You’re almost ready to create the KMZ overlay file, but there are several options you might want to change:
KMZ Filename: The final output file will be saved using the name specified here in the same directory as the graphic file used to create it. Default is “Overlay_name”, and I’m assuming you’ll want to change this. If you choose a name that corresponds to a file that already exists, you’ll get an error message when you try to create the file.
JPG Quality: The output imagery is required by Garmin to be in JPG format. You can adjust the quality of the image from highest (100) to lowest (50 here) to reduce the total filesize, which may improve speed. Garmin’s recommended JPG quality number is 80, but you can experiment with lower/higher numbers to see which works better for you. One possible complication: the maximum image filesize is 3 MB, and in very rare circumstances choosing a high quality (98-100) might result in a tile that’s too large. Wouldn’t worry about it, but it’s something to keep in mind.
DrawOrder: Garmin offers two options for viewing the raster imagery. With On Top, the raster image displays above everything else, including any loaded vector maps. With Below Vector, the raster map still sits on top of some vector imagery (like lakes and parks), but can have other vector data on top of it (like roads and contour lines).
50% Transparency In Google Earth: Makes the overlay partially transparent in Google Earth, to help with determining whether it’s lined up correctly with underlying imagery. Has no effect on the map’s appearance in the Garmin unit’s display.
Rescale Factor / Rescale Image: Rescales the image to a smaller size based on the rescale factor entered ( > 1 only). For example, a rescale factor of 2 resizes the x and y dimensions by two, making the image a factor of 4 smaller in total pixel size. The advantage of this is to reduce the total number of tiles required to cover the image, in case you want to create multiple overlays with a total number of tiles less than the maximum 100. The disadvantage of this is that you will lose some image resolution, but depending on the Garmin zoom level you view the image at, you might not even notice the diminished resolution.
Step 4: Create KMZ File
Once you’ve set the parameters at left as desired, click the “Create KMZ File” button, and in a few seconds a message will pop up telling you that the KMZ file has been created in the same directory as the original graphic file.
If you like, you can now change some of the parameters, and create another KMZ file; this way, you can experiment with different settings. Just be sure to specify a different name for every one.
Step 5: Check the file in Google Earth
IMO, this is a mandatory step – you have to make sure the map is positioned correctly before trying to use it in your Garmin GPS unit.
You should have Google Earth installed on your computer for this step; if you don’t, go to the Google Earth website, and download/install the program on your computer. You can then double-click on the KMZ file created in Step 4 to load it into Google Earth. The KMZ overlay will be listed in the “Temporary Places” section of the info pane at left, and Google Earth will automatically zoom into the area covered by the map. Clicking the checkbox next to the overlay name will turn the image on and off, helping to see if it lines up correctly. If you chose 50% transparency as an option, the map image will be slightly transparent so that you can see what’s underneath – this may help you see how well the image is placed:

Depending on your location, you may notice a shift in position between the KMZ overlay and the underlying imagery of anywhere from 0 – 100 meters, with 10-20 meters being common for the US. This is not an indication of an error in the overlay, but rather a reflection of a fundamental limitation with Google Earth. The geographic position of Google Earth imagery isn’t always 100% accurate; see this post for more info. Unfortunately, there’s no way now to know how far off the imagery is shifted, which in turn imposes a limitation on how confident you can be that your overlay will be calibrated correctly in your Garmin unit.
Step 6 – Load The Overlay For Use In Your Garmin GPS Unit
Until the Garmin firmware is out of beta, I strongly recommend that you only install KMZ files on an external memory data card, not in the internal memory of your Garmin unit. This way, if there’s a problem, you can fix it by removing the card.
1. Take the external card, and put it into a separate card reader (not the Garmin itself). It will show up on your computer as a separate drive.
2. Open the drive, and go to the \Garmin\CustomMaps folder (if it doesn’t exist, you’ll have to create it)
3. Copy the KMZ raster overlay file into this folder.
4. Install the external memory card into your computer.
5. Follow Garmin’s instructions on its use, including turning it on and off.
In my next post, I’ll offer some tips and tricks to make the most of G-Raster.
Additional support for this new Garmin feature is available at the Garmin Custom Maps forum, including a helpful post if you have problems after installing a map.

This seems like an outstanding contribution. I plan to try it on my Colorado 400t. Thanks!
Shane
I’m just getting into custom maps for my Garmin Legend HCx, and your site is a great one. But it seems like it’s all for Windows and not Macintosh. I run Mac OSX 10.4 and would love to be able to get .img
files and raster images into my GPS.
Are there any utilities for working with OSX? Or am I gonna have to do it all on a Win machine and then
transfer the results to Mac?
When it comes to creating maps for Garmins, it’s a Windows world; there’s no Mac programs I know of that will create .img files for Garmins. So yes, your only option for now (and for the foreseeable future) is to do it all on a Windows machine, then transfer the results to a Mac.
G-Raster is a very nice program and all function seems to work great. The only problem that I have with it is when you create more than one KMZ file thats adjacent to each other you get a small black V shaped boarder between the edges of the two KMZ files when displayed on google earth. The images that I’m working with are High Res Color ortho from the USGS seamless server in Geo-tiff format.
Is there a way to create two adjacent KMZ files with G-Raster and have them diplay without the V shaped black boarder?
The black borders come from re-projecting the maps from UTM to geographic coordinates; in the process, they get rotated and stretched, and the black borders are added to keep the image rectangular. The best you can do is to combine and crop high-res orthos to the maximum size (100 megapixels), which will minimize the number of borders; see my recent blog post on using MicroDEM to do that.
I have custom underwater topo maps of reefs that are regular TIFF files (not GeoTiff) that I would like to convert into Garmin Custom maps. My Tiff maps have a Lat/Lon grid on them and I could position a cursor on an Lat/Lon intersection and type in the exact cordinates. Three points on the map should be sufficient to Georeference the map. Please let me know the best way to proceed.
Thanks
Bob
Try my list of georeferencing software and websites:
https://freegeographytools.com/2009/the-big-list-of-image-registration-georeferencing-software
I was able to use jpg and google earth to create an overlay on my Macintosh (for Rod Rees above) and created a KMZ/KML file that could be ready by Basemap. My problem is that I have an Edge 705 and I don’t think it likes KMZ files. If anyone knows how to convert the KMZ map to a gmapsupp.img file, I’d really appreciate it.
Can’t be done. You could try to “vectorize” the jpg with a program like MapWel or bmap2mp, but that only works well with an image that has large solid blocks of the same color (like a graphic map).
Having a little trouble with this…
I followed the instructions and registered my copy of G-Raster. Using a GeoTiff from the USGS Seamless server, I loaded it into G-Raster and it began to process the tile. I got an error about resizing, saying it failed because the image was too big.
I followed the instructions to the letter. Why does this happen and how can I fix the problem?
Check the help file.
The kmz files should be copied to GarminCustomMaps (NOT GarminCustom Maps as mentioned above)
You’re right, of course – thought I had fixed that.
Above comment had backslashes remove. KMZ files should be copied to the folder mentioned above, but without the space between Custom and Maps