So you’ve followed the directions in the previous post, and created a CSV POI file, and uploaded it to you Garmin GPS unit. Now what?
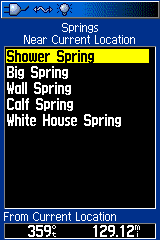
First off, if you’ve uploaded only a single CSV file of data, it’s easy to view. Go to the Find => Custom Points Of Interest icon item on your Garmin GPS, and you should see a list of the POI names by proximity to your current position, with the closest one listed at the top:
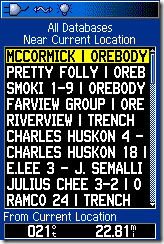
This is from my Garmin 60Cx; your unit’s screen may look somewhat different. Press “Enter” to bring up the data screen for the highlighted POI:

Choosing “Go To”, as in the case above, would set this POI as your navigation destination. Choosing “Save” lets you create a waypoint at the coordinates of the POI, while “Map” will display the waypoint on the GPS’s map screen.
To find a POI by name, select “Menu” from the initial Custom POI screen, then choose “Nearest Containing” from the two options; that will let you select from the entire list by name. If you want to find all the POIs near a different location, choose the other “Change Reference” option from the Menu screen; this will let you select a point on the map to use as the new reference point for determining proximity.
But if I have multiple CSV (or GPX) POI files that I upload from the same folder to the Garmin; how will they show up? Suppose I have a files called Springs.csv (springs data), Km.csv (kilometer markers along a path), and Kelsey.csv (landmarks from a guidebook), all in the same folder. If I upload all those to the GPS with the POILoader, all of the POI data points will show up on the initial POI list:
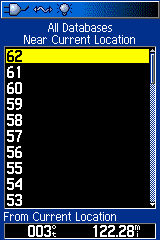
Here, the numbers refer to the kilometer markers in the Km.csv datafile; scrolling down further would bring up points from the other two datafiles. If I press Menu, I get:
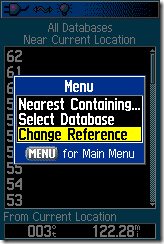
In addition to the two options mentioned previously, there’s now a third one called “Select Database”. Choosing that one:
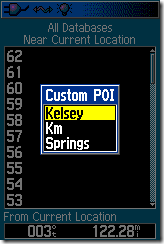
I can now choose from the three names of the datafiles to look at the data from only that specific file’s dataset. If I choose “Springs”, it will bring up a list of the closest springs from that database:
Pressing “Menu” at this screen will bring up the same Menu screen as above, to select a different database, find by name, or change the reference point.
You can also group sets of POI CSV files into folders on your computer to organize them, and have that organization preserved when the points are uploaded to your GPS. For example, I could create a folder on my computer called POI, and a subfolder of that called Landmarks. Into the root POI folder, I put a file called “Uranium mines,csv”, while in the Landmarks subfolder I put the Springs.csv, Km.csv and Kelsey.csv POI files. Running the POILoader program, and selecting the root POI folder, the program will upload not just all the individual files in the root folder (only Uranium mines.csv in this case), but also any POI files it finds in the next level of folders down (only the Landmarks folder in this case). If I now “Select Database” from the POI list, I get:
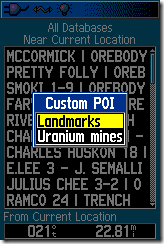
The Uranium mines.csv file in the root directory gets its own database listing; all of the other data files get put into a single database listing with the name of the folder they’re in (Landmarks here). They are not subdivided further, i.e. there’s not another “Select Database” menu item from which you can choose “Km”, “Springs”, or “Kelsey” as before; all those are lumped together under the single heading of Landmarks. But you can differentiate between different datasets in the same folder using custom icons for each dataset; more on that in the next series post.
To sum up, you can create a database listing by having a datafile in the root directory you’re uploading from, in which case the database listing is the filename itself. Or you can create a subfolder of that root directory, put as many datafiles in there as you want, and have all the data from all the files lumped into a single database listing with the name of the folder. Case matters – if I named the uranium data as “uranium MINES.csv” instead of “Uranium mines.csv”, I would see “uranium MINES” listed as a database choice.
Probably the biggest annoyance is that every time you upload a set of POI data using the POILoader, you wipe out POI data uploaded earlier and stored in the standard POI file on the Garmin, called “poi.gpi”. If you upload some POI data and then go into USB Mass Storage mode with your unit, or look at the data card using a card reader, you’ll find that file in the garmin\Poi directory:
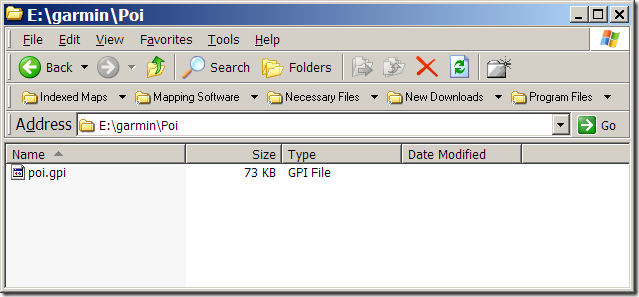
Next time you upload more data, that file will be overwritten with a new set of data. But there’s a way around that problem, that lets you save POI data on your Garmin unit. If you rename the “poi.gpi” file to something else, it won’t be overwritten, but your Garmin will still be able to read the data. For example, if I upload the “Springs”, “Kelsey” and “Km” data one set at a time to my Garmin, rename the freshly-uploaded “poi.gpi” files to reflect the data contents, then upload just the uranium data without renaming the poi.gpi file, the folder will look like this:

Going back to the Garmin, and looking at the available POI databases, I get:
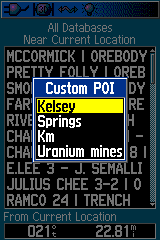
The renamed POI files weren’t wiped out by successive uploads, and all of the databases can be referenced separately. You can also copy and paste these renamed POI files onto your computer, and then install them onto another GPS unit by copying them directly into that GPS’s garmin\poi folder – no need to use the POILoader to install them. Given that you can do this, it doesn’t make a lot of sense that Garmin’s POILoader doesn’t support this functionality, but it doesn’t – you have to do it manually. Also, while the POILoader has an option to erase all POI points on a GPS, it only erases the “poi.gpi” file. To get rid of any renamed *.gpi files, you’ll have to manually delete them from your GPS’s data card in either the USB Mass Storage mode or by putting the data card into a card reader.
Finally, if you select a POI as a navigation destination, or to view on a map, it will show up at all zoom scales. But otherwise, the default setting when your Detail setting is “Normal” is to have them show on the map display only when you zoom in to the “500ft” zoom level (for you metric maniacs, it’s the “300m” level). If you want all the POIs to be visible on a map at a different zoom range, you need to go to the Map Setup screen, go to the Points subscreen, and then set the Map Points Max Zoom setting to the desired level. Here, I’m setting that zoom level so that POIs will show up on the map at the 1.2-mile zoom level:

Similarly, you can adjust the text size for the POI names with the Map Setup – Text screen (None, Small, Medium or Large).

Very useful information!
“Hide POI on Garmin 60Csx GPS”
Hi!
I need some help “hiding” some waypoints/POI on my GPS.
I have 2 point databases. But I only want to see and search one database at the time.
Is there anyway to hide one database completely?
I hoped transferring 2 GPI files and using the “Select Database” would do the trick. But all the points in both databases are listed when opening the “Custom POI” and Map Page.
Unit: Garmin 60Csx
Firmware: 3.60
Any help is greatly appreciated!
/Thomas
As far as I know, there’s no way to do what you want. Sorry!