Continuing on from yesterday’s post about my utility to create Google Earth screen overlays …
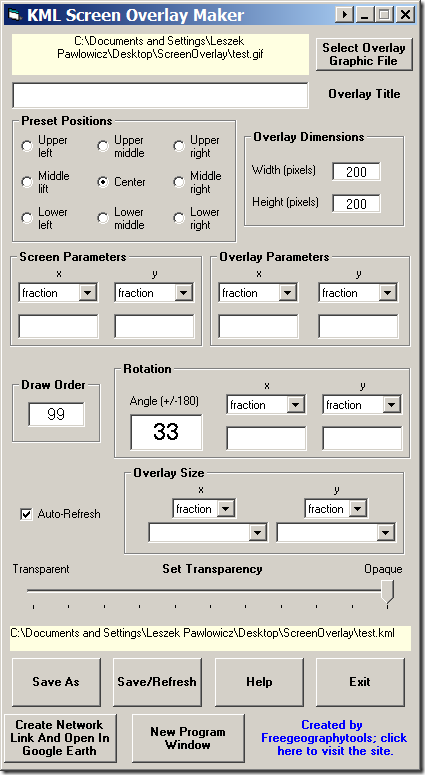
Rotation: Sets the rotation angle and axis. The angle needs to be between -180 and +180, and counter-intuitively clockwise is negative, counterclockwise is positive. Default (and blank) is no rotation. The “x” and “y” sets the position of the rotation axis for the image relative to the lower-left-hand corner of the image. Leaving this blank sets the rotation axis in the center of the image. Units, selected by the dropdown, are:
- fraction – The fraction across the image screen where you want the reference point, e.g. 0.5 is halfway across the image. Can be greater than 1 or negative, which sets the rotation axis outside of the image.
- pixels – The pixel position for the origin measured from the lower left-hand corner of the screen. Can be larger than the image size, or negative, which sets the rotation axis outside of the image.
- insetPixels – Similar to pixels, but measures from the upper-right-hand corner of the screen. Can be larger than the image size, or negative, which sets the rotation axis outside of the image.
Auto-Refresh: See the Save/Refresh section below for info on this
Overlay size: This sets the size of the overlay image on the Google Earth screen. The default, with the data blank, uses the native pixel size for the image. The top dropdown sets the units, either fraction of the Google Earth screen size or pixels. In the bottom dropdown, you can enter the desired fraction or pixel size, but you also have two dropdown choices:
- Maintain native size: Keeps that dimension at its original size in pixels, regardless of the units set above;
- Maintain aspect ratio: As you change the other dimension, this dimension will be scaled up to maintain the image’s aspect ratio. This will keep the image from getting grossly distorted in one direction as you increase or decrease its size in the other direction.
Set Transparency: Sets the overlay transparency from fully transparent (invisible) at the left slider position to fully opaque at the right.
Save As: Lets you select the screen overlay KML filename and save it; filename is displayed in the yellow box above the button. Once you’ve saved a file once, the next two buttons are enabled.
Create Network Link And Open In Google Earth: Clicking this button creates a network link to the KML screen overlay file, and loads it in Google Earth (if Google Earth is not installed in its default location, you’ll be prompted to specify where the Google Earth executable is located). This will display the last saved version of the overlay in Google Earth, and update that view every second. So if you change any of the parameters, and then click the Save/Refresh button, one second later the modified screen overlay will show up in Google Earth, letting you see the effects of the change immediately.
Save/Refresh: If you change any of the parameters and want to save them under the same filename, click this button. If you have created a network link using the above button, the screen overlay in Google Earth will also be refreshed/updated with this button. If you have the Auto-Refresh box checked, the overlay will be saved automatically under the current filename any time you change a parameter, and you won’t have to keep clicking the Save/Refresh button to update the overlay in Google Earth. This can be useful in the final stages of tweaking the results, but you might want to have this turned off in the early stages lest it drive you nuts.
New Program Window: If you want to put multiple graphic elements into Google Earth at once to see how they’ll look relative to each other, clicking this button will open up another program window so that you can create multiple screen overlays at the same time. Once you’ve created the individual screen overlay KML files, you can open them all and put them into a single Google Earth folder to keep them together.
Help: Brings you to the posts on this blog (the lazy programmer’s help page)
Exit: Guess …
Don’t forget that the KML screen overlay file you’ve created references the graphic to its location on your hard drive. If you want to create a portable screen overlay file that you can send to someone else, you should save it in KMZ format from Google Earth.
That’s it. Download the small executable file here, or the much larger full install file here. As usual, use at your own risk, and report bugs/quirks to me. The alpha testers didn’t indicate any serious problems, and the program doesn’t alter any of your original data, so problems should be minimal.
Other free utilities can be found on the Utilities page. If you find this or any of my other utilities particularly useful and would like to show your appreciation, donations of any amount are gratefully accepted via PayPal.