Google Earth supports GIF files as image overlays, with or without transparency, but it doesn’t directly support animated GIFs. However, by “disassembling” the animated GIF into the individual frames, and then assigning each of those frames a time stamp in a KML file, you can re-create the animation effect using Google Earth’s time animation feature.
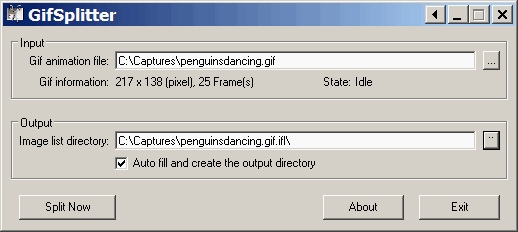
Once you have a GIF animation, one you’ve either downloaded or created with a free GIF animation program like Beneton Movie GIF, you need to break the GIF animation down into its individual frames. There’s a free utility called GIFSplitter that will do that for you, splitting the image into all its frames as BMP files if you check the “Auto fill” box:

It’s usually best to convert all of the individual frames back to GIF format, using your favorite graphics editor or IrfanView (which has a Batch Conversion capability to speed things up). You can also add transparency to the GIFs at this stage. But this isn’t required; you can create animations with the BMP images, or use a similar process to animate sets of JPG, PNG, or TIF images as well.
Next, define the geographic position extents for the GIF animation. Open Google Earth, create a folder, and then add the first of the animation frames as an overlay. Position it where you want it; if you re-size it, and want to maintain the original aspect ratio, keep the shift key depressed during resizing, otherwise the resizing may stretch or compress the image in one or both dimensions. Once you have it sized and positioned where you want it, save the folder with the one overlay as a KML file like this one:
<?xml version=”1.0″ encoding=”UTF-8″?>
<kml xmlns=”http://earth.google.com/kml/2.1″>
<Folder>
<name>Animation</name>
<open>1</open>
<GroundOverlay>
<name>Untitled Image Overlay</name>
<Icon>
<href>C:/Captures/penguinsdancing.gif.ifl/IMG00000.gif</href>
<viewBoundScale>0.75</viewBoundScale>
</Icon>
<LatLonBox>
<north>-71.54193350154206</north>
<south>-71.57016090675403</south>
<east>-12.07503263159531</east>
<west>-12.21545153576837</west>
<rotation>54.53226789942224</rotation>
</LatLonBox>
</GroundOverlay>
</Folder>
</kml>
Now you need to add both a GroundOverlay section for every image file in the animation, and also assign a timespan for every image so that you can animate it. In the example below, I’m assigning an year to every animation frame, with the time extent for every frame running from January 1 to December 31 for every year:
<?xml version=”1.0″ encoding=”UTF-8″?>
<kml xmlns=”http://earth.google.com/kml/2.1″>
<Folder>
<name>Animation</name>
<open>1</open>
<GroundOverlay>
<name>Untitled Image Overlay</name>
<TimeSpan>
<begin>2000-01-01</begin>
<end>2000-12-31</end>
</TimeSpan>
<Icon>
<href>C:/Captures/penguinsdancing.gif.ifl/IMG00000.gif</href>
<viewBoundScale>0.75</viewBoundScale>
</Icon>
<LatLonBox>
<north>-71.54193350154206</north>
<south>-71.57016090675403</south>
<east>-12.07503263159531</east>
<west>-12.21545153576837</west>
<rotation>54.53226789942224</rotation>
</LatLonBox>
</GroundOverlay>
<GroundOverlay>
<name>Untitled Image Overlay</name>
<TimeSpan>
<begin>2001-01-01</begin>
<end>2001-12-31</end>
</TimeSpan>
<Icon>
<href>C:/Captures/penguinsdancing.gif.ifl/IMG00001.gif</href>
<viewBoundScale>0.75</viewBoundScale>
</Icon>
<LatLonBox>
<north>-71.54193350154206</north>
<south>-71.57016090675403</south>
<east>-12.07503263159531</east>
<west>-12.21545153576837</west>
<rotation>54.53226789942224</rotation>
</LatLonBox>
</GroundOverlay>
<GroundOverlay>
<name>Untitled Image Overlay</name>
<TimeSpan>
<begin>2002-01-01</begin>
<end>2002-12-31</end>
</TimeSpan>
<Icon>
<href>C:/Captures/penguinsdancing.gif.ifl/IMG00002.gif</href>
<viewBoundScale>0.75</viewBoundScale>
</Icon>
<LatLonBox>
<north>-71.54193350154206</north>
<south>-71.57016090675403</south>
<east>-12.07503263159531</east>
<west>-12.21545153576837</west>
<rotation>54.53226789942224</rotation>
</LatLonBox>
</GroundOverlay>
<GroundOverlay>
<name>Untitled Image Overlay</name>
<TimeSpan>
<begin>2003-01-01</begin>
<end>2003-12-31</end>
</TimeSpan>
<Icon>
<href>C:/Captures/penguinsdancing.gif.ifl/IMG00003.gif</href>
<viewBoundScale>0.75</viewBoundScale>
</Icon>
<LatLonBox>
<north>-71.54193350154206</north>
<south>-71.57016090675403</south>
<east>-12.07503263159531</east>
<west>-12.21545153576837</west>
<rotation>54.53226789942224</rotation>
</LatLonBox>
</GroundOverlay>
And so on until the final animation frame …
<GroundOverlay>
<name>Untitled Image Overlay</name>
<TimeSpan>
<begin>2024-01-01</begin>
<end>2024-12-31</end>
</TimeSpan>
<Icon>
<href>C:/Captures/penguinsdancing.gif.ifl/IMG00024.gif</href>
<viewBoundScale>0.75</viewBoundScale>
</Icon>
<LatLonBox>
<north>-71.54193350154206</north>
<south>-71.57016090675403</south>
<east>-12.07503263159531</east>
<west>-12.21545153576837</west>
<rotation>54.53226789942224</rotation>
</LatLonBox>
</GroundOverlay>
</Folder>
</kml>
Note: Unlike HTML, case counts in KML (as I found out to my frustration), so make sure you enter “TimeSpan”, not “timespan”. Once you’re done, open the edited KML file in Google Earth, and you should see the animation control at the top:

Clicking the play button at the right should play the animation, and you can set the animation speed and repeat mode (once, bounce or wrap) by clicking on the check at the left. You should also set the time start and stop span control to be the same (as they are above – the control should look like the one tagged by “AUG 2023”), otherwise you may see multiple animation frames at the same time. If you’re happy with the animation, save the entire folder as a KMZ file that will contain all of the animation graphics in embedded form. You can download the goofy sample animation I created above at this link.
Comments pulled in from the old site:
Anonymous:
I wanted to put an animated wind turbine on google earth. I was wondering if it is possible to animate it.
In this case I don’t think you could use years as the frames, as you would rather want milli seconds. Also we are talking about vertical areas, not overlays. Do you think this could be done?
My reply:
Try this website:
http://www.barnabu.co.uk/
He’s been doing a lot of interesting animations, using both GIFs and SketchUp models. Check out in particular his London Eye animations, which isn’t too far away from what you want to do.
I add a GIF animation into Google Earth. How do it become a GIF animation on the Google Earth?
I was wondering if it was possible to overlay GIF animations on GE while that the the animation still runs its loops?
Click on the checkmark at the left of the animation control, and set the mode to “Wrap” – it will then repeat the time animation over and over.
I add a placemark on GE and insert code html(Gif image)in description:
When I click on the placemark then the GIF animation show but not runs its loops. Why?
Can you help me so that the Gif animation runs its loops?
I add a placemark on GE and insert code html(Gif image)in description:
“img src=”http://www12.24h.com.vn/upload/news/2007-09-24/T9_CauDo24-9.gif” alt=”” border=”0″ />”
When I click on the placemark then the GIF animation show but not runs its loops. Why?
Can you help me so that the Gif animation runs its loops?
Google Earth does not support animated GIFs. You have to follow the procedure in my post to break it down into individual frames, and assign a time to the frame, so that it will run as a time animation.