Note: Version 6.15.3 of MapSource accidentally dropped support for custom waypoint icons; version 6.15.4 puts it back. Make sure you have the most recent version.
The two previous posts in this series dealt with creating and uploading custom waypoint icons to supported Garmin GPS units. But while third-party software for handling GPX data (both upload and download) will download the waypoints, most (if not all) don’t support display of these custom waypoint icons. For that, you’ll have to use Garmin’s MapSource program (aka Trip and Waypoint Manager), and set up custom waypoint icon graphics so that MapSource can import and use them.
The earlier posts described how to create and name graphic files for uploading to your Garmin as custom waypoint icons. In addition to very strict graphic file requirements, these files have to be named “Waypoint Symbol 000.bmp”, “Waypoint Symbol 001.bmp”, “Waypoint Symbol 002.bmp”, … “Waypoint Symbol 023.bmp”, (for a Garmin 60Cx) corresponding to maximum of 24 custom waypoint icon symbols (for my Garmin 60Cx; your unit may be different). Once you’ve created and uploaded these icon graphics to your GPS, copy them to MapSource’s “Custom Waypoint Symbols” folder, usually located in the “My Garmin” subfolder of your Windows’ “My Documents” folder. If this is the first time you’re doing this, you’ll probably find 8 files in that folder, “000.bmp” to “007.bmp”; these are 8 dummy custom waypoint icon symbols, plain blue dots, corresponding to the default custom waypoint icon on a Garmin GPS. You could probably delete these, but on the off chance you might want them again in the future, you might want to move these into another folder for safekeeping.
Now, rename the Waypoint Symbol files like this:
Waypoint Symbol 000.bmp => 000.bmp
Waypoint Symbol 001.bmp => 001.bmp
Waypoint Symbol 002.bmp => 002.bmp
…
Waypoint Symbol 023.bmp => 023.bmp
(Note: MapSource can use up to 64 different custom waypoint icons, 000 through 063, but if your GPS unit only supports 24 custom icons, 024 and above would only work in the MapSource display, and would show up on your GPS as a default waypoint icon).
For example, for doing archaeological field surveys, I created five custom waypoint icons, each representing a different prehistoric cultural artifact:
| Icon | |||||
| Graphic file | Waypoint Symbol 000.bmp | Waypoint Symbol 001.bmp | Waypoint Symbol 002.bmp | Waypoint Symbol 003.bmp | Waypoint Symbol 004.bmp |
| Artifact type | Pottery | Arrowhead | Food grinder | Rock art | Ruin |
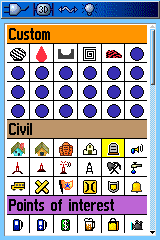
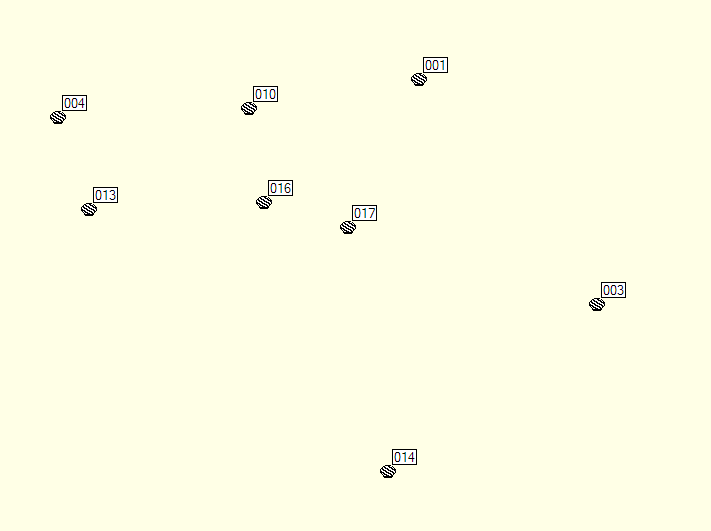
The magenta color in each graphic is the transparent color, and disappears when uploaded to the GPS. Using the procedures described previously in this series, the icons are uploaded to the GPS, and show up in the “Custom” waypoint icons section:
I can now use these icons when marking waypoints, and have them show up on the map screen:
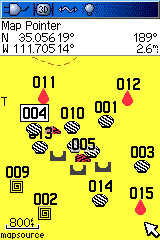
(Note to concerned archaeologists: This is a fictitious example, and doesn’t depict actual locations of cultural artifacts).
Now, I copy all five of the above bmp files to the “Custom Waypoint Symbols”, and rename them as described above (e.g. “Waypoint Symbol 000.bmp” is renamed to “000.bmp”). Starting up MapSource, and downloading all of the waypoints depicted above, the waypoints are mapped out:
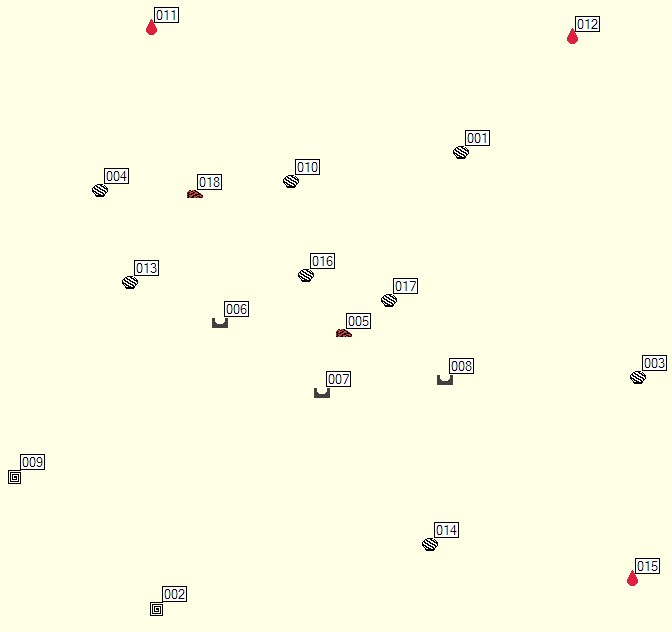
The custom waypoint icons show up exactly the same in MapSource as they do on the GPS unit.
You don’t actually have to use the same graphic for custom waypoints in MapSource as you did for the GPS unit. MapSource will accept custom waypoint graphics in either 16 x 16 or 24 x 24 BMP format, and in either 8-bit or 24-bit color (unlike the GPS custom waypoint graphics, which have to be 16 x 16 8-bit color). You just have to make sure you name them to correspond to the correct GPS custom waypoint icon, i.e. 000.bmp for the first icon, 001.bmp for the second icon and so on. Transparency is supported as well; as with the icons for the GPS, magenta (R 255, G 0. B 255) is the transparent color.
Using custom icons like this gives you a handy way to separate out and save waypoints in different categories. For example, downloading the points above into MapSource gives me the following waypoint list on the left:
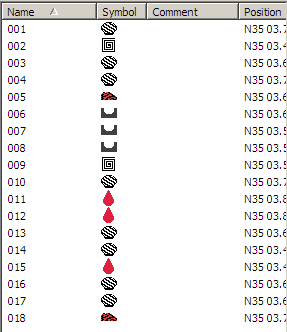
Clicking on the “Symbol” column at the top sorts the waypoints in this listing by the symbol type:
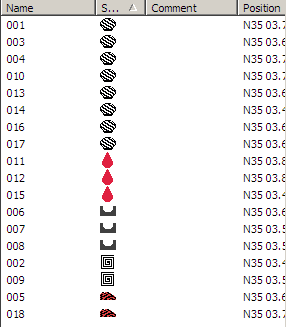
To save only the pottery-related waypoints in this list:
- Select the first seven waypoints (with the pottery symbol)
- Right-click on the selected points, and choose Copy
- Start up another MapSource program window (e.g. from the Windows Start Menu, or by double-clicking on the program icon or shortcut)
- Paste the copied waypoints into the second MapSource window (Ctrl-V, Edit => Paste, or right-click anywhere in the second MapSource program window and choose Paste)
Only the pottery-related waypoints will show up in the new program window:
I can now save these points in their own file, say a GPX file, for either direct import into a GIS program or conversion to an alternate format like shapefile using a program like DNRGarmin.
Finally, I can also create waypoints in MapSource using these custom waypoint icons, using the Symbol dropdown in the Waypoint Properties window:
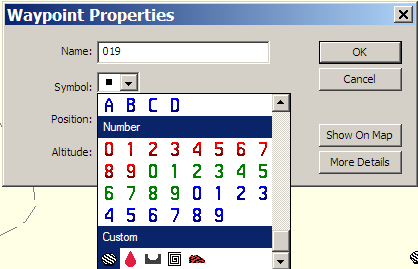
When uploaded to GPS that has matching custom waypoint icons, they will display in the map with the corresponding custom waypoint icon.

Thanks for the 3 articles on Custom Waypoint Icons. I was wondering if there is an easy way to get icons out of MapSource and into the GPS. MapSource has a few icons like the GeoCaching Puzzle Icon and the Multi Stage Cache Icon that I would like to get into my GPS. I don’t understand why they would have those in MapSource, but not put them in the Garmin GPS.
Thanks
If you use a screen capture to grab an icon image in MapSource, like the ones you want, you could convert that to a custom icon.
I Tried that, but failed :-( I was hoping there was a icon data folder in MapSource that I could just copy the icon from. I take it that isn’t the case?
There is no icon folder, but I was able to capture an icon image using the screen capture program HoverSnap. In MapSource, click on the dropdown to select the icon, then invoke HoverSnap’s function to capture part of the screen (Ctrl-PrintScreen). Select the area that includes the icon or icons you want, and then edit the captured image to fit to the icon requirements I talk about in my post. You can also create a waypoint in MapSource with the icon of your choice, then capture the icon image on the map. I’ve emailed you an example, capturing the Multi-Cache icon.
As I stated before, I tried what you had said in your post, not with HoverSnap, but just using Ctrl-Alt-PrintScreen and than tried to edit in MS Paint. I will try again with the icon you sent. Thanks for trying to help!
I’ve got a post somewhere here on my blog about HoverSnap; it’s a nice freeware screen capture program, small and unobtrusive.
Where is the problem occurring? If it’s when you try to upload, it could be because the icon isn’t in the exact, precise format required (i.e. 96 dpi, 8-bit color bmp, 16 x 16 pixels). I ran into enough of those to frustrate me for a while.
I previously used mapsource 6.13.70 and had no problems with my custom waypoints. I know have 6.15.40 and everything works fine except that with this version the purple color is visible on my computer screen when viewing my custom waypoints in 6.15.40 I double checked and the color is still 255-0-255 and the size is 16 bit. Everything is still ok in 6.13.70 Has anyone else expereinced this and is there a away to fix it?
The problem with non-transparency is clearly a bug in MapSource, and there’s no way to get around it; we’ll have to wait for Garmin to fix the problem.
The non-transparency issue has a work around for MapSource 6.15.4. You need a tool that can convert your xxx.bmp to xxx.gif. As long as xxx.bmp does not co-exist with xxx.gif, MapSource will use the gif. You can have some of each type in the same folder. For instance, 000.gif and 001.bmp work fine as long as 000.bmp does not also exist in the same folder.
I used Corel Photo-paint to do the conversion, I’m sure there are other tools that can do this as well but there are two parameter you must adhere to:
1) Make sure that when you save it that that your are using interlaced mode (for Corel Photo-paint this is a box you must check)
2) Make sure you specify transparency mode. With this you need to select the color (by palette index) that will be transparent. That is, you need to know the position in the palette of the color you desire to be transparent.
I was able to convert all the bmps into gifs; they look great. Also, since MapSource uses 24×24 pixel icons in the default set, the custom 16×16 icons look a little small. I was able to successfully re-size a couple of these but it does take a bit of clean up (pixel editing). So if you can live with the smaller icons, you are good to go.
Thanks William, this info on resolving the non transparency was very useful.
/Steph