Yesterday’s post dealt with the basics of what a Google Earth screen overlay is, and some of its possible applications. But you can’t create or edit a screen overlay in Google Earth, so until now you’d have to create it in KML with a text editor or stand-alone KML editor. I’ve written a small utility for Google Earth that lets you create a screen overlay from a graphic file for Google Earth with a GUI, and also lets you modify the parameters and see the changes in the screen overlay immediately in Google Earth.
You can download the small executable file here, and it will probably work fine as is. If you get error messages about missing files, or if you want the full install with a Start Menu item, you can download the full install package. Here’s the program interface:
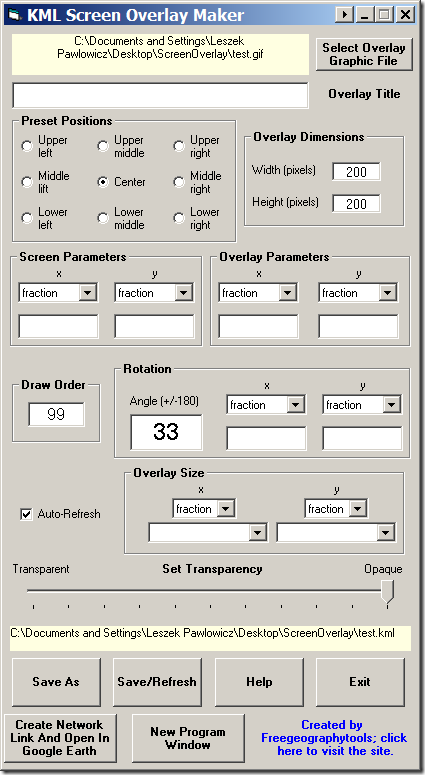
The unusual aspect ratio (taller than it is wide) is so you can drag it to the left side over the Google Earth view, where it will block less of the globe and overlay view. This may help you better see the effects of modifying screen overlay parameters.
The various option sections, from top to bottom:
Select graphic overlay file: Click on the button to choose the single graphic file to use as an overlay (if you want multiple graphic images in your Google Earth screen, you can create multiple screen overlay files and load them all into Google Earth). Supported graphic formats are TIF, BMP, JPG, GIF, PNG, TGA, PGM, DDS and PPM; transparency is supported for GIF and PNG files. As soon as you select a graphic file, the “Save As” button will be enabled; saving the screen overlay without changing any of the parameters will place the graphic image in the center of the Google Earth screen at its original pixel dimensions. The full filename (with path) will be displayed in the yellow box.
Overlay title: This is the title that will be associated with the overlay in the Google Earth Places pane at left.
Preset positions: Enters preset parameters to position the graphic image at the specified location on the screen, at its original pixel size.
Overlay dimensions (for reference only): When positioning the graphic and setting some of the parameters, it can be useful to know the native pixel dimensions of the overlay image. You don’t need them for creating an overlay, so they’re there just there for reference. When you open GIF, JPG and BMP images, the pixel dimensions will be entered automatically; for other image types, you can enter those manually after determining them some other ways (like right-clicking on a graphic file and choosing Properties).
Screen Parameters: Sets the “point relative to the screen origin that the overlay image is mapped to”, where the screen origin (x=0, y=0) is in the lower left corner. There are three options for units, set by the dropdown:
- fraction – The fraction across the image screen where you want the reference point, e.g. 0.5 is halfway across the screen. I’d recommend using the fraction unit option instead of the next two pixel-based options because the overlay will behave better across a wider range of screen resolutions. Can be greater than 1 or negative, but for some screen parameters this can position the overlay out of sight.
- pixels – The pixel position for the origin measured from the lower left-hand corner of the screen. Can be larger than the screen size, or negative, but this may also position overlay out of sight.
- insetPixels – Similar to pixels, but measures from the upper-right-hand corner of the screen.
Default value is fraction; if you don’t enter values below the units, the default is the center of the screen.
Overlay Parameters: Similar to Screen Parameters, sets the reference point for the overlay image. Same units (and caveats as above).
For example, if you set the units and parameters for both the screen and overlay to fraction (0.5,0.5), you’ll position the image directly in the middle of the screen for all screen resolutions and sizes. Change the screen to (0,1), and the overlay will be positioned in the upper left corner with only the lower-right-quadrant visible; change overlay to (0,1) as well, and the entire overlay will be visible in that corner.
Draw Order: An integer that sets the draw order if you have multiple overlays; overlays with higher draw order numbers will go on top of ones with lower numbers. For example, an overlay with a draw number of 3 will be drawn on top of an overlay with draw number 1. If this is blank, the default is 0.
Other free utilities can be found on the Utilities page. If you find this or any of my other utilities particularly useful and would like to show your appreciation, donations of any amount are gratefully accepted via PayPal.
Great application, the link is broken (the link to freegeographytools), in double click shows a message “file not found”
best regards.
me again, if release double click on the link, this is the message: error 53, file not found
Thanks for the info. I suspect that you’re getting that error message because the program looks for Internet Explorer in the default location (“C:\Program Files\Internet Explorer\iexplore.exe”) to open the website, and if it doesn’t find it there, it gets “confused”. Do you have Internet Explorer installed on a drive other than the C:-drive, or in a different program directory?
WOW!!! This would work great for our use in broadcasting Google Earth on television. Would you be able to make the app available for Macintosh? I’ve tried it with our PC and love it but we work on Macs to do our on-air graphics. Also a great feature would be to add text over the overlay.
I don’t own a Mac, and it was written in Visual Basic for Windows, so a Mac version is unlikely. But you can create the overlay on a PC, save the overlay from Google Earth on the PC as a KMZ file, and then open it up on Google Earth in Mac.
This is actually a very simple program, but adding text would be very complicated. So probably not anytime soon.
Hi, thanks for this useful tool!! However I would like to know how to remove an image that I put as a screen overlay.
thanks in advance
To remove an overlay, delete its listing from the Places window at left. To just make it invisible, uncheck the box next to it.
Thanks for your answer Leszek, but what if I want to do it by code?
Beyond my knowledge – sorry.
:(
thanks anyway!