For a long time, I thought that the free utility ERDAS Viewfinder 2.1 had slipped through the cracks after the acquisition of ERDAS by Leica Geosystems, but it recently re-surfaced for me in a Google search. And that’s great (thanks, Leica!), because while Viewfinder is an OK geographic image viewer, especially when compared to the many alternatives now available, it does have one very handy capability: the ability to re-project a raster image from one coordinate system to another, and save the new image in GeoTiff format with the new projection/datum data embedded.
Running the program brings up a prompt to select the image file, or you can use the File => Open menu. Quick note: the file dialog can’t see files or directories that have been compressed in Windows XP. Supported image formats for reprojection include GeoTiff, BIL, BSQ, IMG, BIP, ERS, MRSID, JFIF and RAW. Note: the image must have the coordinate system/projection data embedded in it in order for Viewfinder to be able to re-project it; it can open a TIFF file with a .tfw worldfile, but can’t re-project it since it’s missing that critical data. If it’s in a supported format (geographic or UTM), you can use MicroDEM to embed that critical header data into the file.
The image will be visible in three different windows with different zoom levels; the coordinate system and spheroid (used for defining the datum) is on the status bar on the lower left. There’s also a more complete set of image information accessible using the Tools => Image Information menu.
To convert the image from its current coordinate system to another:
1. Choose File => Save As …
2. Click on the tab at the top that says “Output File Options”
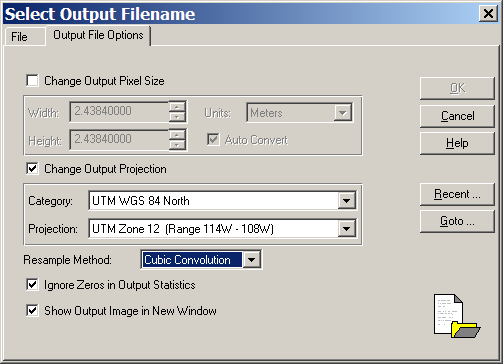
3. There are two checkboxes: “Change Output Pixel Size” and “Change Output Projection”. The first is used only if you’re changing either the output pixel dimensions or the units; an example of the latter would be going from UTM in meters to geographic coordinates in degrees. When you check a box, the dropdown menus become active, allowing you to set the desired parameters. For example, if I have a NAD27 UTM Zone 12 USGS topo that I want to convert to WGS84, the options window would look like this:
While if I wanted to change it to WGS84 in geographic coordinates (lat/long), it would look like this:
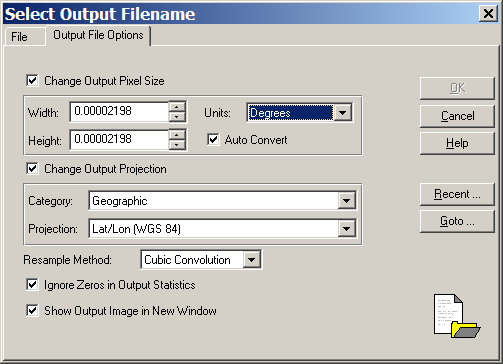
Note that the “Change Output Pixel Size” box has been checked, and Units set to degrees, since that’s the units for the target coordinate system. If it were left in meters, you’d get an error message later on when you tried to save the image. “Resample Method” defines the algorithm used for stretching or compressing the image. The “Recent” button just brings up a list of recent filenames used, while “Goto” brings up a recent list of directories used, and lets you select a new one to save the image in.
Once you’ve set the Output File Options, click on the File tab at the top, enter a filename, select the type of image file you want to create (GeoTiff or IMG), and click OK. The process of re-projecting and saving the image will typically take less than 30 seconds, and create not just a GeoTiff but also the .TFW world file as well.
Here’s my original UTM topo map:
And here it is re-projected to geographic coordinates (lat/long):
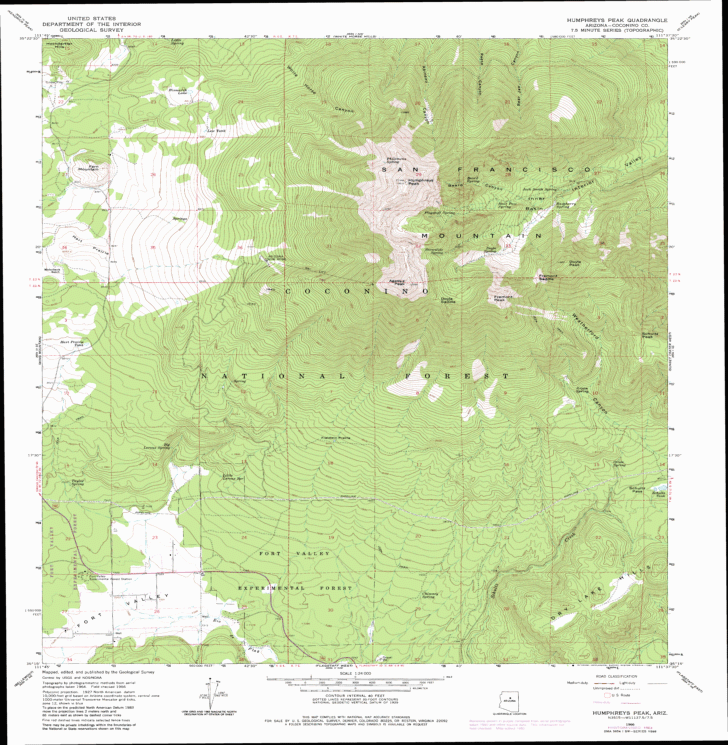
Laying the two files one one top of another in layers in a program that supports on-the-fly re-projection, the two images line up virtually exactly, well less than a pixel’s difference between them. And Viewfinder will preserve the original file color type; for example, the original input UTM topo map was an indexed-color TIF, and so is the output geographic topo map.
ERDAS Viewfinder supports 30 general coordinate system categories, with each category having its own sublisting of projections; for example, selecting the US State Plane Coordinate System (SPCS) brings up a sublisting of selectable state zones (note: be careful when converting to SPCS using the FIPS option, as it sometimes gives odd results; the Old USGS option seems to work OK). And it apparently supports coordinate systems for the input image that aren’t supported as output options. For example, it opened, read and successfully converted a USGS DRG from the California Digital Raster Graphics page, which came in the Teale projection, a variant of Albers Equal Area; the Teale projection is not included as an output option. Finally, if you don’t select a new projection, Viewfinder will create a GeoTiff with the same projection as the original image; this makes it handy for converting images in the supported input formats (BIL, BSQ, IMG, BIP, ERS, MRSID, JFIF and RAW) directly into GeoTiff files.
ERDAS Viewfinder also comes with a few other handy utilities, which I’ll cover in another post.
worked great for me! thanks for this little gem and thanks for all the great tips you’ve given in general. this is the first time i’ve commented but i’ve used the site for tons of things!
i gave gdalwarp a try but going from california teale albers to state plane nad 83 survey feet wasn’t happening. erdas view finder did the trick and all w/in a nice GUI.