I’ve been posting about various ways to extract and embed geographic metadata from GeoTiffs, image files that have coordinate information in them that can be used by GIS software to georeference the image, i.e. assigning a geographic location to each pixel. Here’s an example of how extracting geographic metadata (like a worldfile) from a GeoTiff might be useful.
USGS 1:24K topo maps are freely available on the Internet from a variety of locations, like LibreMap or the USGS Seamless Server. Maps of forested areas often include green shading to indicate the presence of tree vegetation, but this coloration has always struck me as inaccurate, superfluous, and interfering with reading more critical map features. The US Forest Service apparently feels the same way, as they have removed that green coloring from their updated versions of these topo maps. But if you have a digital topo map with this coloration, it’s possible to get rid of it without losing the geographic metadata.
I’ll start with the USGS 1:24K topo map of Kendrick Peak in Arizona, available here among other locations. This map has a large amount of green shading on it, which was arbitrary to begin with, and is now unfortunately out-of-date because of a serious fire a few years ago:
If I open this map in virtually any editor and save it, the geographic metadata will be lost. So the first step is to extract and save the full metadata using the libgeoGUI along with the libgeotiff utilities. Next, I’ll open it up in Photoshop Elements. Yes, Photoshop isn’t a “free geography tool”, but Photoshop Elements is a lot cheaper than the full version while still containing much of its functionality. If you look around on eBay or Google, you can often find a brand-new copy of an older version of Photoshop Elements very cheaply, $20-30. And it’s a useful tool to have for general image manipulation, including the purpose I’ll be describing here.
To keep the filesize down, USGS GeoTiff topo maps are often saved in “indexed color” mode, where there’s a limited palette of colors assigned to each byte of pixel information. If it is indexed, Photoshop will show “(Index)” at the top of the image window; if you go to Image => Mode, “Indexed Color” will be checked as well. As long as we’re in Image=>, I’ll select “Color Table”:

This shows the full palette of colors used in this topo map, only 13 in this case. If I double-click on the green, the color I want to get rid of, the color picker comes up:
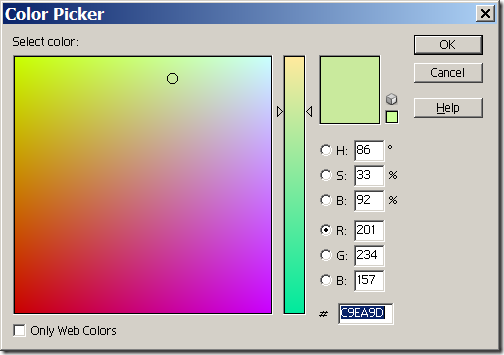
This lets me modify that index color to whatever I want; in this case, setting R, G and B to 255 will turn everything colored green in the original to white. If I now save the newly-modified image as a TIF with a different name, the map area from above, with lots of green, will now look like this:
All the green has been transformed to white, while all the other colors were unaffected. One could have at the same time modified any of the other colors to white to make them disappear, or modified them to a different shade. If you create a modified color scheme you plan to use again, you can save that palette using the “Save” button in the Color Table window.
For images with standard RGB color instead of indexed color, you can use the “Replace Color” function (Enhance => Adjust Color => Replace Color) to perform a similar function.
Opening and saving the map image in Photoshop removes the geographic metadata, but as long as you don’t resize the image, you can use the metadata of the original image to convert this modified image into a GeoTiff. In libgeoGUI, specify the .gtf metadata file created in the first step as the input worldfile, specify the modified Tiff image with the green removed as the input Tiff, and enter a name for the output GeoTiff. Click the “Embed” button, and you now have a GeoTiff with the same geographic metadata as the original, but modified to remove the green. And this approach will work not just with color modifications; as long as you don’t resize the image, you can modify it any way you want, drawing lines and shapes, putting other images on top of it, etc., and then embed the metadata into the saved image when you’re done.
Thanks for all the great tools and tips. Paint.net is a great freeware photogshop clone that I’m pretty sure also has color picking ability.
http://www.getpaint.net/
There is also the GIMP, which is a free image editor very similar to Photoshop. The UI is different, but I believe that it does many of the same things as Photoshop
Paint.Net does have a recolor function, but it’s manual – you have to paint the recoloring over the entire image with a brush, and that can take a while. There’s no universal re-coloring, and no support for indexed color. Paint.Net is also an incredible memory hog; I have a standard USGS 24K topo map loaded in it now, and it’s using almost 400 MB of memory.
Haven’t played with The GIMP for a while, so I downloaded it and took a look. While it will let you look at the indexed color table, you can’t modify it directly, and you can’t colorize an indexed color image, only an RGB one. There may be another way to do it, but the GIMP’s interface is still as painful and non-intuitive as I remember it, and I don’t feel like banging my way through it. And while it’s not as big a memory hog as Paint.Net, it’s close, and it’s very slow with large images. I’m not a huge fan of Photoshop either, as I don’t really care for its interface, but it is faster, less memory-intensive, and offers more features than either The GIMP or Paint.Net.
Paintshop Pro also lets you modify the color table for indexed color images. While it’s not free, it’s cheaper than the current version of Photoshop Elements, and is more powerful.
Thanks for the info, what about manage raster to vector?
Along the same lines, if you have multiple rasters uniformly indexed and software like Arcview GIS, using a simple script you can easily switch on and off one or more colors/information classes. I’ve shown the example here http://gis-lab.info/qa/trlegend.html, it is in Russian, but the idea should be clear. We use this approach to work with hundreds of raster maps simultaneously.