Back in 2005, EarthPlot software released several shareware tools for plotting data and creating graphic overlays in Google Earth. The most recent versions of their software are now available as freeware. If you’re interested in plotting spreadsheet data or creating annotated overlays in Google Earth, you should definitely check these out.
More after the fold …
EarthPlot 1.3: EarthPlot’s main function is to take data in spreadsheet form and plot it in a number of graphical formats. You can open CSV files directly, or copy and paste data from Excel or any other spreadsheet program directly into the program’s datasheet. EarthPlot has several different plotting options:
- Post Maps – Simple plots of the data as a 2D or 3D post, with the data value plotted next to it
- Contour Maps – Plots data in gridded format as colored contours. If the data is unevenly spaced, EarthPlot can convert it to an evenly-spaced grid using an inverse-distance algorithm.
- Trajectory maps: Plots a line in 2D or 3D based on position and altitude
- Graduated Raster: Plots the size of a symbol based on a data value
- Spider: Plots lines from an origin point to the data point
EarthPlot can also take an image file, and convert it into a graphic overlay. The image can either be a graphic file on your computer, or can be a geographic image loaded in from the TerraServer website (US only):
- Topographic map
- USGS digital orthoquad (black-and-white aerial photo)
- USGS urban orthophoto (color; limited coverage area)
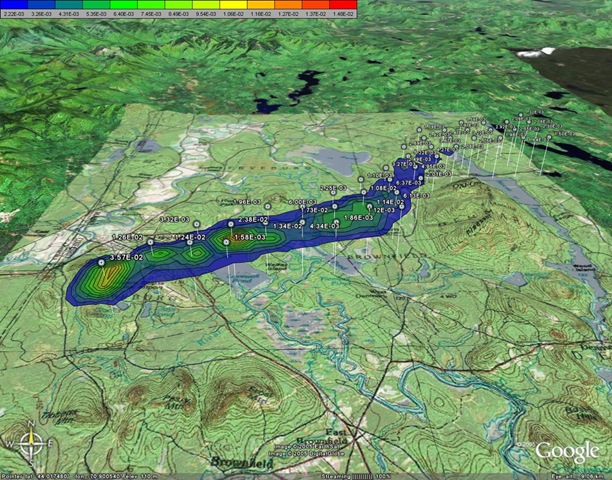
Here’s a screenshot from the website showing both post and contour mapping, plotted on top of a USGS topo overlay:

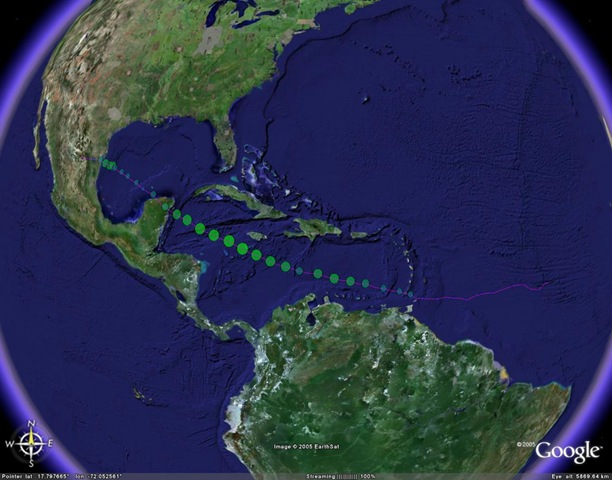
And a graduated raster map for a hurricane’s path and intensity:

Sample hurricane data files are available at the website.Finally, EarthPlot can take position, view direction and speed data, and create an flyover path in Google Earth.EarthPlot is a great companion program to GE-Graph.
EarthPaint 1.3: A while back, I had a couple of posts on how to add raster and vector graphic imagery to Google Earth as an image overlay. It involved a multi-step process of saving the GE screen image, loaded it into a graphics program, overlaying the graphics on top, etc.. For fancy or elaborate graphics, this is still a useful approach, but for creating a basic graphic overlay for Google Earth, EarthPaint is the way to go. And even for the fancier stuff, EarthPaint can simplify the task.First, fire up Google Earth, zoom in to your area of interest, then start up EarthPaint. EarthPaint will give you the option of either synchronizing its view with the current one in Google Earth, or setting a new location. In either case, EarthPaint will load in a black-and-white version of the current view in Google Earth, which you can draw on top of using a standard set of vector drawing tools in different colors:
- Line (freehand and straight; adjustable line width)
- Text (adjustable font and font size)
- Circle / Ellipse (open and filled)
- Square / Rectangle (open and filled)
- Polygon (open and filled)
Once a graphic is drawn, editing options are limited to Undo; you can’t otherwise erase or modify graphic elements after they’ve been created. One big annoyance is that the font always resets itself to the default size, so you’ll have to keep changing it to your desired size and type every time.
Once you’re done, you export the overlay directly to Google Earth, where you can save it as a KML or KMZ file (there’s no direct Save capability in EarthPaint).
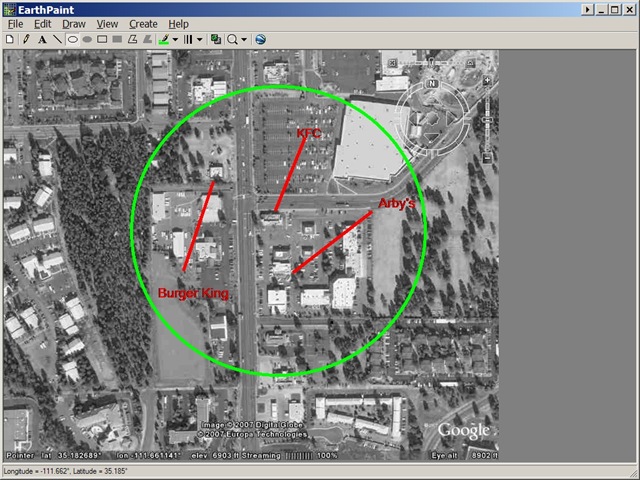
Here’s a screenshot of EarthPaint in action:

And here’s how the results look in Google Earth:

But it’s also possible to modify the overlay in another program, fixing it up or adding more elaborate graphics to it:
- Save the overlay as a KML file
- Go to the “Cache” subdirectory of the EarthPaint program directory, and open the GIF file for the overlay in your favorite graphics editor
- Modify it as much as you want without resizing it
- Save it as a GIF file under the same name with the background color set to transparent (if your editor doesn’t support transparency, use IrfanView to set the background to transparent)
- Open the KML file, and the modified overlay should show up; save it as a KMZ file if you want to use the overlay on a different computer
- If you’d like to use the Google Earth view as a guide to modifying the overlay, and your graphic editor supports layers, you can save the original view in Google Earth, load it into your graphics editor as the base layer, then load the overlay into a separate layer on top of it
This is a much easier approach to creating fancy raster Google Earth overlays than the one I described in my previous post.
EarthShape 1.0: This program will create an equilateral shape overlay (triangle, square, pentagon, … circle) at a specified geographic location. I’m not a big fan of this program; the only choice for shape is circle, and you select the other shapes by modifying the number of sides (3 for triangle, 4 for square, up to 36 for a circle). And overlays didn’t work well clamped to the ground; to see them completely, you had to set them to “relative to ground”, and increase the altitude until they were completely visible. For these kind of shapes, GE-Path is a much better choice (and it’s free).